Ultra Custom Night/애니매트로닉스 및 스킨
덤프버전 :
 상위 문서: Ultra Custom Night
  관련 문서: Ultra Custom Night/게임 시스템
 [ 펼치기 · 접기 ]
1. 개요[편집]
Five Nights at Freddy's 2차 창작인 Ultra Custom Night에 나오는 애니매트로닉스에 대해 설명하는 문서이다. 원작에 나왔던 애니매트로닉스는 공략이 같거나 리메이드로 분류되었다.
2. 일반 애니매트로닉스[편집]
유해성 애니매트로닉스는 O[1], 무해성 애니매트로닉스는 X로 표기한다[2]. 모든 애니매트로닉스의 점프스케어에는 진동은 있으나, 큰 움직임은 없다. 게임이 워낙 용량이 크기 때문에 점프스케어가 움직이면 아마도 게임이 원활하지 않을 것이다.[3] 또 이 게임에선 공식이 아닌 팬게임의 캐릭터들도 포함되어 있다.
2.1. Five Nights at Freddy's[편집]
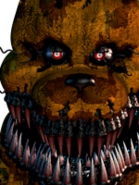
2.1.1. Freddy Fazbear(프레디 파즈베어)O[편집]

그는 4층의 오른쪽 복도(CAM 02)를 통해서 너에게 갈 거야. 그를 지켜보고 있으면 느려지게 만들 수 있어. 그의 공격으로부터 살아남으려면 그의 얼굴이 다가올때 문을 닫아 공격해!
He will go through the Right Hall (CAM 02) (Floor 4). Watching him will make him walk slower. Close the door on his face to save yourself from his attack!
티저 프레디의 반대 메커니즘으로 4층에 있는 오른쪽 문으로 접근한다. 가끔 사람들이 4단계에서 오른쪽 문을 닫는데 이 프레디 파즈베어는 위 트레일러 프레디와 다르게 5단계까지 있다. 여담으로 원래 이 자리는 티저 프레디가 접근하는 장소였지만 업데이트로 프레디 파즈베어로 변경되었다.
2.1.1.1. Freddy Fazbear 스킨[편집]


1번째 스킨은 Alex The Lion(사자 알렉스)이라는 이름의 스킨이다. 마다가스카르에 나오는 사자 캐릭터다.
2번째 스킨은 Finished Model Freddy(피니쉬드 모델 프레디)이라는 이름의 스킨이다.
3번째 스킨은 Troll Oni(트롤 오니)라는 이름의 스킨이다. 트롤 페이스와 게임 아오오니 시리즈에 나오는 아오오니를 합쳤다.
4번째 스킨은 Krugga(크루가)라는 이름의 스킨이다. Nightshift at Krugga's 라는 게임에서 나온 캐릭터다.
5번째 스킨은 Special!(스페셜!)이라는 이름의 스킨이다.
6번째 스킨은 Optimized Popgoes(최적화된 팝고즈)라는 이름의 스킨이다. 역시 팬버스 게임 팝고즈에서 따온 스킨이다.
7번째 스킨은 Bonnie(보니)다. 말그대로 그냥 보니의 스킨이다.
2.1.2. Bonnie(보니)X[편집]

그는 폭시와 파이럿 코브를 공유하지만, 폭시는 카메라로 볼 때 자신을 숨기는 반면, 보니는 그 반대로 더 활동적이 될 거야. 책상 위에 있는 피규어를 보고 파이럿 코브에서 누가 활동하는지 확인할 수 있어.
He shares Pirate Cove with Foxy, but whereas Foxy will hide himself when viewed on camera, Bonnie will do the opposite and become more agitated. View the figurine on your desk to see who is active in Pirate cove.
원작과 같은 능력으로 데스코인을 사용해 파이럿 코브에 있는 보니와 폭시를 제거할 수 있다.
2.1.2.1. Bonnie 스킨[편집]


1번째 스킨은 Paper Bonnie(종이 보니)라는 이름의 스킨이다. 종이 인형 중 하나인 종이 소년 보니이다.
2번째 스킨은 Source(소스)라는 이름의 스킨이다. 리틀 트롤리드 원, 스프링트랩스에 나오는 보니이다.
3번째 스킨은 Foxy(폭시)라는 이름의 스킨이다. 일단 책상 위의 나오는 피규어의 모습은 원래 폭시의 모습과 다르지만, 그래도 폭시의 모습을 하고있는지라 그런지 은근히 헷갈린다.
4번째 스킨은 Nothing(없음)이라는 이름의 스킨이다. 말그대로 아무것도 없는 모습이다.
2.1.3. Chica(치카)O[편집]

치카는 부엌 (캠 04)에서 냄비와 프라이팬을 두드리며 자신이 부엌에 있다는 것을 알려주고 있어. 하지만 네가 부엌에서 아무 소리를 듣지 못하면 치카는 그 음악에 싫증이 났다는 뜻이니, 너는 짧은 시간 내에 음악을 바꿔야할 거야. 음악을 바꾸면 치카는 다시 부엌으로 돌아가서 냄비와 프라이팬을 다시 두드리며 놀 거야. 하지만 네가 음악을 일찍 바꾸면 치카는 분노할 거야. 그녀가 분노하면 문을 닫아도 통과해서 들어올 거야. 글로벌 뮤직 박스로 그녀를 달래줄 수도 있어.
Chica resides in the Kitchen (CAM 04) and shows her presence by knocking around pots and pans. However, if the player hears nothing in the kitchen, then this means that Chica has gotten bored of the music playing, and the player must change the music. Once the music is changed, Chica will resume knocking around pots and pans to show that she's content again. She is enraged if the player changes the music too early. Once she is angered, she will leave the kitchen to jumpscare the player, by passing through the hallway and security door. Using the Global Music Box will soothe her.
울트라 커스텀 나이트로 넘어오면서 너프를 심하게 받은 애니매트로닉스 중 하나인데, 음악을 잘못 바꿔도 글로벌 뮤직 박스를 사용하면 다시 부엌으로 돌아간다.
2.1.3.1. Chica 스킨[편집]


1번째 스킨은 Chica The Badass(치카 더 배드애스)라는 이름의 스킨이다. 리틀 트롤드 원, 치카 더 배드애스에 나오는 치카이다. 모델링이 FNaF AR의 치카와 비슷하다는 것이 특징이다.
2번째 스킨은 Bonnie(보니)라는 이름의 스킨이다. 말그대로 보니다.
2.1.4. Foxy(폭시)O[편집]

"Hahaha! Argh! Never underestimate the cunning of a pirate, or a fox, for that matter."
"하하하! 야알! 해적의 교활함을 결코 과소평가하지 말라고, 아니면 여우라던가."
"Argh! You never stood a chance!"
"야알! 너한테는 가망이 없어!"
"Argh! I came for your booty, that be treasure, you know."[4]
"야알! 네 전리품을 가지러 왔다. 보물이라고 해야 하나."
"I can't run like I used to, but I can pull myself apart just fine."
"난 예전처럼 달리지 못해, 하지만 내 몸을 멀쩡히 분해하고 재조립할 수는 있지."
"Arghh! So much more spacious in here, I may stay awhile."
"야아알! 여기가 내가 사는 곳보다 훨씬 넓군. 잠시 머물러야겠어."
대사
폭시는 보니와 번트 폭시와 함께 파이럿 코브 (캠 05)에 있어. 원래의 FNaF 1과 같이 넌 그의 공격속도를 늦추려면 그를 자주봐야 할 거야.(책상 위의 피규어가 폭시라면 말이지.) 그렇지 않으면 그는 빠져나가서 너의 사무실로 갈 거야. 그가 사무실에 도착하면 그는 자신을 분해하고 그의 분해된 부품은 환풍구, 문을 통해서 들어갈 거야.[5]
그의 모든 조각이 너에게 도착하면 그는 다시 자신을 재조립하고 너에게 점프스케어를 선사해주겠지.
Foxy resides in Pirate Cove (CAM 05) alongside Bonnie and Burnt Foxy. Like in the original Five Nights at Freddy's, the player must check him (but only if the figurine on the player's desk has changed to him) to slow down his attack, or else he'll escape and reach the office. Once he's reached the office, he will take himself apart and his pieces will be slid in through any open door or vent. Once all of his pieces are in the office, he will reassemble himself and jumpscare the player.
성우는 Christopher McCullough(크리스토퍼 맥컬로프). 능력은 원작과 같다. 폭시가 머리까지 들어와도 파이럿 코브에 데스코인을 쓰면 폭시를 막을 수 있다.
2.1.4.1. Foxy 스킨[편집]

1번째 스킨은 Bonnie(보니)라는 이름의 스킨이다. 프레디와 치카처럼 보니의 모습이어도 헷갈리지 않을 애니매트로닉스들과는 달리, 폭시는 보니와 카메라를 같이 차지하는지라 보니의 폭시 스킨처럼 헷갈린다.
2.1.5. Yellow Bear(옐로우 베어)O[편집]

카메라를 내리면 그가 방 한 가운데에 앉아있을 가능성이 있어. 그는 눈에 불이 들어오기 전까지는 바로 죽이지 않아. 죽임을 당하기 전에 프레디 가면을 써.
When lowering the monitor, there is a chance that he will appear in the middle of the room, slumped over. He isn't an immediate threat until you see that his eyes lit up. Once this happens, quickly put on the mask to avoid a jumpscare.
FNaF 1의 골든 프레디이다. Yellow Bear(노란 곰)이라는 명칭은 FNaF 1의 파일명으로부터 가져왔다.[6]
2.1.5.1. Yellow Bear 스킨[편집]

1번째 스킨은 Bonnie(보니)라는 이름의 스킨이다. 말그대로 보니의 모습이다.
2.1.6. Endo01(엔도01)O[편집]

그는 해피 프록과 똑같이 움직여. 그는 배관 시스템(Duct System)에 나타날거야. 그를 제자리에 붙잡아두려면 오디오 미끼를 사용해. 그는 히터에 면역이야.
He works the exact same as Happy Frog. He will go through the Duct System, you must use the Audio Lure to keep him in place. He's immune to the Heater.
FNaF 1의 준비실에 배경 및 이스터에그로 처음 등장했었던 애니매트로닉스이다. 배관 시스템에는 느낌표 표시가 뜨는데 일반 옌도01의 스킨은 검은색, 샌즈 스킨은 파란색을 띤다.
2.1.6.1. Endo 01 스킨[편집]

1번째 스킨은 Sans Endo(샌즈 엔도)라는 이름의 스킨이다. 거부된 커스텀 나이트 2[7]에서 나온다.
2.1.7. Cupcake(컵케이크)X[편집]

카메라를 더 오래 내리고 있을수록 컵케이크가 너의 왼쪽 문에 나타날 확률이 높아. 컵케이크가 왼쪽 문에 있으면 너는 왼쪽 문을 닫지 못 해. 카메라를 몇 초 동안 보면 컵케이크는 사라질 거야.
The longer the cameras are down, the more chance of him appearing at your Left Door. When he's there, you will be unable to close it until looking at the cameras for several seconds.
FNaF 1에서 치카가 들고 있는 그 컵케이크이다. 발로라, 나이트메어 프레드베어 또는 티저 프레디가 있다면 죽은 목숨이나 다름없다.
2.1.8. Mike Schmidt(마이크 슈미트)X[편집]

그는 배터리가 50% 미만일때 가끔 왼쪽 문과 오른쪽을 닫았다가 열고, 카메라를 들었다 내리기까지 할 거야.
He will close and open the Left Door and Right Door as well as pull the monitor up and down if the power meter is below 50%.
FNaF 1의 주인공이다. 폭시.EXE가 있다면 매우 난처하게 되는 캐릭터이다.
2.1.9. Phone Guy(폰 가이)X[편집]

그가 너에게 전화를 걸면 빠르게 전화를 끊어. 그렇지 않으면 소음이 추가 되고 거기에 반응하는 애니매트로닉스가 움직일 거야. 끊는 버튼은 매번 다른 위치에 나타날 거야.
When he calls, quickly mute him, otherwise it will create a lengthy audio disturbance. The mute button will appear in different places each time.
FNaF 1~2에서 주인공에세 전화를 걸던 인물이다. 원작 UCN에 비해서 꽤 위에 올라와있는데 이는 1편에서 첫 등장하기 때문이다.
2.1.10. Fan(선풍기)X[편집]

선풍기는 밤을 보내는 중간에 갑자기 스스로 꺼질 때가 있어.
It will randomly turn itself off when it is on throughout the night.
FNaF 1에 등장했던 쓸데없이 배터리만 낭비했던 선풍기이다. 하지만 이번 작에서는 선풍기가 스스로 꺼지는데 만약 선풍기를 켰는데 온도가 올라가면 확인해주어야한다.
2.1.11. Stuffed Freddy(스터프 프레디)O[편집]

밤에 가끔 화면 위에 가짜 게임 오버 화면이 나타날 거야. 그걸 없애려면 엔터 버튼을 눌러야 해. 가짜 게임 오버 화면이 나타났을 때 마우스 클릭을 하면 그가 점프스케어를 할거야.
Once per night, he will cause a fake game over screen to appear. You must quickly press ENTER to make it disappear and continue your night. Clicking during the fake game over screen will result in his jumpscare.
FNaF 1의 게임 오버 됐을 때 나오는 경비원의 시체가 쑤셔 넣어진 프레디다.
2.1.12. Backstage Freddy(백스테이지 프레디)X[편집]

그는 네가 가지고 있는 프레디 가면을 자신의 가면으로 대체 해 버릴 거야. 더 크고 무겁기 때문에 착용하고 벗는데 더 오래 걸리겠지.
He will replace your mask with his. Due to it being bigger and heavier, it takes more time to put it on and off.
FNaF 1의 준비실에 놓여있던 프레디의 머리 부품이다. 골든 프레디 같은 가면으로 대응하는 애니매트로닉스에게는 큰 불편이다.
2.1.13. Stage Freddy(스테이지 프레디)O[편집]

그의 웃음 소리가 들리면 쇼 스테이지 (2층 CAM 01) 카메라를 확인하고 그의 코를 클릭 해. 빨리 클릭 하지 않으면 그가 너를 죽일 거야.
If you hear his laugh, check the Show Stage (CAM 01) camera and click his nose. If you don't, he will jumpscare you.
FNaF 1에서 무대 쪽 카메라에 잡히던 프레디의 모습이다. FANF 1에 스테이지에 있던 프레디이며 코를 눌러주어야 하는 시리즈 내내 이어졌던 것이 나온다.
2.1.13.1. Stage Freddy 스킨[편집]


1번째 스킨은 Real Freddy(리얼 프레디)라는 이름의 스킨이다. 트레일러 프레디와 비슷하게 생겼다는 것이 특징이다.
2번째 스킨은 Bonnie(보니)라는 이름의 스킨이다. 말그대로 보니다.
2.1.14. Jumpscare Freddy(점프스케어 프레디)O[편집]
 [8]
[8]글로벌 뮤직 박스(Global Music Box)가 너무 오래 켜져 있으면 주방 (CAM 04) 카메라에 나타나서 자신의 오르골 음악을 들려줄 거야. 그가 너를 공격 하기 전에 주방을 보면서 오른쪽 문을 닫고 있어. 그러면 그는 사라질 거야.
When the Global Music Box is on for too long, he will appear on the Kitchen (CAM 04) camera and play his jingle. Watch him while having the Right Door closed to make him leave before he attacks.
FNaF 1에서 등장했던 프레디의 점프스케어로, 오른쪽 문으로 들어왔을 때의 모습이다. 예방 방법은 글로벌 뮤직 박스를 빨리 끄는 것이다.
2.1.14.1. Jumpscare Freddy 스킨[편집]

1번째 스킨은 Bonnie(보니)라는 이름의 스킨이다. 말그대로 역시 보니다.
2.1.15. String Freddy(스트링 프레디)X[편집]

그는 너의 화면을 못 움직이게 실로 널 묶을 거야! 피자 커터로 줄을 잘라 다시 움직일 수 있게 해.
He'll catch you with his strings, stopping your head movement! Make sure to equip the Pizza Cutter and pull the strings and make them ring with precision so that you can move again.
FNaF 1의 이스터 에그 중 하나였던 CAM 2B의 얼굴을 찢고 있는 프레디 포스터에서 나온 프레디의 모습이다.
2.1.16. Poster Yellow Bear(포스터 옐로우 베어)O[편집]

라이트 시스템(Light System)에 프레디 파즈베어(Freddy Fazbear)의 포스터가 있을 거야. 네가 라이트 시스템(Light System)을 볼 때마다 포스터가 노란 곰(Yellow Bear)으로 바뀔 확률이 높아질 거야. 노란 곰(Yellow Bear) 포스터에 계속해서 빛을 비추어 그 포스터를 프레디 파즈베어(Freddy Fazbear)로 돌아가게 해. 노란 곰(Yellow Bear) 포스터가 거기 너무 오래 있으면 너를 죽일 거야.
There's a poster of Freddy Fazbear on the Light System. Whenever you stay in the Light System, it will have a chance to turn into a poster of Yellow Bear. Keep shining your light on it to make it turn back into Freddy. If Yellow Bear stays there for too long, he will kill you.
FNaF 1의 서쪽 복도에서 종종 환각으로 등장하던 골든 프레디의 포스터. 본래는 포토샵 노란 곰(Photoshop Yellow Bear)이였으나, 추후 업데이트에서 점프스케어 옐로우 베어가 추가되면서 이름이 변경됐다.
2.1.17. Jumpscare Yellow Bear(점프스케어 옐로우 베어)X[편집]

그는 때때로 캠 시스템을 볼 때 가끔 너의 시야에 보일 거야. 카메라를 내리면 그가 사라지고 점프스케어를 피할 수 있어. 그의 점프스케어는 죽지 않지만 전체 시야가 밝은 노란색으로 변할 거야.
He'll sometimes fade into your view when watching the Cam System. Flip down the monitor to make him disappear and avoid his jumpscare. His jumpscare isn't lethal, but will cause your entire view to hue-shift into bright yellow.
FNaF 1에서 골든 프레디가 점프스케어를 할 때의 모습이다.
2.1.18. Hallucination Freddy(환각 프레디)X[편집]

사무실의 전기 충격을 사용하다 보면 환각 프레디를 부르게 되는데, 잠시 동안 화면에 나타났다가 사라질 거야. 환각이 계속 발생하면 산소 수치를 떨어뜨릴 거야.
Using the office's controlled shock will trigger Hallucination Freddy, causing hallucinations to flash on your screen for a little while. These hallucinations will deplete your oxygen slowly.
FNaF 1에서 환각으로 등장하던 눈의 핏줄이 섬뜩한 프레디의 모습이다.
2.1.19. Hallucination Bonnie Gang(환각 보니 패거리)X[편집]

그들은 산소가 너무 낮을 때 화면에 나타났다가 사라질 거야. 그들이 사라지고 나면 너는 전기 5%를 잃을 거야.
If your oxygen gets too low, they'll start appearing, flashing on your screen. After they're gone, 5% of your power will be taken.
FNaF 1을 실행했을 때 종종 이스터에그로 등장하는 눈 없는 보니의 모습. 본작에서는 프레들즈처럼 여러마리가 나온다.
2.1.20. Cheat Classics(치트 클래식)[편집]

그들은 1층을 반복적으로 돌아다닐 거야. 카메라 자체에서는 표시 되지 않고 캠 버튼 위에 있을거야. 그들이 너무 가까이 와 있다 싶다면 문을 닫아!
They will move on top of the Floor 1 map. They aren't visible on the camera views themselves. Close the corresponding door on their faces if they get too close the office!
FNaF 1에서 치트를 쓰면 나오는 애니매트로닉스들이 어디에 있는지 표시되는 아이콘이다.
2.1.21. Loading Clock(로딩 시계)X[편집]

로딩 시계(Loading Clock)가 활성화 된 경우 처음 몇 초 동안은 로딩 중인것 처럼 어둡게 표시 되지만, 밤은 이미 시작돼 있어. 로딩 시계(Loading Clock)의 AI는 너의 밤이 어두워질 시간과 동일해. 예를 들어 AI가 5일 경우 밤은 5초 동안 어두울 거야.
If Loading Clock is active, for the first few seconds of the night, it will still be displayed as if it's loading, however the night has already started. This will cause your view to be obstructed for the first few seconds of the night. The AI of Loading Clock will be the same as the number of seconds it will be shown as loading, for example if it's at AI 5 it will be displayed as loading for 5 seconds.
프레디 시리즈(1~SL까지)에서 전통적으로 등장하는 로딩 화면의 시계이다. 처음하는 사람들은 이걸 보고 기다리다가 죽는 경우가 다수.[9]
2.1.22. Lives Guy(라이브스 가이)O[편집]

밤이 시작 될 때 화면 왼쪽에 표시되는 라이브스 가이(Lives Guy) 이외의 캐릭터에게 점프스케어를 당해야 하는 짧은 시간이 주어질 거야. 시간이 다 되기전에 성공적으로 다른 애니매트로닉스에게 점프스케어를 당하면 그는 사라질 거야. 시간이 다 되기전에 점프스케어를 당하지 못하면 너는 그에게 죽을 거야.
At the start of the night, you will have a short amount of time to get jumpscared by any lethal character other than Lives Guy, which will be shown on the left side of the screen. If you successfully die, you will continue the night. If you take too long, Lives Guy will jumpscare you, ending your run.
FNaF 1의 미사용된 데이터. FNaF 1의 초기 구상 당시에는 목숨 시스템이 존재할 예정이였지만 최종본에서 짤리면서 아이콘으로만 남았다. '목숨 시스템'이라는 본래의 목적답게 다른 애니매트로닉스에게 점프스케어를 당해야 하는 독특한 기믹을 가지고 있다.
2.1.23. Beaver & Wolf(비버와 늑대)O[편집]

그들은 밤이 시작되기 전에 취소됐어. 그들의 영혼은 사무실의 아무 곳에나 나타나서 널 괴롭힐 거야. 괴롭힘에서 벗어나려면 클릭해. 만약 그들이 너무 오래 머무르고 있다면, 넌 산소를 잃을 거야.
They were cancelled before the start of the night. Their ghosts will haunt you by appearing in random places in the office. Click on them to un-haunt yourself. If they stay for too long, you'll start to lose oxygen.
스콧이 FNaF1에서 폭시를 대신하던 애니매트로닉스.
2.1.24. Plush Gang(플러시 갱)O[편집]

카메라를 위로 올릴 때마다 카메라 오른쪽 아래에 다른 인형이 나타나. 인형을 막는 걸 완료하기 전에 카메라를 다시 아래로 내리면 점프스케어를 해서 넌 죽을 거야.
프레디 (FNaF 1): 그의 코를 클릭해.
보니 (FNaF 1): 왼쪽 문을 닫아.
치카 (FNaF 1): 오른쪽 문을 닫아.
폭시(FNaF 2): 시스템을 바꿔.
벌룬 보이 (FNaF 2): 2층에 있는 손전등을 사용해.
골든 프레디 (FNaF 2): 3층에서 오디오를 재생해.
맹글 (FNaF 4: HE): 중앙 환풍구 문을 닫아.
프레드베어 (FNaF SL): 아무 모드로 바꿔(1~6키 포함).
서커스 베이비 (UCN): 조명을 조명 시스템에서 그녀에게 비춰.
A different plush will appear on the bottom right of the monitor every time you flip up the monitor. Flipping the monitor back down before completing whatever the plush makes you do will result in a jumpscare.
Freddy (FNaF 1): Click his nose.
Bonnie (FNaF 1): Close the Left Door.
Chica (FNaF 1): Close the Right Door.
Foxy (FNaF 2): Switch the system.
Balloon Boy (FNaF 2): Use the flashlight on Floor 2.
Golden Freddy (FNaF 2): Play audio on Floor 3.
Mangle (FNaF 4: HE): Close the Front Vent Door.
Fredbear (FNaF SL): Switch to any mode (with the 1-6 keys)
Circus Baby (UCN): Shine your flashlight on her in the Light System.
FNaF 시리즈를 플레이 해봤다면 한 번쯤 봤을 다양한 인형들의 패거리이다.
2.1.24.1. Plush Gang 스킨[편집]

1번째 스킨은 YO?(요?) 라는 이름의 스킨이다. 장난으로 만든 캐릭터라고 한다.
2.1.25. Feddy(페디)X[편집]

밤이 시작될 때, 너의 전기는 상당히 빨리 소모될 거야. 레버를 네 번 당겨서 중지시켜.
At the beginning of the night, your power will start draining rather quickly. Pull the lever four times to make the power draining stop.
Feddy는 FNaF 1, 2, 3, 4의 콘솔 포트 Four Nights at Feddy's(페디에서 4일밤) 업적에 등장하는 캐릭터들의 모음이다. 이 업적들은 "Freddy's"의 철자를 "Feddy's"로 잘못 나온 거다. 캐릭터는 치카, 토이 치카, 팬텀 프레디, 나이트메어 폭시다.
2.2. Five Nights at Freddy's 2[편집]
2.2.1. Toy Freddy(토이 프레디)O[편집]

"That game was totally rigged!"
"이 게임은 완전히 조작됐어!"
"That's what you get for leaving me hanging!"
"날 혼자 내버려 둔 대가다!"
"It's not my fault! I have these fat, plastic fingers and can't press the buttons!"
"내 잘못이 아니야! 내 두꺼운 플라스틱 손가락 때문에 버튼을 못 누른 거라고!"
"Mr. Hugs got me again!"
"미스터 허그가 또 날 잡았어!"
"If I get jumpscared, you get jumpscared!"
"내가 점프스케어를 당한다면, 너도 점프스케어 당해야지!"
대사
토이 프레디는 대형 컴퓨터 모니터에서 " 미스터 허그와의 5일밤 "이라는 제목의 FNaF 패러디를 파츠/서비스 (캠 08)에 앉아서 하고 있지. 게임에는 세 개의 복도가 있고 캐릭터는 각 주어진 시간에 나타날 수 있는 애니매트로닉스는 미스터 허그야. 각 복도에는 미스터 허그를 막을 수 있는 문 또한 있지. 그러니까 너의 목적은 미스터 허그가 어떤 복도에 있는지 모니터로 확인하고 적절한 문을 닫아야 해. UCN과 다르게, 카메라 전환과 문 닫는 패널은 토이 프레디의 모니터에 있는 게 아닌, 너의 카메라에 있어. 아니면 네가 데스 코인으로 그를 없앨 수도 있어. 미스터 허그가 토이 프레디에게 점프스케어를 하면 토이 프레디가 너에게 와서 점프스케어로 화풀이를 할 거야. 일단 그가 떠나면 다시는 돌려놓을 방법이 없어.
Toy Freddy sits in Parts/Service (CAM 08) playing a parody of Five Nights at Freddy's titled "Five Nights With Mr. Hugs" on a large computer monitor. The game is shown to have three main hallways, and the character is Mr. Hugs, who may appear on each hallway camera at any given time. Each hallway also has a door which can block Mr. Hugs from jumpscaring Toy Freddy. The goal of the player is to discern which hallway Mr. Hugs is at and close the appropriate door. Unlike Ultimate Custom Night, the panel for switching cameras and shutting doors is instead tied to the in-game monitor, as opposed to Toy Freddy's monitor. Alternatively, Toy Freddy can be removed from the night if the player uses the Death Coin on him. If Mr. Hugs jumpscares Toy Freddy, then Toy Freddy will come and jumpscare you too. Once Toy Freddy leaves, there is no way to make him go back.
성우는 Darren Roebuck(대런 로벅). 여기서나 원작 UCN에서나 화풀이나 하는 건 다름 없다.
2.2.2. Toy Bonnie(토이 보니)O[편집]

"I've been waiting so long for this chance, and now, it's finally here!"
"이 기회를 정말 오랫동안 기다리고 있었는데, 이제야 왔구나!"
"This game of cat-and-person is delicious."
"이 고양이와 사람 게임은 정말 재밌는 걸."
"Closer... closer now... Just a little closer..."
"가까이... 더 가까이... 조금 더 가까이 와 봐..."
"Now I'm a superstar."
"Ladies and gentlemen, the stage is now mine."
"신사 숙녀 여러분, 이제 무대는 저의 것입니다."
"This next part is totally going to hurt."
"다음 번엔 완전 아플 거야."
"Don't worry! This next part won't hurt a bit."
"걱정마! 다음에는 아프지 않을 거야."
"This is my chance to shine, and your chance to fade away!"
"이건 내가 빛날 기회야, 네가 영영 사라질 기회이기도 하고!"
"There you are!"
"거기 있구나!"
"Why ever is this creature... hiding from little old me?"
"왜 이 생물은... 작고 오래된 나로부터 숨는 걸까?"
"No kidding? You thought you could survive me?"
"진심이야? 설마 나한테서 살아남을 수 있을 거라고 생각했어?"
"Did you actually think that you could hide from me?"
"정말 나한테서 숨을 수 있을 거라고 생각했어?"
"What do we have here, someone hiding from me?"
"뭐가 있나봐, 누가 내게서 숨으려 하나?"
"It's not my fault I'm so much more famous than you."
"내가 너보다 훨씬 인기가 많은게 내 잘못은 아니지."
"Six... Seven... Five... Three... Four... Two... One."
"여섯... 일곱... 다섯... 셋... 넷... 둘... 하나."
"Aren't I just the shiniest?"
"내가 제일 빛나지 않아?"
"Clear the stage, for the star of our show is now here!"
"무대를 깨끗이 치워줘, 쇼의 스타가 도착하였으니까!"
"My star is rising and yours, sadly, is fizzling out!"
"나의 별은 떠오르는데, 너의 별은 슬프게도 다 타버렸네!"
"I can see you."
"너 다 보여."
"Did you know I used to be a real rockstar."
"나도 한때는 진짜 락스타였어."
대사
토이 보니는 너에게는 보이지 않는 다락문에서 무작위로 너의 사무실 오른쪽으로 들어가면 조명이 깜빡거릴 거야. 그리고 너는 그를 막기 위해 프레디 파즈베어 마스크를 써야할 거야. 가면을 쓰고 토이 보니를 똑바로 쳐다보면 그는 더 빨리 갈 거야. 만약에 네가 마스크를 너무 늦게 착용하거나 착용하지 않으면 토이 보니는 널 깜짝놀래키고 널 죽여버릴 거야.
Toy Bonnie will randomly climb out of an unseen trapdoor to enter the Office, sliding in from the right and causing the lights to flicker. The player will need to put on the Freddy Fazbear Mask to fend him off. Staring at Toy Bonnie with the Mask on will make him leave faster. If the Mask isn't put on in time, or at all, Toy Bonnie will jumpscare the player.
성우는 알 수 없음. 원작 UCN에서는 대사가 없었지만 FNaF AR의 대사가 생겼다.
2.2.2.1. Toy Bonnie 스킨[편집]


1번째 스킨은 Negate Rainbow Blacklight Toy Bonnie(네게이트 레인보우 블랙라이트 토이 보니)라는 이름의 스킨이다. 장난으로 만든 캐릭터라고 한다. 상점에서 1000 파즈 코인으로 구매 할 수 있다.
2번째 스킨은 Balvin(밸빈)이라는 이름의 스킨이다. 리틀 트롤드 원에 나오며, 커스텀 딜리버리라는 팬게임에도 등장한다.
2.2.3. Toy Chica(토이 치카)O[편집]

"Where's my beak? Lodged in your forehead, of course."
"내 부리가 어디 갔을까? 니 이마에 박혀있지, 물론."
"You won't get tired of dying, will you?"
"죽는 것에 질리지 않을 거지, 응?"
"You won't get tired of my voice, will you?"
"내 목소리에 질리지 않을 거지, 응?"[10]
"Let's go somewhere more private. So I can eat you."
"조금 더 비밀스러운 곳으로 가자. 그래야 내가 널 먹을 수 있지."
대사
그녀는 보이지 않는 다락문을 통해 왼쪽으로 몰래 들어올 거야. 토이 보니처럼 그녀가 방에 들어가는 걸 막거나 등장할 확률을 낮출 방법도 없지. 너의 유일한 방어 수단은 프레디 파즈베어의 가면을 쓰고 그녀를 돌려보내는 거야. 토이 치카는 토이 보니보다 속도가 빠르고 사무실에 더 자주 침입하지만, 속이는 건 특히 쉬울 거야.
She sneaks in through an unseen trapdoor to the left, and just like Toy Bonnie, there is no way to prevent her from entering the room or directly lower her chances of appearing. The player's only defense is to put on the Freddy Fazbear Mask to fend her off. Toy Chica is faster than Toy Bonnie and will invade the Office more often, however, she is easier to fool with the mask, especially when looking directly at her.
성우는 Amber Lee Connors(앰버 리 코너스). 토이 보니보다 사무실에 더 들낙날락하지만, 마스크로 썼을 때 가는 속도는 토이 보니보다 빠르다.
2.2.3.1. Toy Chica 스킨[편집]


1번째 스킨은 Neon Emerald Toy Chica(네온 에메랄드 토이 치카)라는 이름의 스킨이다. 장난으로 만든 캐릭터라고 한다. 상점에서 1000 파즈 코인으로 구매 할 수 있다.
2번째 스킨은 Neon Emerald Toy Chica V2(네온 에메랄드 토이 치카 V2)라는 이름의 스킨이다. 또한 1000코인으로 구매 가능하다.
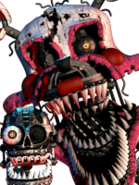
2.2.4. Mangle(맹글)O[편집]

"Now I get to play take apart and put back together! You won't feel a thing."
"이젠 내가 분해하고 재조립하기를 해보겠네! 넌 아무것도 못 느낄거야."
"I wanted to wait until just the right moment to drop in."
"들어오기 딱 좋은 시간을 기다리고 싶었어."
"It's so much more fun hanging out in here with you."
"여기서 너랑 노는 게 더 재밌네."
"He's here, and always watching. The one you shouldn't have killed."
"그가 여기 있고, 항상 지켜보고 있어. 네가 죽이지 말았어야 했던 자 말이야."
"Don't be afraid. Soon you'll look just like me: Beautiful!"
"두려워 하지 마. 곧 나처럼 될 테니까: 아름답게!"
대사
녀석은 환풍구 시스템을 통해서 너에게 갈 거야. 환풍구의 적과는 달리, 너의 환풍구 앞에 도착하면 다시는 돌아가지 않을 거야. 대신, 환풍구 덫을 사용해서 녀석을 멀리 떨어뜨려 놓아야 해. 녀석이 너의 사무실에 들어가면, 잡음을 내며 너의 사무실 천장에 있다가 결국 너를 죽이겠지.
They will go through the Vent System. Unlike other enemies in the vents, once they reach the vent opening they will never leave. Use the Vent Snare to prevent them from making it that far. Once they enter your office, they will hang on the ceiling making noise, until eventually jumpscaring you.
성우는 Jena Rundus(제나 런더스). UCN과 똑같이, 덫으로 막기에 실패해서 환풍구 앞까지 오면 굉장히 열 받는 놈이다.[11] 하지만 카메라를 볼 때만 들어온다는 트리거를 이용해서 막으면 끝.[12]
2.2.4.1. Mangle 스킨[편집]


1번째 스킨은 Plush-Based Mangle(플러시-베이스 맹글)라는 이름의 스킨이다. 말그대로 맹글 인형을 바탕으로 만들어진 스킨이다.
2번째 스킨은 OMC Mangle(OMC 맹글)이라는 이름의 스킨이다.
3번째 스킨은 Festive Evergreen Mangle(축제 에버그린 맹글)이라는 이름의 스킨이다.
2.2.5. BB(벌룬 보이)X[편집]

네가 카메라를 여닫을 때 BB가 가끔 너의 오른쪽 환풍구에 나타나 있을 거야. 그가 쿵하는 소리가 들릴 때까지 그를 발견하면 오른쪽 환풍구 문을 닫아둬야해. 만약에 그가 너의 사무실에 들어가면 일시적으로 너의 손전등을 사용하지 못하게 하고 웃으며 너를 놀릴 거야. 그와 동시에 너의 소음 수치도 올라갈 거야.그렇게 된다면 뮤직맨과 시큐리티 퍼펫을 막는게 조금 까다롭겠지.
Whenever the monitor is pulled up, there is a chance for BB to appear in the right vent. The player must shut the vent if they see him until they hear a thud indicating he is gone. If he manages to slip into the office, he'll disable the Flashlight temporarily and laugh, agitating sound sensitive animatronics like Animdude (when he is writing a book), Music Man, and Security Puppet.
UCN과 똑같지만 이번 작에서는 소음 수치까지 올린다. 뮤직맨 같이 소음에 민감한 녀석한테 꽤 성가신 녀석이며, 리메이드 팬텀 프레디와 구형 폭시를 막는데 아주 짜증난다.
2.2.6. The Puppet(퍼펫)O[편집]

"Seeing you powerless is like music to me."
"무력한 널 보는 것은 나에게는 음악과도 같아."
"I don't hate you, but you need to stay out of my way."
"널 싫어하는 건 아니야, 하지만 너는 내 앞길에서 비켜야 할거야."
"I recognize you, but I'm not afraid of you, not anymore."
"난 널 알아, 하지만 네가 두렵지 않아, 더 이상은."
"The others are under my protection."
"다른 이들은 내 보호 하에 있어."
"The others are like animals, but I am very aware."
"다른 이들은 동물과 같지만, 난 다 알고 있어."
대사
부엌(캠 04)의 뮤직 박스를 잘 감아둬야 할 거야. 그렇게 하지 않으면 퍼펫이 널 공격할 테니까. 글로벌 뮤직 박스 또한 녀석을 달래줄 수 있는 수단이기도 하지.
Keep the Music Box wound up on the Kitchen (CAM 04) camera or else the Puppet will attack. The Global Music Box can also keep it at bay.
성우는 Jena Rundus(제나 런더스). UCN에서 골치 아프게 했던 그 퍼펫이다. 이번 작으로 넘어와서 버프와 너프를 동시에 먹었다. 퍼펫의 뮤직 박스가 더 빠르게 닳지만, 그와 동시에 글로벌 뮤직 박스를 사용하면 매우 빠르게 오르골이 돌려진다.
2.2.6.1. The Puppet 스킨[편집]

1번째 스킨은 Grey Puppet(잿빛 퍼펫)이라는 이름의 스킨이다. Hoaxes의 퍼펫 종류 중 하나다. 상점에서 1000 파즈 코인으로 구매 할 수 있다.
2.2.7. Withered Freddy(구형 프레디)O[편집]

그는 구형 보니와 똑같이 막으면 될 거야. 때때로 네가 카메라를 볼 때 구형 프레디가 공격할 준비를 하고 너의 사무실에 나타나있을 거야. 그를 피하려면 넌 마스크를 써야할 거야.
He works the exact same as Withered Bonnie. Sometimes when you pull your monitor up, there's a chance Withered Freddy appears in your office poised to attack. Throw on the mask to avoid him.
원작의 구형 보니와 똑같이 막으면 된다.
2.2.7.1. Withered Freddy 스킨[편집]


1번째 스킨은 Lettuce(레튜스/양상추)라는 이름의 스킨이다. 리틀 트롤드 원에 나오는 애니매트로닉스다.
2번째 스킨은 The Slayer(슬레이어)라는 이름의 스킨이다. 리틀 트롤드 원에 나온다.
3번째 스킨은 Withered Asgore(구형 아스고어)라는 이름의 스킨이다. 언더테일에 나오는 아스고어의 구형 버전이다.
2.2.8. Withered Bonnie(구형 보니)O[편집]

"Time to face the consequences of your failure."
"네 실패의 결과를 마주할 시간이로구나."
"Might as well face the facts, you were always destined to fail."
"사실을 마주하는 게 좋을 걸. 넌 항상 실패할 운명이었어."
"You blinked."
"너, 눈 깜박였어."
"What is this new prison? Is it me trapped, or is it you? Perhaps, it's us both."
"이 새로운 감옥은 뭐야? 내가 갇힌 거야, 아니면 너야? 어쩌면, 우리 둘 다 일지도 모르지."
"I may be missing my face, but even I could see you stalk."
"내가 얼굴을 잃어버렸다한들, 너 다가오는건 보여.”
대사
그는 네가 카메라를 보는 동안 너의 사무실에 무작위로 나타날 거야. 그가 사라질 때까지 프레디 파즈베어 마스크를 쓰고 있어.
He will randomly appear in your office while you're looking at the cameras. Put on your Freddy Fazbear Mask until he goes away.
성우는 Hans Yunda(한스 윤다). 원작과 똑같이 막으면 된다. 원작에서는 가면을 쓰면 바로 사라졌지만 이번에는 조금 턴을 두고 사라진다.약간에 버프인 것 같다.
2.2.8.1. Withered Bonnie 스킨[편집]

1번째 스킨은 Zombie(좀비)라는 이름의 스킨이다. 마인크래프트에 나오는 좀비다.
2.2.9. Withered Chica(구형 치카)O[편집]

"I was the first! I have seen everything."
"내가 첫 번째였어! 내가 모든 것을 봤다고."
"Come closer... Let's smile together!"
"가까이 와 봐... 함께 웃어 보자!"
"I have seen him, the one you shouldn't have killed!"
"난 그를 본 적이 있어, 네가 죽이지 말았어야 했던 자를!"
"Let me show you how to break your face and look like me."
"네 얼굴을 망가뜨리고 나와 닮게 되는 방법을 보여 줄게."
"I never thought I'd make it through that vent, but now we are together!"
"그 비좁은 환풍구에서 못 빠져나갈까 걱정했는데, 결국 우리는 이렇게 함께 만나게 되었잖아!"
대사
그녀는 환풍구 시스템을 통해서 너에게 접근할려고 해. 그녀의 몸이 환풍구에 끼면 맹글을 제외한 모든 환풍구 시스템 애니매트로닉스는 들어오지 못해. 그리고 빠져나와서 결국 너에게 점프스케어를 하겠지. 환풍구 덫 또는 환풍구 문을 닫으면 그녀는 다시 돌아갈 거야.
She climbs through the Vent System, but will get stuck when trying to enter your office, blocking anyone else from entering. After a while she will wiggle out, however. Use the Vent Snare or the door to prevent her from entering.
성우는 Darbi Logan(다비 로건). 원작과는 달리, 환풍구에 몸이 꼈을 때 손에 전선이 있고, 손에 전선이 없는 구형 치카는 와이어리스 구형 치카(Wireless Withered Chica)로 따로 분류 됐다.
2.2.10. Withered Foxy(구형 폭시)O[편집]

그는 너의 사무실에 무작위로 나타날 거야. 그가 나타날 때 그가 떠날 때까지 그의 얼굴에 손전등을 깜빡여. 그는 빛을 피하기 위해 가끔 머리를 움직일 거야. 제 시간 안에 그를 돌려보내지 못하면 그는 너를 죽일 거야.
He will appear in your office at random. When he appears, flash your light on and off on his face until he leaves. He will also occasionally move his head. Not doing it in time will result in a jumpscare.
이번 작에서는 끈질기게 손전등을 피하려고 머리까지 움직인다. 가끔 돌려보내도 연속으로 나타날 때가 있다.
그리고 원래는 구형 폭시에 메커니즘은 폭시.EXE의 메커니즘이었는데
업데이트로 인해 구형 폭시에 메커니즘이 바뀌고 폭시.EXE가 구형 폭시에 전 메커니즘을 사용하고 있다.
2.2.10.1. Withered Foxy 스킨[편집]


1번째 스킨은 Roster Builder Redbear(로스터 빌더 레드베어)라는 이름의 스킨이다. UCNRB에 나온다. 상점에서 1500 파즈 코인으로 구매 할 수 있다.
2번째 스킨은 OMC Withered Foxy(OMC 구형 폭시)라는 이름의 스킨이다.
2.2.11. Golden Freddy(골든 프레디)O[편집]

골든 프레디는 카메라를 내리면 무작위로 나타날 거야. 프레디 가면을 쓰거나 카메라를 다시 올리면 골든 프레디가 사라질 거야. 빨리 가면을 쓰지 않거나 카메라를 빨리 올리지 않으면 그가 너를 죽일 거야.
Golden Freddy will appear in the Office at random after the player lowers the monitor. Putting on the Freddy Fazbear Mask or raising the monitor again will make Golden Freddy disappear. Failing to put on the Mask or Monitor in time and Golden Freddy will jumpscare the player.
FNaF 2 에서는 카메라를 다시 올리면 죽지만 UCN에서는 FNaF 1의 골든 프레디와 합쳐진 듯 하다.
2.2.11.1. Golden Freddy 스킨[편집]

1번째 스킨은 Purple Man(보라색 남자)이라는 이름의 스킨이다. Hoaxes의 골든 프레디 종류 중 하나다.
2.2.12. Shadow Freddy(섀도우 프레디)X[편집]

그의 메커니즘은 팬텀 BB와 비슷할 거야. 그는 카메라 중 하나에 무작위로 나타나. 너는 그의 점프스케어를 피하기 위해 카메라를 내리거나 카메라를 전환 해야 해. 그가 너에게 점프스케어를 하면 카메라는 자동으로 내려질 거야.
His mechanic is pretty much the same as Phantom BB. He can appear in one of the cameras at random, you must close it or switch the camera to avoid a non-lethal jumpscare. If he jumpscares you, he will force you out of your monitor.
점프스케어 소리는 2의 소리지만 중간에 끊기고 메아리로 지속 된다.
2.2.12.1. Shadow Freddy 스킨[편집]

1번째 스킨은 Redbear(레드베어)라는 이름의 스킨이다. 레드베어의 언어드벤처 버전이다.
아마 FNaF3에 이스터에그로 나오는 그 레드베어를 가져온 것같다.
2.2.13. RWQFSFASXC(섀도우 보니)X[편집]

그는 무작위로 사무실에 나타나서 너의 사무실을 2시간 동안 어둡게 만들 거야. 그를 막을 수 있는 방법은 없어.
He will appear in the office at random and cause it to be pitch-black for 2 hours in-game. There isn't anything you can do to stop or prevent him.
UCN 원작에서는 숨겨진 캐릭터로 등장 했지만, 이번에는 공식 캐릭터로 등장 한다.
2.2.13.1. RWQFSFASXC 스킨[편집]

1번째 스킨은 Shadow BB/RWQFCFSWQT(섀도우 BB)라는 이름의 스킨이다. Hoaxes의 벌룬 보이 종류 중 하나다.
2.2.14. JJ(벌룬 걸)X[편집]

그녀는 가끔 카메라를 내리면 웃으면서 소음을 추가 할 거야. 카메라를 다시 올리면 그녀는 사라져.
She will sometimes appear after lowering the monitor, laughing and adding to the noise meter. Put the monitor back up to make her go away.
원작 UCN의 JJ는 리메이드 JJ가 돼서 밑으로 갔다.
2.2.14.1. JJ 스킨[편집]

1번째 스킨은 Fishing JJ(낚시꾼 벌룬 걸)라는 이름의 스킨이다.
2.2.15. Endo02(엔도02)O[편집]

오빌 엘리펀트와 마찬가지로 내골격02는 배관 시스템을 통과 할 거야. 그를 막으려면 히터를 지속적으로 사용 해야 해. 그는 오디오 루어에 면역일 거야.
Similar to Orville Elephant, Endo02 will go through the Duct System. You need to constantly use the Heater to keep him at bay, and he is completely immune to the audio-lures.
FNaF 2에서 종종 환각으로 등장했었던 애니매트로닉스이다. FNaF 2에서는 주인공을 죽이진 않는 애니매트로닉스 였다.
2.2.16. Paperpals(종이 친구들)X[편집]

???
공략은 ???지만 막는 방법이 없는 것 뿐이고 설명은 밤에 한번 쓰레기와 갱단처럼 가짜 점프스케어를 한다.
성능이 좋지 않은 컴퓨터에선 점프스케어가 아니라 화면을 가려버리는 식으로 되버린다.
2.2.17. Toy Cupcake(토이 컵케이크)X[편집]

카메라를 오래 볼 수록 그가 오른쪽 문에 나타날 확률이 높아져. 그가 거기 있으면 네가 카메라를 몇 초 동안 볼 때까지 오른쪽 문을 닫지 못 할 거야.
The longer the cameras are down, the more chance of him appearing at your Right Door. When he's there, you will be unable to close it until looking at the cameras for several seconds.
FNaF 2에서 토이 치카가 들고 있는 컵케이크이다.
발로라나 리메이드 나이트메어가 있다면 죽은 목숨이나 다름없다.
2.2.18. Freddy Fazbear Head(프레디 파즈베어 머리)O[편집]

프레디 파즈베어 마스크를 착용할 경우 화면 왼쪽에 있는 독성 수치가 서서히 채워지며, 더 많이 채워질수록 시야가 어두워져. 만약 그게 완전히 가득 차면, 넌 기절 할 거고, 그건 게임 오버로 가는 결과를 초래할 거야.
The Toxic Meter on the left of the screen will slowly fill up if you have the Freddy Fazbear Mask on, the more it fills up the darker your view will become. If it fills up fully you will pass out, which will result in a game over.
FNaF 2에서 방어 수단으로 사용하던 인형탈. 원래 이 캐릭터의 메커니즘은 방사능 폭시의 것이였으나 변경됐다. 여담으로 독성 수치는 본래 FNaF 2의 초기 구상 단계에서 프레디 가면을 썼을때 사용하려던 메커니즘이였지만, 최종본에서 짤려서 파일로만 남아있는 데이터였으나, 본작에서 제대로 활용되었다.
2.2.19. BB Figure(BB 피규어)X[편집]

소음 수치가 너무 높으면 그는 천천히 왼쪽 문에서 선명해질 거야. 그가 완전히 선명해지면, 왼쪽 문을 사용하지 못하게 만들 거야. 수입산 버터를 클릭해서 그를 사라지게 해.
He will slowly fade into the Left Door if the Noise Meter is too high. If he fully fades in, he will disable the left door. Click the Exotic Butters to make him disappear.
FNaF 2의 커스텀 나이트 챌린지 중 하나인 Nights of Misfits(적응 못하는 밤)을 클리어하면 보상으로 책상에 생기는 벌룬 보이 피규어다.
2.2.20. Toy Bonnie Figure Duo(토이 보니 피규어 듀오)X[편집]

소음 수치가 너무 높으면 그들은 천천히 오른쪽 문에서 선명해질 거야. 그들이 완전히 선명해지면, 오른쪽 문을 사용하지 못하게 만들 거야. 수입산 버터를 클릭해서 그들을 사라지게 해.
They will slowly fade into the Right Door if the Noise Meter is too high. If they fully fade in, they will disable the right door. Click the Exotic Butters to make them disappear.
FNaF 2의 New & Shiny(새롭고 반짝이는 것들) 챌린지를 클리어하면 주는 토이 보니 피규어들[13]이다. 기타를 가진 것은 PC 버전의 New & Shiny를 클리어하면 주는 보상이고 모바일은 기타를 들지 않은 피규어를 보상으로 준다.
2.2.21. Toy Foxy(토이 폭시)O[편집]

토이 폭시는 환풍구 시스템을 통과 할 거야. 녀석이 사무실 입구에 도착하면 환풍구 시스템을 확인 해서 사무실에 들어 오도록 해야 해. 그런 다음 프레디 가면을 써. 너무 오랫동안 녀석이 환풍구에 있거나 프레디 가면을 쓰지 않으면 너는 죽을 거야.
Toy Foxy will go through the Vent System. Once they get to the opening, you will have to look at the vent radar to make them appear in your office. You must then put on your Freddy Fazbear Mask to get them away. If they're in the vent opening for too long or you fail to put on the mask, they will jumpscare you.
FNaF 2에서 포스터로도 모습이 보여진 적 있었던, 멀쩡하던 시절의 맹글의 모습.
2.2.21.1. Toy Foxy 스킨[편집]

1번째 스킨은 Missing Toy Foxy(미싱 토이 폭시)라는 이름의 스킨이다. 장난으로 만든 캐릭터라고 한다. 상점에서 1000 파즈 코인으로 구매 할 수 있다.
2.2.22. Jeremy Fitzgerald(제레미 피츠제럴드)X[편집]

그는 네가 발전기를 너무 자주 사용하면 두 손전등을 모두 깜박이고 프레디 마스크를 썼다 벗게 할 거야.
He will flash both Flashlights as well as put on and off the Freddy Fazbear Mask if the Power Generator is used too frequently.
FNaF 2의 주인공이자 1~6일밤까지 경비를 맡았던 경비원이다.
2.2.23. Fritz Smith(프리츠 스미스)X[편집]

밤이 시작될 때 그는 너의 밤에 임의의 FNaF2 캐릭터를 추가할 거야. 여기에는 토이들과 구형들이 포함이 될 거야. 이미 토이들과 구형들이 활성화 돼 있다면 더 이상 추가되지 않을 거야. 또한 그는 밤이 시작 될 때와 카메라를 내릴 때 프레디 가면을 몇 초 동안 쓰게 강제로 쓰게 할 거야.
At the start of the night, he will add in a random FNaF 2 character that was customizable in the custom night. This includes Toy Freddy, Toy Bonnie, Toy Chica, Mangle, BB, Withered Freddy, Withered Bonnie, Withered Chica, Withered Foxy and Golden Freddy. If all of those characters are already active, no more characters will be added. He will also force you to wear the Freddy Fazbear Mask for a couple of seconds after everytime you lower the monitor, including at the start of the night.
FNaF 2의 주인공이자 7일밤의 경비를 맡았던 경비원. 하지만 악취와 애니마트로닉 AI조종으로 인해 하루만에 짤렸다.
2.2.24. Cakebear(케이크베어)O[편집]

마우스 커서 위에 있을 때
아이
화난 아이
점프스케어
케이크베어는 밤새 너의 마우스 커서 위에서 머물고 있을 거야. 그리고 사무실에는 각 모서리에 4명의 아이가 있지. 아이 위에 케이크베어를 올려서 주기적으로 케이크를 줘야할 거야. 그렇지 않으면 점점 화나려 할 거야. 아이가 완전히 화나면 케이크베어는 결국 너에게 점프스케어를 할 거야.
Cakebear will stay above your cursor the entire night. There will be 4 kids in the office, one for each corner of the >screen. Give them cake regularly by hovering Cakebear on top of them, or else they will get more and more mad. If a kid >gets too mad, Cakebear will jumpscare you.
FNaF 2에서 게임오버시 일정 확률로 플레이 가능한 미니게임(Take Cake to the Children)의 프레디. 마우스 커서를 아이에 둬서 아이에게 케이크를 줘야한다.
2.2.25. Mike(마이크)O[편집]

사무실에 나타났을 때
입을 벌린 모습
점프스케어
그는 사무실의 중간에 나타날 거야. 네가 그를 클릭하면 그는 입을 약 1초간 벌려. 가끔씩 왼쪽에서 피자가 날아올 때가 있는데, 피자가 마이크에게 닿기 직전에 마이크의 입을 벌려서 피자를 먹게 해야 해. 그렇게 하지 않는다면 너는 그의 식사를 망치게 될 거야. 너무 많이 실패하다보면 결국은 죽고 말 거야.
He'll appear in the center of the office. If you click him, he will open his mouth for about a second. Occasionally a gray pizza will come in from the left of the office, when the pizza is about to touch Mike, you must open his mouth to let him eat it, if you don't, you will fail to feed him. Failing to feed him too many times will result in death.
FNaF 2의 게임 파일 속에 있는 정체불명의 미사용 데이터이다. 생긴건 퍼펫을 많이 닮았다.
2.2.25.1. Mike 스킨[편집]

스킨1 사무실에 나타났을 때
스킨1 입을 벌렸을 때
스킨1 점프스케어
1번째 스킨은 What Monster Is This?(이것은 무슨 괴물이지?) 라는 이름의 스킨이다.
언더테일을 많이 해본 사람이라면 알겠지만 폐허의 잡몹 ' 프로깃 '이다.[14]
2.3. Five Nights at Freddy's 3[편집]
2.3.1. Springtrap(스프링트랩)O[편집]

"Suffer now, like all who have stood before me!"
"고통받아라, 내 앞에 섰던 모든 이들처럼!"
"It is not your flesh that sustains me. It is your FEAR."
"나를 살아가게 하는 것은 네 육체가 아니다. 바로 네 두려움이지."
"I'm here to claim what is left of you."
"난 네게 남은 것들을 가지러 왔다."
"You will not be spared. You will not be saved."
"넌 용서받지 못할 거다. 넌 구원받지도 못할 거다."
"Hide if you want. It did not save the others. It will not save you."
"숨고싶다면 숨어라. 그래봤자 다른 녀석들은 무사하지 못했고, 너 또한 무사하지 못할 거다."
"Let's see how many times you can be pulled apart... and put back together again."
"네가 몇 번이나 분해될 수 있는지... 몇 번이나 다시 재조립 할 수 있을지 보자."[A]
"Your fear... will consume you."
"네 두려움이... 널 집어삼킬 것이다."
"Got you!"
"잡았다!"
"It... Is... Time!"
"때가... 되었다!"
"Your time... is up!"
"넌... 이제 끝이다!"
"I can taste the fear in your breath."
"네 숨 속에서 두려움이 느껴지는군."
"I will make you suffer... suffer like so many of the others."
"널 고통스럽게 해주마... 수많은 이들이 고통받았던 것처럼."
"You... will... fear... me!"
"넌... 날... 두려워... 할 것이다!"
"And now you are mine."
"I'm... back..."
"내가... 돌아왔다..."
대사
그는 환풍구 시스템을 통해서 너에게 갈 거야. 그에게 환풍구 덫은 전혀 통하지 않지. 그가 너의 사무실에 도착했을 때, 넌 그의 얼굴이 가운데 환풍구 문에 보일 거야. 그가 점프스케어 하는 걸 막으려면 넌 그때 환풍구 문을 닫아야 해.
He will go through the Vent System, immune to the Vent Snare. When he reaches your office, you will see his face staring down at you from the vent opening. Close the door to avoid getting jumpscared.
성우는 PJ Heywood(PJ 헤이우드). UCN의 스프링트랩과 똑같지만, 원작과 달리 문을 닫으면 바로 사라지지만 여기서는 문을 닫았다가 쿵 소리가 나서 열면 스프링트랩이 서서히 사라지는 걸 볼 수 있다.
2.3.1.1. Springtrap 스킨[편집]


1번째 스킨은 Musical Springtrap(뮤지컬 스프링트랩)이라는 이름의 스킨이다. 말 그대로 뮤지컬에서 나오는 스프링트랩이다.
2번째 스킨은 Springtrap Newspaper(스프링트랩 신문버전)라는 이름의 스킨이다. FNaF 3 6일밤을 깨면 나오는 신문지에서 밝기를 높혀보면 나오는 프레디 피규어 옆에 있는 그 스프링트랩이다.
3번째 스킨은 Trolltrap(트롤트랩)이라는 이름의 스킨이다. 트롤 페이스와 스프링트랩을 짬뽕했다.
4번째 스킨은 Black Monky(블랙 몽키)라는 이름의 스킨이다. Survive Monky: The Game이라는 게임에 나오는 듯하다.
스프링 트랩의 스킨은 개그스러운 스킨들이 많다.
2.3.2. Phantom Freddy(팬텀 프레디)X[편집]

팬텀 프레디는 때때로 사무실에서 나타나 오른쪽에서 왼쪽으로 걸을 거야. 그를 클릭하면 그는 너를 깜짝 놀래켜서 환기구 오류를 발생시킬 거야.
Phantom Freddy will sometimes appear in your office, walking from right to left. If you click him, he will jumpscare you, causing a ventilation error.
FNaF 3에서 나왔던 팬텀 애니매트로닉스 중 하나. 원작 UCN에서의 팬텀 프레디는 리메이드 팬텀 프레디가 됐다.
관심을 주지 않으면서 플레이한다면 막는 방법은 어렵지 않다.
2.3.2.1. Phantom Freddy 스킨[편집]

1번째 스킨은 OMC Phantom Freddy(OMC 팬텀 프레디)라는 이름의 스킨이다.
2.3.3. Phantom Chica(팬텀 치카)X[편집]

그녀의 얼굴이 가끔 너의 카메라에 나올 거야. 그 때 넌 카메라를 전환해야 돼. 만약에 네가 그때 카메라를 내린다면 널 깜짝 놀래켜서 시스템 중 하나에 오류가 날 거야. 그녀는 또한 토이 프레디 모니터 화면을 강제로 바꿀 수 있어. 이때 빨리 카메라 화면을 바꾸는 게 좋을 거야.
Her face can appear on the monitor. If this happens, switch the camera. Closing the monitor will result in a non-lethal jumpscare and will cause one of the systems to error out. She can also randomly cover Toy Freddy's monitor screen. Switch the camera on your monitor when that happens.
굉장히 짜증나는 녀석이다. 카메라 화면을 내리지 않으면 갑툭튀를 안 해서 화면을 가리는 거나 다름 없어져서 짜증난다는 거다.
심지어 이 녀석을 피할 시간이 굉장히 짧다.
2.3.4. Phantom BB(팬텀 벌룬 보이)X[편집]

FNaF 3에서의 능력과 유사하게, 팬텀 BB는 카메라 화면에 무작위로 나타날 거야. 단순하게 카메라를 화면을 전환하거나, 카메라를 내리면 그의 점프스케어를 피할 수 있을 거야. 팬텀 BB에게 점프스케어를 당하면 일시적으로 너의 시야가 가려질 거야.
Similar to his behavior in the third game, Phantom BB will appear on the monitor screen at random. Simply just switch cameras or close the monitor to avoid his jumpscare, getting jumpscared by Phantom BB will cause you to black out temporarily.
UCN과 같다. 카메라로 볼 것도 많은데 갑툭튀 한 번 당하면 열받는다.
2.3.5. Phantom Foxy(팬텀 폭시)X[편집]

카메라를 내리면 팬텀 폭시가 사무실 왼쪽에 나타나있을 수도 있어. 단순하게 오른쪽을 보면 되지만, 그것만으로 그가 떠나는 건 아냐. 대신 카메라를 들어서 그를 사라지게 해야 해. 그를 너무 오래 쳐다보면 그는 널 깜짝 놀래켜서 시스템 중 하나를 망가뜨릴 거야.
When lowering your monitor, there is a chance for Phantom Foxy to appear in the office on the far left side. You can avoid his jumpscare by simply looking away, however, this won't make him leave. Instead, you must lift up the monitor to make him disappear. If you look at him for too long, he will jumpscare you, erroring out one of the systems.
FNaF 3에서는 그냥 보기만해도 갑툭튀를 했지만 여기서는 피할 시간을 주기 때문에 다행인 녀석이다.[15]
2.3.5.1. Phantom Foxy 스킨[편집]

1번째 스킨은 Classic(클래식)이라는 이름의 스킨이다. 팬텀 폭시의 옛날 모델링[16]인듯 하다.
2.3.6. Phantom Mangle(팬텀 맹글)X[편집]

FNaF 3에서의 능력과 유사하게 팬텀 맹글은 너의 카메라에 무작위로 나타날 거야. 그때 카메라를 닫아서 그를 사라지게해야 돼. 그녀를 너무 오래보면 카메라를 강제로 내리고 사무실에 일시적으로 들어가서 소리를 시끄럽게 하고 소음 수치를 증가시켜서 소리에 민감한 애니매트로닉스를 악화시킬 거야.
Similar to its behavior in the third game, Phantom Mangle will appear at random on the player's monitor. Close the monitor to make it disappear. If left onscreen for too long, Phantom Mangle will lower the monitor and invade the office temporarily, causing audio distractions and increasing the Noise Meter, which can aggravate sound-sensitive animatronics.
FNaF 3에서나 UCN에서나 여기서나 사플에 굉장히 짜증나는 존재다.이 녀석을 피할 시간은 1초도 안된다.
2.3.6.1. Phantom Mangle 스킨[편집]

1번째 스킨은 Tangle(탱글)이라는 이름의 스킨이다. 탱글의 언어드벤처 버전이다.
2.3.7. Phantom Puppet(팬텀 퍼펫)X[편집]

팬텀 퍼펫은 환풍구 시스템에 무작위로 나타날 거야. 녀석이 환풍구 시스템에 나타날 때 녀석을 너무 오래 쳐다보면 너의 사무실에 나타나서 너의 시야를 가리고 오랜 시간동안 소음 수치를 올릴 거야.
Phantom Puppet can appear on the vent radar at random. Staring at it for too long when he appears on the vent radar will cause it to appear in your office, staring at you and raising the noise meter for a lengthy amount of time.
아주 중요한 화면을 가려서 제일 짜증나는 존재. 하지만 이때 카메라 정도는 볼 수 있어서 그나마 나아진 캐릭터이다.
2.3.7.1. Phantom Puppet 스킨[편집]

1번째 스킨은 Classic(클래식)이라는 이름의 스킨이다. 팬텀 퍼펫의 옛날 모델링[17]인듯 하다.
2.3.8. The Security Guard(경비원)X[편집]

그는 오디오 장치, 환기구 등이 고장났을 때 히터를 강제로 킬 수도 있을 거야.
He will mess with the Audio Lure on the Duct System and the Vent Snare on the Vent System when the Heater is used too frequently.
FNaF 3의 주인공이자 경비원이다. 현재까지도 이름은 불명. 히터를 강제로 틀어서 잭-오-치카나 잭-오-보니가 있다면 굉장히 짜증난다.
2.3.9. Phone Dude(폰 듀드)X[편집]

그의 메커니즘은 폰 가이와 거의 같아. 그가 전화를 걸면 신속하게 끊어. 그렇지 않으면 긴 오디오 장애가 생겨서 모든 시스템에 오류가 생겨. 음소거 버튼은 매일 다른 위치에 나타날 거야.
His mechanic is almost the same as Phone Guy. When he calls, quickly mute him, otherwise he will create a lengthy audio disturbance and will cause all your systems to error out. The mute button will appear in different places each time.
FNaF 3에서 등장해 폰가이 역할을 맡았던 캐릭터인 만큼, 본작에서의 메커니즘도 폰가이와 동일하다. 막지 못하면 시스템에 오류가 생기게 하는 것은 원작인 FNaF 3에서 팬텀 애니매트로닉스들에게 점프스케어를 당했을 때 시스템에 오류가 생기던 것에서 오마주 했다.
2.3.10. Shadow Cupcake(섀도우 컵케이크)X[편집]

그가 카메라에 나타나면 다른 카메라로 전환 하기 전에 그를 클릭 해. 그를 클릭 하지 않고 카메라를 전환 하면 너에게 점프스케어를 하고 너의 카메라를 강제로 내릴 거야.
When he appears on your monitor, click him before switching to a different camera. If you don't, he will jumpscare you, lowering your monitor in the process.
FNaF 3에서 3일밤에만 플레이 가능한 숨겨진 토이 치카 미니게임(Chica's Party)을 언락하기 위한 수단이였던 컵케이크다. 막는 방법은 클릭하면 미니게임으로 이동되는 것에서 따온 듯하다.
원래 아이콘은 직접 제작이었으나 FNaF 3의 모습을 그대로 따온 아이콘으로 변경되었다.
2.3.11. Crumpled Freddy Suit(구겨진 프레디 슈트)X[편집]

???
FNaF 3에서 이스터에그로 등장하는 프레디로, 팬들 사이에서는 흔하게 팬텀 골든 프레디라고도 불린다. 막는 방법은 물음표로 표시 되어 있지만 사실 사무실을 누적 10초 동안 볼 때마다 갑툭튀를 하는
2.3.12. Freddy Stand(프레디 스탠드)X[편집]

카메라를 들면 그가 나타날 수 있어. 그가 사라지도록 카메라 또는 시스템을 전환 해. 그가 있을 때 카메라를 다시 닫으면 환기 오류가 발생 할 거야.
After pulling up the monitor, he may appear on it. Change cameras or systems to make him disappear. Closing the monitor when he's there will result in a ventilation error.
FNaF 3의 사무실에서 시야를 왼쪽으로 돌리면 사무실 문 밖에서 배경으로 보이던 조명 역할을 하는 스탠드 이다.
2.3.13. Bonnie Stand(보니 스탠드)X[편집]

그는 사무실에 머물면서, 눈에 불을 켜두기 위해 전기 공급 장치에 연결되어 있어. 그는 가끔 넘어져서 빨리 대처하지 않으면 너의 전기 일부를 빼앗을 거야. 다시 제자리로 돌아가게 하려면 클릭해.
He stays in the office, connected to the power supply to keep the light in his eyes on. He will occasionally fall over, taking away a chunk of your power if not dealt with quickly enough. Click on him to put him back in place.
FNaF3의 CAM 2에 나온다.
2.3.14. Chica Head(치카 머리)X[편집]

사무실 중앙에 배치되어 한쪽만 비추게 될 거야. 조명을 비추는 쪽을 바꾸려면 치카 머리를 클릭해. 빛을 비추지 않는 쪽은 어둠에 가려질 거야.
It will be in the center of the office, illuminating one side of it, click it to change the side it's illuminating. The side it's not illuminating will be covered in darkness.
FNaF3의 CAM 8에 나오는 치카의 머리다.
2.3.15. Hotdog(핫도그)O[편집]

그것은 너의 책상 위에 있을 거야. 정기적으로 그것을 먹어야 해. 그렇지 않으면 너를 죽일 거야. 만약 독성 수치가 너무 높으면 그것은 초록색으로 곰팡이가 덮일 거야. 그것을 먹으면 너는 죽게 될 거야.
It will stay on your desk. You must eat it regularly, otherwise it will kill you. If the Toxic Meter gets too high, mold will cover it (indicated by a green tint) and eating it in that state will result in its jumpscare.
FNaF 3의 사무실 책상에 배경으로 놓여 있던 핫도그다.
2.3.16. Jumpscare Phantom BB(점프스케어 팬텀 BB)X[편집]

그가 너의 카메라에 나타나면 카메라를 전환 하거나 카메라를 닫아. 그가 너무 오랫동안 너의 카메라에 있으면 그는 몇 초 동안 너의 시야 색상을 반전 시킬 거야.
When he appears on your monitor, switch the camera or close the monitor. If he's kept on the monitor for too long, he will invert the colors of your view for a few seconds.
말 그대로 점프스케어를 하고 있는 팬텀 벌룬 보이다. 시야 색상이 반전된 상태는 정말 눈이 아프다.
2.3.17. Crying Child(우는 아이)O[편집]

그들은 남은 밤 동안 오전 4시에 사무실에 나타날 거야. 사무실에 있을 때 마스크를 쓰고 너무 많이 둘러보면 용수철이 풀려서 죽을 수도 있어.
They'll appear in the office at 4AM for the rest of the night. Looking around too much with the mask on while they're in the office will cause the springlocks to trip, killing you
FNaF3 미니게임에서 등장하는 우는 아이다.
2.3.18. Purple Freddy(퍼플 프레디)O[편집]

밤이 시작 될 때, 1층 카메라 상에서 그의 머리 모양 아이콘이 표시되는데, 그를 찾을 수 있는 시간은 몇 초 밖에 없어. 그가 사라질 때 까지 카메라를 쫓아 다니면서 그를 따라 가. 그를 너무 오래 지켜 보지 않으면 그는 너를 죽일 거야. 그가 돌아 다닐 카메라 수는 그의 AI 난이도에 1을 더한 거야.
At the start of the night, you only have a few seconds to find him in the cameras, indicated by an icon of his head on the map of Floor 1. Follow him through more cameras as he walks throughout the building until he disappears. If you don't bother to watch him for too long, he will kill you. The number of cameras he will go through is his difficulty level plus 1.
FNaF 3에서 밤을 하나씩 깰 때마다[18] 플레이 가능한 미니게임에서 등장해 플레이어에게 따라와(Follow Me)라며 유인했던 섀도우 프레디 형상의 캐릭터이다. 메커니즘도 거기서 따온 듯 하다.
2.3.19. Air BB(공기 벌룬 보이)X[편집]

오른쪽 환풍구 문이 열려 있으면 그가 사무실에 들어올 수 있어. 일단 그가 들어가면, 그는 풍선을 너의 마우스 커서에 묶을 것이고, 커서가 위로 떠오르게 할 거야. 커서가 화면 맨 위에 닿으면 넌 점프스케어를 당할 거야. 몇 초 후에 그는 떠날 거야.
He can come into the office if the right vent door is open. Once he gets in, he will tie a balloon to your cursor, which will make it float upwards. If your cursor reaches the top of the screen, he'll jumpscare you. After a few seconds he'll leave.
FNaF3의 벌룬보이 미니게임에 등장한다.
2.3.20. Crying BB(우는 벌룬 보이)O[편집]

그는 글리치 층에 나올 것이고, 그는 계속해서 뒤틀린 웃음 소리를 낼 거야. 그가 있는 동안에는 카메라를 변경할 수 없을 거야.[19]
그를 떠나게 하려면 그를 쳐다봐. 그가 너무 오래 있으면, 넌 죽을 거야.
He will appear on the Glitch Floor, followed by his distorted laugh. While he's there, you will be unable to change cameras (you can still change systems and floors). Stare at him to make him leave. If he stays for too long, you'll die.
FNaF3 벌룬보이 미니게임에 등장한다.
2.3.21. Crying Puppet(우는 퍼펫)X[편집]

모드(발전기,글로벌 뮤직 박스 등)을 변경 할 때 우는 퍼펫의 이미지가 부분 적으로 선명해 질 거야. 시간이 지남에 따라 그것은 다시 희미해 질 거야. 그것은 너의 시야를 가리는 역할을 해. 글로벌 뮤직 박스를 키면 더 빨리 희미해 질 거야.
Each time you switch modes, an image of Crying Puppet will partially fade in. It will fade back out over time. It only serves to block your view. Having the Global Music Box on will make it fade out faster.
FNaF 3의 맹글의 미니게임(Mangle's Quest)에서 숨겨진 루트로 가면 배경으로 볼 수 있는 퍼펫이다.
2.3.22. Stage 01 Crew(무대 01 멤버)X[편집]

새벽 4시에 화면 상단에 텍스트 상자가 나타날 거야. 텍스트 상자를 클릭하고 '395248'을 입력한 다음 시간이 다 되기 전에 ENTER를 눌러. 만약 너가 충분히 빨리 하지 않는다면 넌 남은 시간동안 가면을 쓸 수 없게 될 거야.
FNAF3 미니게임에 나온 캐릭터들이다
2.3.23. Minigame RWQFSFASXC & RWQFSFASXC Figure(미니게임 섀도우 보니와 섀도우 보니 피규어)X[편집]

때때로 층 또는 시스템을 전환 할 때 카메라가 글리치 층에 고정 될 수 있어. 카메라를 정상으로 되돌리려면 사무실 어딘가에서 미니 게임 RWQFSFASXC(섀도우 보니)의 피규어를 찾아 클릭 해야 해.
Sometimes when switching floors or systems the view will become stuck on the Glitch Floor. To make the monitor go back to normal, you must find and click a figure of Minigame RWQFSFASXC somewhere in your office.
FNaF 3의 섀도우 보니 미니게임에서 등장하는 섀도우 보니이다.
2.3.24. Cheattrap(치트트랩)O[편집]

FNaF 3에서 맵 치트를 쓰면 나오는 스프링트랩 위치를 알려주는 아이콘이다.그는 너를 죽이기 위해 엘리베이터로 가려고 3층을 지나갈 거야. 그가 있는 자리에 오디오 루어를 사용 하면 이전 자리로 돌아가게 돼. 그는 카메라에 표시 되지 않고 캠 버튼 위에만 나타날 거야.
He will go through Floor 3, trying to get to the elevator to kill you. Playing an Audio Lure in the room he is in will make him go back to the previous room. He is not visible on the cameras and instead only on the map.
2.3.25. Glitchedtrap(글리치드트랩)X[편집]

그의 환각은 오디오, 비디오, 환기 오류가 있을때 마다 화면에 지속적으로 나타나서 깜박일 거야. 이 오류를 고치면 그는 사라질 거야.
Hallucinations of him will constantly flash on your screen whenever there's an audio, video or ventilation error. Fixing those errors will stop him from appearing.
한 유튜버가 올린 FNaF 3 영상에서 버그 때문에 스프링트랩이 두 명이 된 것에서 따온 것이다.
2.4. Five Nights at Freddy's 4[편집]
2.4.1. Nightamre Freddy(나이트메어 프레디)O[편집]

"I have always been hiding in your shadow."
"난 항상 네 그림자에 숨어 있었다."
"What a gift to relish. A victim that can't perish."
"죽을 수 없는 희생자라니, 이 얼마나 즐거운 선물인가."
"I am given flesh, to be your tormentor."
"난 널 고통스럽게 하기 위해 육체를 받았다."
"No light can save you now."
"그 어떤 빛도 이제 널 구할 수 없다."
"I am remade, but not by you, by the one you should not have killed."
"난 다시 만들어졌다. 네가 아니라, 네가 죽이지 말았어야 했던 자에 의해 말이다."
그는 알람 시계를 들고 딱 한 번 시계가 30초가 됐을 때 사무실에 나타날 거야. 알람 시계를 클릭 하면 5초 동안 침대에서 일어났다가 다시 잠들고 밤을 계속 할 거야. 빠르게 알람 시계를 클릭 하지 않으면 나이트메어 프레디가 너를 죽일 거야.
He will appear in your office only once, 30 seconds into the night, holding an alarm clock. You will only have a moment to press the clock and activate the alarm. You will then wake up in your bed for 5 seconds before falling back asleep and continuing the night. If you don't click the alarm clock in a timely fashion then Nightmare Freddy will jumpscare you and kill you.
성우는 Tim Simmons(팀 시몬스). 원작 UCN의 나이트메어 프레디와는 다르게, 프레들즈와 나이트메어 프레디가 분리 되었다. 원작 UCN의 나이트메어 프레디는 프레들즈가 됐다. 메커니즘은 스콧이 만우절 당시 장난으로 올렸던 글에서 따왔다.[20]
2.4.2. Nightmare Bonnie(나이트메어 보니)O[편집]

그가 오른쪽 복도에 나타나면 그의 공격을 피하기 위해 상품 카운터(CAM 07)에서 보니 봉제 인형을 구입 해. AI가 높을 수록 봉제 인형의 가격이 높아 질 거야.
When he appears on the Right Hall (CAM 02) camera, buy the Bonnie plush on the Prize Counter (CAM 07) to avoid his attack. The higher his AI is, the more expensive the plush will be.
2.4.3. Nightmare Chica(나이트메어 치카)O[편집]

그녀의 입이 너를 삼키려고 하면 파워 에어컨을 켜서 그녀의 입을 열어서 너를 죽이지 못하도록 해.
When her jaws begin to close in on you, turn on the Power A/C to make her jaws open and prevent her from killing you.
원작 UCN에서는 숨겨진 캐릭터로 나오지만 울트라 커스텀 나이트에서는 정식 캐릭터로 나온 듯 하다.
2.4.4. Nightmare Foxy(나이트메어 폭시)O[편집]

나이트메어 폭시는 맹글과 유사하게 작동 해. 그는 환풍구 시스템을 통과 할 거야. 환풍구 덫으로 그를 막아야 해. 그가 입구에 다다르면 문을 닫아도 리셋 하지 않고 네가 CCTV를 보는것을 기다리지 않을 거야. AI가 높을 수록 더 빨리 움직일 거야. 맹글과 달리 그는 몰래 들어오면 바로 너를 죽일 거야.
Nightmare Foxy behaves similar to Mangle. He will go through the Vent System. You need to stop him with the Vent Snares. If he manages to reach the entrance, he will not reset and wait until the door is open and you have the monitor up to slip in. The higher his AI is, the faster he will move. Unlike Mangle, once he sneaks in, he will automatically jumpscare the player.
FNaF 4에서 들어오지만 않으면 되지만 들어오면 수시로 봐줘야 하는 짜증나는 캐릭터이다.
2.4.5. Nightmare Fredbear(나이트메어 프레드베어)O[편집]
"Let me put you back together, then take you apart all over again."
"널 재조립하고, 다시 전부 분해해주마."
"Let's see how many times you can be pulled apart."
"네가 몇 번이나 분해될 수 있는지 보자."
"I assure you, I am very real."
"장담하는데, 난 정말 진짜야."
"This time, there is more than illusion to fear."
"이번에는, 환상보다 더 무서워 할 것이 더 있어."
"We know who our friends are, and you are not one of them."
"우린 우리의 친구가 누군지 알고 있고, 너는 그들 중 하나가 아니야."
그는 카메라에 보이지 않고, 왼쪽 문에 도착했을 때만 보여. 그의 얼굴 앞에 왼쪽 문을 닫아서 그를 어둠 속으로 돌려 보내.
He is invisible to the cameras and can only be seen when he reaches the left doorway. Close the Left Door on his face to send him back into the darkness.
성우는 Zach Hoffman(잭 호프만). FNaF 4의 보스 중 하나인 애니매트로닉스다. 원작 UCN처럼 바로 가는 게 아니라, 약간 1초 정도 기다리고 똑 소리를 내서 티저 프레디 등과 헷갈리면 죽을 위험이 있다.
2.4.6. Nightmare(나이트메어)O[편집]

그가 연속으로 두 번 웃는 걸 들으면 왼쪽과 오른쪽 복도를 확인하고 그의 숨소리가 들리는 문을 닫아. 그를 빨리 막지 않으면 그는 결국 너를 죽일 거야.
If you hear him laugh twice in a row, check the left and right hallways and listen for his breathing, then close the door he is at. If you don't block him fast enough, he will jumpscare you.
FNaF 4의 보스 중 하나인 애니매트로닉스다. 숨소리를 들어야하지만, 그냥 웃음 소리가 나는 문을 닫거나 사운드 플레이에 자신이 없으면 양쪽 문을 닫아도 된다. 원작 UCN의 나이트메어는 리메이드 나이트메어가 돼서 밑으로 갔다.
2.4.7. Plushtrap(플러시트랩)O[편집]

그는 시간이 바뀌는 순간 펀타임 코브 (캠 06)에 등장하지만 어떤 시간에는 무작위로 나타날 거야. 그의 의자에서 그에게 겁을 주지 않으면 그는 너에게 점프스케어를 선물해줄 거야.
He will appear on the Funtime Cove (CAM 06) camera the moment the hour switches, though which hour it will be is random. If you don't scare him out of his chair fast enough, he will jumpscare you.
FNaF 4의 " 플러시트랩과 놀기 "라는 미니게임에서 나온다. 클리어하면 시작 시간이 2시로 바뀐다. 역시나 UCN과 똑같이 펀타임 코브를 봐서 쫓아내면 끝.
2.4.8. Freddles(프레들즈)O[편집]

카메라를 들면 프레들즈가 사무실에 모여들 거야. 손전등을 비춰서 그들을 멀리하는 게 좋을 거야. 너무 많이 나타나면 결국 너에게 점프스케어를 하고 죽일테니까.
When you lift up the monitor, they will start to appear in front of you. Shine your flashlight to make them go away. If you let too many of them appear, you will die.
상술했듯이, 나이트메어 프레디와 분리됐다. 원작 UCN의 나이트메어 프레디와 똑같이 막으면 된다.
2.4.8.1. Freddles 스킨[편집]

1번째 스킨은 Insane Freddy라는 이름의 스킨이다. FNaF 시리즈의 2차 창작 INSANITY-MACABRE에서 나온다고 한다.
2.4.9. Nightmare Cupcake(나이트메어 컵케이크)O[편집]

만약 너의 카메라가 너무 오랫동안 내려져 있으면 그는 너의 책상 위에 나타날 거야. 그는 너가 다시 카메라를 올려야 떠날 거야. 그를 너의 사무실에 너무 오래 있게 하면 너를 죽일 거야.
She will appear on your desk if your cameras are down for too long. She will only leave once you pull up the cameras again. Having her in your office for too long will result in a jumpscare.
다른 컵케이크 시리즈는 죽이지는 않으나, 유일하게 플레이어를 죽일 수 있는 컵케이크다.
2.4.10. Jack-O-Bonnie(잭 오 보니)O[편집]

잭 오 보니는 온도가 올라감에 따라서 천천히 나타날 거야. 넌 선풍기 또는 에어컨을 사용해서 온도를 낮춰서 그를 사라지게 해야 해. 그가 완전히 나타나면 그는 널 죽일 거야.
Jack-O-Bonnie will slowly form in your Office as the temperature rises. The player must cool down their Office quickly, using the Fan or Power A/C to make him disappear. If he is fully solid, he will jumpscare the player.
잭 오 치카와 똑같지만, 사무실 안에서 나타난다.
2.4.10.1. Jack-O-Bonnie 스킨[편집]

1번째 스킨은 Blaze(블레이즈)라는 이름의 스킨이다. 마인크래프트의 그 블레이즈다.
2.4.11. Jack-O-Chica(잭 오 치카)O[편집]

"I am a burning reminder of your misdeeds."
"나는 너의 악행을 상기시켜 주는 불타는 존재다."
"Come and burn with me!"
"이리 와서 나와 함께 불타자!"
"The fire within me burns eternal, and now you shall as well!"
"이제 너도 내 안의 불처럼 영원히 불타라!"
"Greetings from the fire, and from the one you should not have killed!"
"네가 죽이지 말았어야 했던 자와 불이 너를 반긴다!"
"Did things get really hot in here, or is it just me?"
"여기가 너무 뜨거워진 건가, 아니면 그냥 내가 뜨거워서 그런 건가?"
잭 오 치카는 사무실이 90도가 되면 왼쪽과 오른쪽 복도에서 점점 나타날 거야. 그리고 넌 그녀를 사라지게 하기 위해 양쪽 문을 닫아야하지. 사무실이 100도를 넘으면 문을 닫아도 소용이 없을 거야. 그녀가 완전히 나타나면 널 죽일 거야.
Jack-O-Chica will slowly materialize at both the left and right halls at the same time if the office reaches 90 degrees, at which point, the player must shut both doors at the same time to make her disappear. If the office reaches 100 degrees, the doors will have no effect on her. If she stays solid for too long, she will jumpscare the player.
성우는 Keyondra Shanae(키욘드라 샤이내). 원작 UCN에서 온도를 중요하게 했던 애니매트로닉스.[21]
2.4.12. Nightmare Mangle(나이트메어 맹글)O[편집]
그녀가 오른쪽 복도에 나타나면 그녀의 공격을 피하기 위해 상품 카운터(캠 07)에서 맹글 봉제 인형을 구입 해. AI가 높을 수록 봉제 인형의 가격이 높아 질 거야.
When she appears on the Right Hall (CAM 02) camera, buy the Mangle plush on the Prize Counter (CAM 07) to avoid his attack. The higher his AI is, the more expensive the plush will be.
나이트메어 맹글에게 점프스케어 당하면 괴상한 기계음이 난다.
2.4.13. Nightmarionne(나이트마리오네)O[편집]

"Let's taste death again, and again, and again."
"죽음을 맛보고, 맛보고, 또 맛보라."
"I am the fearful reflection of what you have created."
"난 네가 만들어낸 존재의 공포스러운 상이다."
"The nightmare is just beginning."
"악몽은 이제 시작되고 있다."
"This is a nightmare that you won't wake from."
"이것은 네가 절대 깨어나지 못할 악몽이다."
"This time, death cannot save you."
"이번에는, 죽음마저 널 구할 수 없어."
대사
녀석은 항상 사무실에 있을 거야. 마우스 커서 위에 있으면 녀석이 점점 나타날 거야. 완전히 나타나면 넌 죽을 거야.
It stays in the office. If your mouse cursor is over it, it will begin to appear. If it fully appears, you die.
성우는 Aleks Le(알랙스 르). 원작 UCN에서 모든 유튜버들을 당황하게 만들었던 그 애니매트로닉스. 이번 작에서도 끈질기게 나온다.
2.4.13.1. NightMarionne 스킨[편집]


1번째 스킨은 Windowsrionne라는 이름의 스킨이다. 거부된 커스텀 나이트 2에서 나오는 무지개[22] 같은 나이트마리오네다. 상점에서 1000 파즈 코인으로 구매할 수 있다.
2번째 스킨은 Enderman(엔더맨)이라는 이름의 스킨이다. 마인크래프트의 그 엔더맨이다.
3번째 스킨은 Nightmare Gumball Swivelhands(나이트메어 검볼 스위블핸즈)라는 이름의 스킨이다.
4번째 스킨은 The Snatcher(더 스내쳐)라는 이름의 스킨이다.
2.4.14. Nightmare BB(나이트메어 BB)O[편집]

"Come closer... help me count my teeth!"
"가까이 와... 내 이빨을 세는 걸 도와줘!"
"You knew I'd get you eventually."
"내가 결국 널 잡게 될 걸 넌 알고 있었잖아."
"There just isn't room in here for both of us..."
"여기는 우리 둘 다 있기는 너무 좁아..."
"Flash that light all you want! It can't save you now!"
"원하는 대로 계속 빛을 비춰 보시지! 이젠 그것도 널 구할 수 없을 테니까!"
"Hehehehe, you're not so big! Just a bite-sized morsel!"
"헤헤헤헤, 그리 크지도 않구나! 딱 한입크기의 간식거리잖아!"[23]
그가 너의 사무실 앞에 쓰러져있을 때 그에게 손전등을 비추지 마. 하지만, 그가 일어서있을 때 넌 손전등을 사용해서 그를 다시 앉혀야 돼. 그가 서있을 때 카메라를 올리거나 그가 앉아있을 때 손전등을 비추면 그는 널 죽여버릴 거야.
When he is slumped over in your office, do not shine your flashlight on him. When he is standing up however, you must use your flashlight to reset him. If you pull up the monitor while he is standing up, or shine your light on him when he's slumped over, he will kill you.
FNaF 4 할로윈 에디션의 벌룬 보이. 마찬가지로 앉아있을 때 손전등을 비추면 황천길로 간다.
2.4.15. Pumpkin Squad(호박 스쿼드)X[편집]

카메라를 내릴 때마다 호박 스쿼드 중 하나가 책상 아래에 나타나있을 거야. 에어컨을 켜서 천천히 사라지게 해야 돼. 4개가 모두 책상 밑에 모이면 너에게 점프스케어하고 온도를 높힐 거야.
Every time you put down the monitor, one of them will appear under your desk. Turn on the Power A/C to make them slowly disappear. If all 4 gather under your desk, they will jumpscare you and cause the temperature to rise drastically.
FNaF 1~4까지 할로윈 에디션에서 등장했던 호박들이다.
2.4.16. Bite Victim(물림 피해자)O[편집]

그는 A 파티 방 (캠 07) 카메라에 머물고 있고, 그를 보지 않을 때마다 점점 그는 울 거야. 결국, 그의 눈물은 너의 사무실에 흘릴 거고, 그 다음에 프레디 파즈베어 마스크를 쓰면 결국 널 스프링락 슈트로 죽일 거야.
He will stay on the Party Room A (CAM 07) camera, crying more and more whenever you're not looking at him. Eventually, his tears end up in your office and will springlock and kill you the next time you put on the Freddy Fazbear Mask.
FNaF 4의 주인공이다. 사실 정식으로 알려진 이름이 없지만, 흔히 팬덤에서 이 아이가 83년도 물림 사건의 피해자이기에 "Bite Victim(물림 피해자)"라고 부르던 것에서 가져온 듯 하다.[24]
2.4.16.1. Bite Victim 스킨[편집]

1번째 스킨은 Happy Birthday(생일 축하해)라는 이름의 스킨이다.[25] 리틀 트롤드 원에서 나온다.
2.4.17. Another Day Fredbear(또 다른 날의 프레드베어)O[편집]

그는 입구 카메라에 있을 거야. 또한 3층 주변 파즈코인 자리에도 피자가 등장할 거야. 피자를 수집하다 보면 또 다른 날 프레드베어를 먹이게 될 거야. 오전 2시 전까지 충분히 먹여야 살아남을 수 있어. 그는 배가 고프지 않으면 떠날 거야.
He will stay on the Entrance camera. Additionally, Pizza will appear in the place of Faz-Coins around Floor 3. Collecting the pizza will feed Another Day Fredbear. You must feed him enough times before 2AM to survive. He will leave once he's not hungry.
FNaF 4의 미니게임에 등장한 프레드베어. 4편의 주인공의 머리를 물었던 바로 그 애니매트로닉스이다. 이름은 프레드베어 봉제 인형이 주인공에게 자주 말하던 "Tomorrow is Another Day(내일은 또 다른 날이 될 거야)"라는 대사에서 가져온 것으로 보인다.
2.4.18. Fredbear Person(프레드베어 사람)X[편집]

아주 강한 블룸 효과가 화면에 적용될 거야.
An overly strong bloom effect will be applied on the screen.
1일밤 클리어 후 미니게임에 등장하는 사람이 들어가있는 프레드베어다.
2.4.19. Fredbear Flower(프레드베어 꽃)X[편집]

최근에 카메라를 다시 전환했다면, 그가 나타날 거고 알갱이를 쏠 거야. 알갱이에 마우스 커서를 갖다대면 하나 당 산소가 소모되고 전기 1%를 빼앗아 갈 거야.[26]
When switching back to a camera you were on recently, he may appear and shoot out pellets. Touching one will drain your oxygen and take away 1% power.
FNaF 4의 미니게임에서 프레드베어 봉제 인형이 주인공을 따라다닐때 꽃에 얼굴이 달린 모습으로 나타났던 것에서 가져왔다. 알갱이를 쏜다는 것과 꽃이라는 점에서 눈치챘겠지만, 플라위의 패러디이다.
2.4.19.1. Fredbear Flower 스킨[편집]

첫번째 스킨은 OMC Fredbear Flower(OMC 프레드베어 꽃)라는 이름의 스킨이다.
2.4.20. The Protagonist(주인공)X[편집]

네가 저소음 환기를 자주 사용하지 않으면 손전등을 깜빡이거나 왼쪽 문 또는 오른쪽 문을 여닫을 거야.
They will flash the office flashlight as well as close the Left Door and Right Door if the Silent Ventilation is used too infrequently.
FNaF 4의 주인공. 아이콘은 FNaF 4의 침실이다. 위에 언급된 Bite Victim과 따로 분리된 이유는 FNaF 4의 주인공(플레이어) 캐릭터가 두 명이라는 가설에서 가져온 것으로 보인다.
2.4.21. Cheatmares(치트메어)O[편집]

그들 모두 배관 시스템의 집 맵을 시스템의 문 버튼과 손전등 버튼을 사용해서 그들에게 겁을 줘야 해. 그들 중 누구라도 침실에 들어가면 넌 결코 죽은 목숨이겠지.
보니 : 보니는 왼쪽 복도로 너에게 접근할 거야. 그를 돌려보내려면 문을 닫아야 해.
치카 : 치카는 오른쪽 복도로 너에게 접근할 거야. 그녀를 돌려보내려면 문을 닫아야 해.
폭시 : 폭시는 양쪽 복도로 너에게 접근할 거야. 그를 돌려보내려면 문을 닫아야 해.
프레드베어 : 프레드베어는 옷장 또는 침대로 너에게 접근할 거야. 그를 돌려보내려면 그의 방향으로 손전등을 비춰야 해.
All of them will go through the side house map on the Duct System. Use the door buttons and flashlight button on the system to scare them off. If any of them enter the bedroom, you're dead.
Bonnie: Bonnie will go through the left hallway. Close the door on him to make him retreat.
Chica: Chica will go through the right hallway. Close the door on her to make her retreat.
Foxy: Foxy can go through either hallway. Close the door on him to make him retreat.
Fredbear: Fredbear can appear in the closet or on the bed. Point the flashlight in his direction to make him leave.
FNaF 4의 할로윈 에디션에서 치트를 사용할시 애니매트로닉스들의 위치를 알려주던 아이콘. 프레디는 아이콘이 없어서 프레드베어가 대신 맡는 듯. 어째서인지, 폭시는 문으로 막아야 죽지 않는다.[27]
2.4.22. Protomare Foxy(프로토메어 폭시)X[편집]

그는 때때로 플라스틱 공이 튀는 소리와 함께 너의 앞쪽 환풍구를 통해 굴러갈 거야. 그를 클릭해서 다른 방향으로 구르게 해. 그가 들어가면 밤 새 앞쪽 환풍구를 닫지 못하게 할 거야.
He will sometimes roll through the vent opening in front of you, with a sound of a plastic ball bouncing. Quickly click him to make him roll the other direction. If he gets in, he will prevent you from closing the Front Vent Door for the rest of the night.
FNaF 4의 기타 창에서 나오는 나이트메어 폭시를 만드는 과정의 첫번째 단계에서 볼 수 있는 모습이다.
2.4.22.1. Protomare Foxy 스킨[편집]

1번째 스킨은 Mimic Ball(흉내내기 구체)이라는 이름의 스킨이다. 게임 속 캐릭터 스킨을 장난으로 만든 것이라고 한다.
2.4.23. Protomare Fredbear(프로토메어 프레드베어)O[편집]

프로토메어 프레드베어는 배관 시스템의 집 맵을 통해서 너에게 접근하지만 문이나 손전등이 고장나서 작동하지 않을 거야. 그가 집의 맵 화면에 있을 때 사무실의 실제 문을 닫고 옷장에 있을 때는 손전등을 비춰야 돼.
Protomare Fredbear goes through the Duct System's House Map, but doors or flashlight on it won't work. You must close the actual doors in your office when he's at them on the House Map and shine your Flashlight in front of you when he's in the closet.
FNaF 4 기타 창에서 나오는 나이트메어 프레드베어를 만드는 과정의 첫번째 단계에서 볼 수 있는 모습이다.
2.5. FNaF World[편집]
2.5.1. Adventure Freddy(어드벤처 프레디)X[편집]

왼쪽 또는 오른쪽 문이 닫혀있고 다른 문이 열려있으면 열린 문으로 피자를 굴릴 거야. 다른 문에 도착하면 즉시 열릴 거야. 피자를 클릭해서 그를 막아.
If either the left or right door is closed and the other one is open, he will send a pizza rolling through the open door. If it hits the other door, it will instantly open it. You can click the pizza to stop it.
FNaF World에 등장한 프레디이다. 메커니즘은 원작의 어드벤처 프레디의 기술인 피자 바퀴(Pizza Wheel)에서 가져왔다.
2.5.2. Adventure Bonnie(어드벤처 보니)X[편집]

그는 밤이 시작되면 사무실에 있을 거야. 그가 너의 사무실에 있을 때 그는 그의 기타로 강타 연주를 할 거야. 소음 수치가 올라가지는 않지만, 소리가 상당히 커서 너는 소리에 귀기울이지 못할 거야. AI가 높을 수록 사무실에 더 오래 머물고 있을 거야. 그를 피할 방법은 없어.
He will stay in your office at the beginning of the night. When he is in your office, he will play Bash Jam on his guitar. While it will not raise the noise meter, it can distract you as the guitar is pretty loud. The higher his AI, the longer he'll stay. There is no way to avoid him.
FNaF World에 등장하는 보니다. 메커니즘은 원작의 어드벤처 보니의 기술인 강타 연주(Bash Jam)에서 가져왔다. 사운드 플레이를 굉장히 방해하는 애니매트로닉스이기도 하다.트로피 룸에서도 한 미니게임에 주인공으로 나온다.
2.5.2.1. Adventure Bonnie 스킨[편집]


1번째 스킨은 FIGHT! Bonnie(파이트! 보니)라는 이름의 스킨이다.
2번째 스킨은 The Awoglet(오글렛)이라는 이름의 스킨이다.
3번째 스킨은 Maxwell(맥스웰)이라는 이름의 스킨이다. 맥스웰 밈에서 따온 고양이의 모습을 하고 있다.
2.5.3. Adventure Chica(어드벤처 치카)O[편집]

컵케이크가 화면 상단에서부터 내려올 거야. 그걸 사라지게 하려면 너는 마우스 커서를 갖다 대야하지. 컵케이크가 화면 하단까지 다다르면 그녀는 널 죽일 거야.
Cupcakes will come down from the top of the screen. You must mouse over them to make them disappear. If a cupcake hits the bottom of the screen, she will jumpscare you.
FNaF World에 등장하는 치카다. 메커니즘은 원작의 어드벤처 치카의 기술인 컵케이크(Cupcake)에서 가져왔다.
2.5.4. Adventure Foxy(어드벤처 폭시)X[편집]

그는 엘 칩과 행동패턴이 매우 비슷해. 그는 폭시 파이터즈라고 불리는 자신의 새 항공사를 광고하려고 왔어. SKIP 버튼 또는 엔터를 눌러서 광고를 닫아야 돼.
He works very similar to El Chip. He is just here to advertise his new airline called Foxy Fighters, you must close the ad by pressing the skip button or the ENTER key.
FNaF World에 등장하는 폭시다. 자신만의 항공사를 광고하려고 여기있다고 한다. 참고로 폭시 파이터즈는 원작에 등장한 미니게임의 제목이기도 하다.
2.5.5. Adventure Toy Bonnie(어드벤처 토이 보니)O[편집]

그는 오른쪽 환기구 카메라(2층 CAM 05 Right Air Vent)에 무작위로 나타날 거야. 프레디 가면을 써서 그를 떠나게 해. 아니면 그는 너에게 점프스케어를 할 거야.
He will randomly appear on the Right Air Vent (CAM 05) camera. Put on your Freddy Fazbear Mask to make him go away, otherwise he will eventually jumpscare you.
FNaF World에 등장하는 토이 보니이다.
2.5.6. Adventure Toy Chica(어드벤처 토이 치카)O[편집]

그녀는 오른쪽 환기구 카메라(2층 CAM 06 Left Air Vent)에 무작위로 나타날 거야. 프레디 가면을 써서 그녀를 떠나게 해. 아니면 그녀는 너에게 점프스케어를 할 거야.
She will randomly appear in the Left Air Vent (CAM 06) camera. Put on your Freddy Fazbear Mask to make her go away, or else she will eventually jumpscare you.
FNaF World에 등장하는 토이 치카이다.
2.5.7. Adventure Toy Freddy(어드벤처 토이 프레디)O[편집]

그는 온라인 모드가 있는 FNaF World의 업데이트 4를 플레이 할 거야. 인터넷 측정기를 높은 상태로 유지 해야 해. 인터넷 측정기가 너무 낮으면 그는 매우 화를 내고 너에게 점프스케어를 할 거야. 더 많은 전력을 사용 하면 인터넷은 더 빨리 소모 될 거야.
He will be playing FNaF World's Update 4, which has an online mode. You must keep the internet meter wound. If the you let the internet meter unwound, then he will get very angry and jumpscare you. The more power you use, the more the internet drains.
FNaF World에 등장하는 토이 프레디이다. 메커니즘은 원본인 토이 프레디의 게이머 콘셉트를 그대로 가져온듯.
2.5.8. Adventure Mangle(어드벤처 맹글)X[편집]

그녀는 몇 초마다 뻥뻥탄을 발사해서 폭발과 동시에 화면 흔들림을 일으킬 거야.
She will send down Poppers every couple of seconds which will cause explosions and screen-shake.
FNaF World에 등장하는 맹글이다. 메커니즘은 원작의 어드벤처 맹글의 기술인 뻥뻥(Poppers)에서 가져왔다. 막을 방법이 없어 여러모로 귀찮은 녀석.
2.5.9. Adventure Balloon Boy(어드벤처 벌룬 보이)X[편집]

그는 때때로 오른쪽 환풍구에 나타날 거야. 그가 거기 있을때 오른쪽 환풍구 문을 닫고 그가 사라졌다는 소리가 날 때 까지 기다려. 그가 너의 사무실 안으로 들어가면 그는 웃을 것이고 그가 떠날 때 까지 환풍구 덫을 비활성화 시킬 거야.
He will sometimes appear in the right vent. Close the right vent when he is there and wait until you hear a thud, indicating that he is gone. If he slips in, he will laugh and disable the Vent Snare until he leaves.
FNaF World에 등장하는 벌룬 보이다. 맹글, 나이트메어 폭시같이 문에 안 막히는 애니매트로닉스가 도착하기 직전이라면 꽤 위험한 애니매트로닉스다.
2.5.10. Adventure JJ(어드벤처 JJ)X[편집]

그녀가 오른쪽 환풍구에 나타나면 닫아. 그녀가 너의 사무실에 들어가면 떠날 때 까지 웃고 배관 시스템의 오디오 루어를 비활성화 시킬 거야.
When she appears in the right vent, close it. If she gets in, she will laugh and disable your Audio Lure in the Duct System until she leaves.
FNaF World에 등장하는 JJ(벌룬 걸)이다. 엔도01과 해피 프록이 있다면 굉장히 위험한 애니매트로닉스다.
2.5.11. Adventure Phantom Freddy(어드벤처 팬텀 프레디)X[편집]

그는 네가 어떤 모드를 사용하던 간에 너의 사무실에서 천천히 나타날 거야. 그가 완전히 나타나면 널 깜짝 놀래킬 거야. 그를 사라지게 하려면 모두 끄기를 사용해.
He will slowly form in your office when you are using any mode and will jumpscare you if he fully forms. Turn on All OFF mode to force him to disappear.
FNaF World에 등장하는 팬텀 프레디이다. 중요한 발전기를 못 키게 하는 위험한 애니매트로닉스다.
2.5.12. Adventure Phantom Chica(어드벤처 팬텀 치카)X[편집]

그녀는 카메라에 보이지 않고 4층을 돌아다닐 거야. 그녀는 자신이 있는 카메라 캠 버튼을 녹색으로 바꿔버릴 거야. 그녀를 보고 있으면 그녀는 사라질 거야. 그녀가 엘리베이터에 도착하면 널 깜짝놀라게 하고 모든 시스템을 고장나게 해서 네가 시스템을 고치도록 강요할 거야.
She will walk around Floor 4, invisible to the cameras. She changes the cam button hue to green on the camera she is at. Staring at her will make her go away. If she gets to the elevator, she'll jumpscare you and make all the systems fail, forcing you to fix them.
FNaF World에 등장하는 팬텀 치카이다. 봐줘야 사라지는 놈이라 고생할만한 애니매트로닉스. 게다가 모든 시스템 까지 고장낸다.
2.5.13. Adventure Phantom BB(어드벤처 팬텀 BB)O[편집]

독성 풍선이 때때로 화면 하단에서부터 올라와 상단으로 올라갈 거야. 그걸 없애려면 그걸 클릭해. 화면 상단에 도착하면 환기구 오류가 발생하고 독성 수치가 25% 오를 거야.
A Toxic Balloon will occasionally come up from the bottom of the screen and move up. Spam-click it to pop it. If it gets to the top of the screen, a ventilation error will occur and your Toxic Meter will rise by 25%.
FNaF World에 등장하는 팬텀 벌룬 보이다. 메커니즘은 원작의 어드벤처 팬텀 BB의 기술인 독성 풍선(Toxic Balloon)에서 가져왔다. 유일하게 플레이어를 죽일 수 있는 팬텀 애니매트로닉스이기도 하다.
2.5.14. Adventure Phantom Foxy(어드벤처 팬텀 폭시)X[편집]

그는 네가 캠 시스템을 보는 동안 너의 사무실에 무작위로 나올 거야. 너는 그에게 손전등을 비춰야 할 거야. 그렇지 않으면 그가 너에게 점프스케어라는 최고의 선물을 해주겠지. 그리고 너의 시야가 고정 될 거야.
He will randomly appear in your office while you are looking at the Cam System. Shine your flashlight on him or else he will do a Jumpscare attack on you and lock you from looking around the office.
FNaF World에 등장하는 팬텀 폭시다. 사무실 시야가 고정된다는 꽤 위험한 메커니즘이다.
2.5.14.1. Adventure Phantom Foxy 스킨[편집]

1번째 스킨은 Untangle(언탱글)이라는 이름의 스킨이다. 탱글이라는 캐릭터를 어드벤처 버전으로 만들었다. 장난으로 만든 캐릭터라고 한다.
2.5.15. Adventure Phantom Mangle(어드벤처 팬텀 맹글)X[편집]

그는 앞쪽 환풍구에서 피자 바퀴 2를 날릴 거야. 피자가 닫힌 문에 부딪히면 몇 초동안 피자 바퀴 2가 비활성화 될 거야. 그녀가 사무실에 들어가면 너의 얼굴을 치고 시야를 가릴 거야. 레버를 사용해서 그를 사라지게 해.
He'll throw a Pizza Wheel 2 from the front vent. If the pizza hits a closed door, it will disable it for a few seconds. If it gets into the office, it'll hit you in the face and cover your view. Use the lever to make it disappear.
FNaF World에 등장하는 팬텀 맹글이다. 메커니즘은 원작의 어드벤처 팬텀 맹글의 기술인 피자 바퀴 2(Pizza Wheel 2)에서 가져왔다. 시야를 가리고 있어서 레버가 꽤 찾기 어려울 수도 있다.
2.5.16. Adventure Withered Bonnie(어드벤처 구형 보니)X[편집]

그는 3층에 머물고 있고, 몇 초마다 3층 곳곳을 돌아다닐 거야. 눈에서 빔의 충전을 지연시키기 위해 그를 지켜봐. 그가 눈에서 빔을 성공적으로 충전하면 넌 결국 15%의 전기를 잃어버릴 거야.
He stays on Floor 3 and will change the camera he's at every couple seconds. Watch him to delay the charge of his Eye Beam. If he successfully charges Eye Beam, you will lose 15% power.
FNaF World에 등장하는 구형 보니다. 메커니즘은 원작의 어드벤처 구형 보니의 기술인 눈에서 빔(Eye Beam)에서 가져왔다. 전기를 15%나 뺏어가는 악질 애니매트로닉스다.
2.5.17. Adventure Withered Chica(어드벤처 구형 치카)O[편집]

밤이 시작될 때 책상에 핫도그가 나타나 있을 거야. 클릭해서 선택한 다음, 너의 사무실 아무 곳이나 클릭해서 클릭한 위치에 핫도그를 놓을 수 있어. 어드벤처 구형 치카는 그걸 먹으려고 할 거고, 그녀가 핫도그를 먹는다면 그녀는 너를 죽일 거야. 그녀가 핫도그를 얻지 못하게 계속 움직여줘야 돼. 히터를 사용하면 그녀는 움직임을 멈출 거야.
A hotdog will appear on your desk at the start of the night. You can click it to select it, then click somewhere else in the office to place it where you clicked. Adventure Withered Chica will try to get to it, and if she does she will kill you. Keep moving the hotdog to ensure she never gets it. The Heater stops her from moving.
FNaF World에 등장하는 구형 치카다. 잭 오 보니나 잭 오 치카가 있다면 굉장히 짜증나는 존재다.
2.5.18. Adventure Withered Freddy(어드벤처 구형 프레디)X[편집]

소음 수치가 너무 오랫동안 하나도 오르지 않는다면 그는 사무실에 나타나서 노래를 시작할 거야. 그가 떠날 때까지 카메라를 내리고 있어야할 거야. 그러지 않으면, 그가 더 크게 노래를 불러서 넌 아무 소리도 못 듣겠지.
When the Noise Meter is 0 for too long, he will appear in the office and start singing. You must keep the monitor off until he leaves, otherwise he will sing louder, which will make you temporarily deaf.
FNaF World에 등장하는 구형 프레디다. 메커니즘은 원작에서 노래를 부르는듯한 모션에서 가져온 듯 한데, 어드벤처 보니보다도 굉장히 시끄럽다.
2.5.19. Adventure Withered Foxy(어드벤처 구형 폭시)O[편집]

그가 2층 부품과 서비스(캠 04)에 나타나면 카메라의 조명을 지속적으로 깜빡이면 사라질 거야. 그가 너무 오랫동안 부품과 서비스에 있으면 널 죽일 거야.
When he appears on the Floor 2 Parts/Service (CAM 04) camera, constantly flash on and off the Flashlight on the cameras like a strobe light to make him leave. Waiting too long will cause a jumpscare.
FNaF World에 등장하는 구형 폭시다.
2.5.20. Adventure Shadow Freddy(어드벤처 섀도우 프레디)X[편집]

가끔 ESC 키 효과가 매시간마다 일어날 거야. 시스템이 고장나면 시스템 중 하나 이상의 오류를 고쳐야 해.
Escape Key will go off in the office halfway through every hour. When it does, at least one of the systems will error out, forcing you to fix them.
FNaF World에 등장하는 섀도우 프레디다. 시야를 가려서 귀찮을 수 있다.
메커니즘은 FNaF World에서에 섀도우 프레디가 사용하는 ESC Key[28] 라는 스킬에서 따왔다.
2.5.21. Adventure Puppet(어드벤처 퍼펫)X[편집]

경품 공이 화면 상단에서부터 떨어질 거야. 하단에 도착하면 카메라, 시스템, 모드, 온도, 전기 양을 무작위로 지정하고 다시 상단으로 이동할 거야. 글로벌 뮤직 박스를 사용하면 그걸 막을 수 있을 거야.
A Prize Ball will fall down from the top of the screen. If it gets to the bottom, it will randomize which camera, floor, system, mode, temperature and power percentage you're on and will move to the top again. Use the Global Music Box to make it fly up.
FNaF World에 등장하는 퍼펫이다. 메커니즘은 원작의 어드벤처 퍼펫의 기술인 경품 공 2(Prize Ball 2)에서 가져왔다. 막는 법은 간단하지만, 못 막았을 때의 리스크가 어지러운 편이다.
2.5.22. Adventure Phantom Puppet(어드벤처 팬텀 퍼펫)X[편집]

오른쪽 문을 통해서 그가 얼굴을 내밀고 있을 거야. 그리고 그를 없애려면 글로벌 뮤직 박스를 사용해야 돼. 그가 떠나지 않으면 그는 너에게 가짜 점프스케어를 할 거야.
His face can appear peeking out from the right doorway. When this happens, activate the Global Music Box to make him leave, or he'll non-lethally jumpscare you.
FNaF World에 등장하는 팬텀 퍼펫이다.
2.5.23. Adventure Golden Freddy(어드벤처 골든 프레디)X[편집]

층을 바꿀 때마다 프레디 파즈베어, 보니와 노란 곰의 환각으로 알 수 있듯이 사무실에 그가 나타날 가능성이 있을 거야. 넌 프레디 파즈베어 마스크를 써서 그를 떠나게 할 수 있고, 환각을 멈출 수 있을 거야.
When switching floors, there is a chance of him appearing in your office, indicated by hallucinations of Freddy Fazbear, Bonnie and Yellow Bear. Put on your Freddy Fazbear Mask to make him leave and make the hallucinations stop.
FNaF World에 등장하는 골든 프레디다. 카메라를 내릴 수 밖에 없게하는 애니매트로닉스 중 하나다.
2.5.24. Adventure PaperPals(어드벤처 종이 친구들)X[편집]

응?
Huh?
FNaF World에 등장하는 종이 친구들이다. 공략 설명문은 원작에서 그대로 가져온 '응?' 이지만 막는 방법이 없는 것 뿐이고, 설명은 밤에 한번 쓰레기와 갱단처럼 가짜 점프스케어를 한다.
2.5.25. Adventure Nightmare Freddy(어드벤처 나이트메어 프레디)O[편집]

가끔씩 여러 마리의 프레들즈가 화면 오른쪽에서 왼쪽으로 달려갈 거야. 살고 싶다면 그들을 모두 클릭하는 게 좋을 거야.
Every once in a while, several Freddles will fly through the screen, from the right to the left. Click on every single one of them to survive.
FNaF World에 등장한 나이트메어 프레디다. 생각보다 프레들이 많아서 모두 누르기 힘들다.
2.5.26. Adventure Nightmare Bonnie(어드벤처 나이트메어 보니)X[편집]

그는 Lumber Co. 카메라에 비를 내리게 할 거야. 커서가 비에 맞으면 일시적으로 문이 약해질 거야. 약해진 문은 닫히고 몇 초후에 저절로 열릴 거야.
He will cause rain to appear on the Lumber Co. camera. If your cursor gets hit by the rain, it temporarily weakens your doors. Weakened doors will open by themselves after a few seconds of being closed.
FNaF World에 등장한 나이트메어 보니다.
2.5.27. Adventure Nightmare Chica(어드벤처 나이트메어 치카)O[편집]

상한 피자 공격 버튼은 카메라의 시스템 버튼 중 하나를 가릴 거야. 버튼은 5초마다 위치를 이동할 거야. 만약 버튼을 클릭하면 독성 수치가 많이 채워질 거야.
A Bad Pizza attack button will cover one of the System buttons on the monitor. The button moves position every 5 seconds. Clicking the button will cause a huge chunk of your Toxic Meter to fill up.
FNaF World의 나이트메어 치카다. 메커니즘은 원작의 어드벤처 나이트메어 치카의 기술인 상한 피자(Bad Pizza)에서 가져왔다.
2.5.28. Adventure Nightmare Foxy(어드벤처 나이트메어 폭시)O[편집]

때때로 바닥에 뜨거운 치즈가 넘쳐나고 온도가 올라갈 거야. 뜨거운 치즈를 제거하려면 에어컨을 키고 레버를 몇 번 작동시키면 될 거야. 치즈가 너무 오래 남아있다면 그는 널 죽일 거야.
The floor will sometimes flood with Hot Cheese, and the temperature will rise. To get rid of the Hot Cheese, turn on the Power AC and flip the lever a few times. He will kill you if the cheese stays for too long.
FNaF World에 등장하는 나이트메어 폭시다. 메커니즘은 원작의 어드벤처 나이트메어 폭시의 기술인 뜨거운 치즈 2(Hot Cheese 2)에서 가져왔다.
2.5.29. Adventure Endo01(어드벤처 엔도01)O[편집]

밤이 시작될 때 엔도 군대는 환풍구 시스템에서 스폰되며 각각 다른 경로를 거쳐서 올 거야. 그들은 문을 닫아도 리셋되지 않고 카메라가 내려져있어도 공격할 수 있어. 이것을 막으려면 환풍구 덫을 사용해야 해. 그들은 하루에 딱 한 번만 공격을 시도할 거야.
At the start of the night the Endo Army will spawn in the Vent System, each one going through a different path. They are not reset by the door and can attack even if the cameras are down. You must use the Vent Snare to block them. They will only attack once.
FNaF World에 등장하는 엔도01이다. 메커니즘은 원작의 어드벤처 엔도의 기술인 엔도 군대(Endo Army)에서 가져왔다. 여담으로 어드벤처 엔도01과 캔디 커뎃은 원작인 UCN에 등장할 예정이였으나, 결국 명단에서 지워졌다.[29] 그래도 여전히 게임에 나올 거라고는 했지만, 캔디 커뎃은 배경성 애니매트로닉스로라도 나왔지 결국 어드벤처 엔도01은 나오지 않았다고...[30]
2.5.30. Adventure Endo02(어드벤처 엔도02)O[편집]
그는 환풍구 시스템을 통해서 너에게 접근할 거야. 그의 양쪽에는 화살표가 있을 거야. 노란색 화살표가 오른쪽으로 표시 돼있으면 앞으로 가고 있다는 거야.. 그럼 또한, 노란색 화살표가 왼쪽으로 표시 돼있으면 뒤로 가고 있다는 거겠지. 하지만 왼쪽으로 해뒀다고 너무 무시하지는 않는 게 좋을 거야. 그는 다시 앞으로 가려고 할 거거든.
He will go through the Vent System. On both sides of him are arrows, one highlighted in yellow. Click him to toggle the highlighted arrow. If it's right, he goes forward. If it's left, he goes backwards. He will eventually correct himself.
FNaF World에 등장한 엔도02다.
2.5.31. Adventure Plushtrap(어드벤처 플러시트랩)O[편집]

그는 손전등 시스템에서 비활성화된 상태를 유지하고 있어. 밤 동안 딱 한 번, 그는 숨바꼭질 게임을 시작한 다음에 활성화 될 거야. 그가 널 죽이기 전에 무작위 층의 무작위 카메라에서 그를 찾아야 해.
He will stay deactivated on the Light System. Once per night, he will activate and begin a game of Hide and Seek. You must find him at a random camera on a random floor before he kills you.
FNaF World에 등장하는 플러시트랩이다.
2.5.32. Endoplush(엔도플러시)X[편집]

시간이 갈 때마다, 그는 커서가 있던 곳에 수직으로 물줄기 2로 공격할 거야. 마우스로 그것을 터치하면 넌 파즈 코인을 잃어버릴 거야.
Everytime the hour changes, he will use his Waterhose 2 attack on the vertical axis of where your cursor was when the hour changed. If your mouse touches it, you will lose all your Faz-Coins.
FNaF World에 등장하는 플러시트랩의 엔도스켈레톤이다.
2.5.32.1. Endoplush 스킨[편집]

1번째 스킨은 Guardian(가디언)이라는 이름의 스킨이다. 마인크래프트의 그 가디언이다.
2.5.33. Adventure Springtrap(어드벤처 스프링트랩)X[편집]

그는 너의 사무실을 돌아다닐 거야. 그에게 손전등을 비추면 도망칠 거고 손전등이 그의 근처에 없으면 그는 멈출 거야. 그가 한 자리에 너무 오래 머물고 있으면 환기구 오류를 발생시키고 너의 전기 5%를 빼앗아 갈 거야.
He will run around the office. He will run away from the flashlight and will eventually stop if the flashlight isn't near him. If he stays in one spot for too long, he will cause a ventilation error and take 5% power.
FNaF World에 등장하는 스프링트랩이다.
2.5.34. Adventure RWQFSASXC(어드벤처 섀도우 보니)X[편집]
오전 5시에 화면 상단에 텍스트 상자가 나타날 거야. 그걸 클릭하고 "RWQFSFASXC"를 입력한 다음에 시간이 가기 전에 ENTER 키를 눌러야 해. 제 시간 안에 하지 않으면 밤새도록 카메라가 잠기고 그 후에 환기구 오류가 발생시켜 네가 사망할 가능성을 높일 거야.
At exactly 5AM, a textbox will appear at the top of the screen. Click it, type "RWQFSFASXC" then press ENTER before time runs out. If you don't do it in time, you will be locked out of the monitor for the rest of the night, and since the ventilation will go out after your monitor gets locked, it will most likely result in death.
FNaF World에 등장하는 RWQFSFASXC(섀도우 보니)다.
2.5.35. Adventure Crying Child(어드벤처 우는 아이)X[편집]

녀석이 책상에 나타나면 책상을 클릭 해. 녀석이 책상 위에 있을 때 카메라를 계속 올리면 강제로 프레디 파즈베어 마스크를 착용시켜서 카메라를 보지 못하게 할 거야.
When it appears on your desk, click it to knock it over. If you pull up the monitor with it still on your desk, you will be forced to wear the Freddy Fazbear Mask for a few seconds, preventing you from looking at the cameras.
FNaF World에 등장하는 우는 아이(영혼)이다.
2.5.36. Adventure Funtime Foxy(어드벤처 펀타임 폭시)O[편집]

그녀는 소리 미끼, 히터에 면역인 상태로 배관 시스템을 통해서 너에게 갈 거야. 그녀는 출구에 다 다랐을 때 볼 수 있을 거야. 그녀는 정확히 오전 2시, 오전 4시, 오전 6시에 왼쪽 배관으로 공격할 거야. 그녀에게 죽기 싫다면 왼쪽 배관을 닫아두는 게 좋을 거야.
She goes through the Duct System, immune to the Audio Lure or the Heater. She will only be visible when she's at the exit. She'll attack from the left side at exactly 2AM, 4AM and 6AM. Have the left duct shut to avoid her jumpscare.
FNaF World에 등장하는 펀타임 폭시다.
2.5.36.1. Adventure Funtime Foxy 스킨[편집]

1번째 스킨은 Wireframe Adventure Funtime Foxy(와이어프레임 어드벤처 펀타임 폭시)라는 이름의 스킨이다. 장난으로 만든 캐릭터라고 한다. 상점에서 1000 파즈 코인으로 구매 할 수 있다.
2.5.37. Adventure Nightmare Fredbear(어드벤처 나이트메어 프레드베어)O[편집]

그의 웃음 소리가 들리면 네온 방벽을 왼쪽 배관에 둬서 죽음을 피해.
When you hear his laugh, move the Neon Wall to the left duct to avoid his jumpscare.
FNaF World에 등장하는 나이트메어 프레드베어다.
2.5.38. Adventure Nightmare(어드벤처 나이트메어)O[편집]

그의 웃음 소리가 들리면 네온 방벽을 오른쪽 배관에 둬서 죽음을 피해.
When you hear his laugh, move the Neon Wall to the right duct to avoid his jumpscare.
FNaF World에 등장하는 나이트메어다.
2.5.39. Adventure Fredbear(어드벤처 프레드베어)O[편집]
"Holy crap!"
"세상에!"
"Holy crap! Is that my voice?! Voice acting?! Nooooooo!"
"세상에! 이게 내 목소리야?! 성우가 이렇다고?! 안돼애애애!"
"He's gone too far this time! You need to shut this game down!"
"그가 이번에는 너무 멀리 갔어! 당장 게임 꺼!"
"Do a barrel roll! Sorry, I'm not sure what came over me."
"배럴 롤 해 봐! 미안, 나에게 무슨 일이 벌어졌는지 모르겠어.."
대사
밤에 딱 한 번 그는 " Holy crap! "라고 말하는 동시에 사무실에 나타날 거야. 그가 나타나면, 넌 4개의 시계를 찾아야 할 거야. 캠 시스템에서 하나, 환풍구 시스템에서 하나, 배관 시스템에서 하나, 조명 시스템에 하나가 있을 거야. 너무 늦으면 그는 널 죽일 거야.
Once per night he will appear in the office along with saying "Holy crap!". When he does, you must find and click 4 clocks, one in the Cam System, one in the Vent System, one in the Duct System, and one in the Light System. Fail to do this fast enough and he will kill you.
FNaF World에 등장하는 가이드 NPC이자 프레드베어다. 여담으로 Holy Crap!은 원작에서 어드벤처 프레드베어의 대사이기도 하다. 또한 4개의 시계를 찾아내는 메커니즘은 원작에서의 시계 엔딩을 오마주한 것으로 보인다.
2.5.40. Adventure SpringBonnie(어드벤처 스프링보니)O[편집]

그녀는 항상 사무실에 머무르고 있을 거고, 파즈 코인을 계속 수집하면 화가 나서 끊임없이 몸을 떨 거야. 코를 클릭해서 그를 진정시켜. 그녀의 화가 가라앉지 않으면, 그는 화나서 널 죽이고 말 거야.
She stays in your office and get angrier when you collect Faz-Coins, visible by constant shaking. Click on her nose to calm him down. If she gets too angry, she will jumpscare you.
FNaF World에 등장하는 스프링 보니다. 성별이 모호한 애니매트로닉스답게 인칭대명사도 그녀와 그를 번갈아서 사용하고 있다.
2.5.40.1. Adventure Spring Bonnie 스킨[편집]


1번째 스킨은 CircusRama Real(서커스라머 리얼)이라는 이름의 스킨이다. 리틑 트롤드 원과 서커스라머에서 나온다.
2번째 스킨은 The Infamous Griefer Popbob(더 인퍼머스 그리퍼 팝밥)이라는 이름의 스킨이다. 마인크래프트와 트롤 페이스를 짬뽕한 거다.
2.5.41. Adventure Jack-O-Bonnie(어드벤처 잭 오 보니)O[편집]

잭 오 폭탄이 화면 상단에서 하단으로 떨어질 거야. 히터를 사용하면 잭 오 폭탄이 중앙에서 없어질 거야. 중앙을 지나면 10도 더 높아질 거야. 잭 오 폭탄으로 120도가 되면 죽을 거야.
A Jack-O-Bomb will fly down from the top of the screen. The Heater must be on when the attack reaches the center to block it. If it gets past the center, it will get 10° hotter. If this addition ends up in above 120°, you will die.
FNaF World 업데이트 2로 업데이트 된 캐릭터인 잭 오 보니다.
FNaF World 에서의 데미지는 상상을 초월한다.
2.5.42. Adventure Jack-O-Chica(어드벤처 잭 오 치카)O[편집]

온도가 60도 또는 120도를 너무 오래 유지해두면 오른쪽 환풍구를 통해서 널 죽이려 할 거야. 문을 닫아서 그녀가 공격하지 못하게 해.
She will attack from the right vent if your temperature is at 60 or 120 degrees for too long. Close the door to prevent her from killing you.
FNaF World 업데이트 2로 업데이트 된 캐릭터인 잭 오 치카다.
FNaF World 에서의 데미지는 상상을 초월한다.
2.5.43. Animdude(애님듀드)O[편집]

애님듀드는 두 가지 동작 중 하나의 동작을 정하고 조명 시스템에 하루종일 머무르고 있을 거야. 패턴마다 네가 해야할 일은 달라질 거야. 그가 책을 들고 있으면, 그건 그가 스토리를 쓰고 있다는 것을 의미하고 넌 소음 수치를 내려둬야 할 거야. 그가 노트북을 들고 있으면, 그가 게임을 만들고 있다는 것을 의미하고, 넌 인터넷 수치를 50% 이상으로 유지해야 할 거야. 이것들 중 하나를 실패한다면 그는 널 죽일 거야.
Animdude will be in the Light System for the entire night, holding one of two items. The item in question changes hourly. If he is holding a book, that means he is writing a story, and you need to keep the Noise Meter down. If he's holding a laptop, that means he is making a game, and you need to keep the internet bar above 50 percent. Failing to do either of these tasks will result in a jumpscare.
스콧 코슨을 상징하는 캐릭터이자 FNaF World의 하드 모드 최종 보스이며, 원작에서 플레이어블 캐릭터로도 등장한다. 메커니즘은 캐릭터의 원본인 스콧이 제작자임을 패러디한 것으로 보인다.
2.5.43.1. Animdude 스킨[편집]


1번째 스킨은 Sans(샌즈)라는 이름의 스킨이다. 언더테일에 나오는 그 샌즈다.
2번째 스킨은 Handsome Toy Freddy(잘생긴 토이 프레디)라는 이름의 스킨이다. 토이 프레디의 모험이라는 팬게임에 등장하는 우유를 먹고 뚱뚱해진(?) 토이 프레디다.
3번째 스킨은 The Seohlry(더 솔리)라는 이름의 스킨이다.
2.5.44. Chipper(치퍼)O[편집]

치퍼는 환풍구 시스템을 통해서 너에게 접근할 거야. 환풍구 덫을 사용해서 그가 너에게 도달하지 못하게 해. 그가 문에 도착하면, 그는 문이 열릴 때까지 문 앞에서 기다릴 거야. 카메라가 내려져있어도 널 공격할 수 있어. 문이 너무 오래 닫혀있으면 그는 문을 잘라내고 사무실에 들어갈 거야.
Chipper will go through the Vent System. Use the Vent Snare to prevent him from reaching you. If he gets to the door, he will wait until the door is open, and can attack even if the monitor is down. If the door is closed for too long, he will chop it down and get in.
스콧의 게임 중 하나인 Chipper & Sons Lumber Co.에 나오는 그 치퍼가 맞다. FNaF World에서도 등장한다.
2.5.45. Adventure Nightmare BB(어드벤처 나이트메어 BB)X[편집]

그는 풍선들 2를 사용해서 밤새 사무실의 시야를 차단할 거야. 풍선을 클릭해서 풍선을 터뜨릴 수 있어.
He will use Balloons 2 all night, blocking the office view with them. You can click the balloons to make them pop and disappear.
FNaF World 업데이트 2로 업데이트된 캐릭터인 나이트메어 BB다. 메커니즘은 원작의 어드벤처 나이트메어 BB의 기술인 풍선들 2(Balloons 2)에서 가져왔다.
2.5.46. Adventure Nightmarionne(어드벤처 나이트마리오네)O[편집]

녀석은 나이트마리오네와 똑같이 행동하지만, 사무실에 나오지 않고 카메라에서 나올 거야. 마우스 커서를 너무 오랫동안 어드벤처 나이트마리오네에게 두지 마.
It acts the same as Nightmarionne, though in the monitor rather than the office. Don't let your cursor linger over Adventure Nightmarionne for too long.
FNaF World 업데이트 2로 업데이트 된 캐릭터인 나이트마리오네이다.
2.5.47. Coffee(커피)O[편집]

그는 사무실 책상에 머물고 있으며 커피를 채울 거야. 그가 완전히 커피를 채우면, 그는 널 죽일 거야. 넌 지속적으로 그의 커피를 마시고 그가 커피를 채우는 걸 막기 위해서 커피를 클릭해야 할 거야.
He will stay on the office desk and fill up with coffee. If he fills up fully, he will kill you. You must constantly click him to drink his coffee and prevent him from filling up.
스콧의 게임 중 하나인 The Desolate Hope의 주인공인 그 커피가 맞다. FNaF World에서도 등장한다.
2.5.48. Adventure Pupleguy(어드벤처 퍼플가이)X[편집]
그는 베기 공격을 오른쪽에서 왼쪽으로 밤새 날릴 거야. 너의 커서가 베기 공격에 명중하면 넌 전기를 5% 잃을 거야.
Slasher attacks will fly through the screen throughout the night, from right to left. Getting hit by one of them will result in you losing 5% power.
FNaF World에 등장하는 퍼플가이다. 메커니즘은 원작의 어드벤처 퍼플가이의 기술인 베기(Slasher)에서 가져왔다.
2.5.48.1. Adventure Purpleguy 스킨[편집]


1번째 스킨은 A Single Red Line(한개의 빨간 선) 이라는 이름의 스킨이다. 진짜 말 그대로 빨간 선이다.(...)
2번째 스킨은 Skeleton(해골) 이라는 이름의 스킨이다. 마인크래프트의 나오는 그 스켈레톤이다.
2.5.49. Adventure Cupcake(어드벤처 컵케이크)X[편집]

카메라를 내리면 그것이 책상에 나타날 거야. 그것을 먹으려면 그것을 클릭 해. 그것을 먹기 전에 카메라를 올리면 독성 수치가 증가할 거야.
It will sometimes appear on your desk after lowering the monitor. Click it to eat it. Opening the monitor before eating it will result in it going stale and increasing the Toxic Meter.
FNaF World에서 Cupcake 라는 기술을 쓰면 나타나는 컵케이크다.
2.5.50. Gearrat(톱니쥐)X[편집]
그들은 너의 사무실에 있을 것이고, 앞 벽에 붙어 있을 거야. 문이 너무 오랫동안 닫혀 있으면 천천히 감기고 360도 회전을 하면 문이 열려. 문을 오랫동안 닫은 상태로 유지하려면 커서로 다시 감아.
They're in your office, sticked onto the front wall. If a door is closed for too long, they will slowly 'wind down', opening the door once a full 360 rotation is done. You can wind them up with your cursor again to keep the door closed for longer.
FNaF World에 파즈베어의 언덕에서 처음으로 만나는 적이다.
2.5.51. Bouncepot(바운스팟)O[편집]

87초 후에, 글리치 층에서 그가 나타날 거야. 그는 너에게 1987년의 입질 사건을 일으킬 거야. 그를 막는 유일한 방법은 그의 옆에 있는 2초 스킵 시계를 모아서 87초를 완전히 건너뛰는 거야.
He'll stay on the Glitch Floor. 87 seconds into the night, he will do the bite of '87 on you. The only way to stop him is to skip the 87th second entirely by collecting the 2 second-skipping clock that stays next to him.
FNaF World에서 등장하는 적 캐릭터로, 파즈베어 언덕에서 만날 수 있는 적 중 하나다.
2.5.52. Ballboy(볼보이)O[편집]

그의 장례식은 Lumber Co. 카메라에서 열리고 있을 거야. 넌 그를 클릭해서 삽을 드래그하고 그의 관을 위해서 구멍을 파야할 거야. 오전 6시까지 관을 묻지 않으면, 그는 죽음으로부터 돌아와서 널 죽여버릴 거야.
His funeral is being held in the Lumber Co. camera. You must click and drag on a shovel and hit the ground many times in order to dig a hole for his coffin. If you don't bury his coffin by 6AM, he'll come back from the dead and kill you.
FNaF World에서 등장하는 적 캐릭터로, 꽃잎 서커스라는 장소에서 등장하는 적 중 하나다.
2.5.53. Meringue(머랭)O[편집]

넌 밤새 FNaF 월드의 마지막 운명의 첫 몇 단어(AI 값에 의해 결정됨)를 입력할 수 있어. 진행 상황은 주방 카메라에 나와. 잘못된 편지를 눌러도 카운트되지 않습니다.
You have the entire night to type the first few words (determined by AI value) of The Final Fate of FNaF World. Your progress will be shown on the Kitchen camera. Pressing a wrong letter will not result in it being counted.
FNaF World에서 등장하는 적 캐릭터로, 꽃잎 서커스라는 장소에서 등장하는 적 중 하나다.
2.5.54. Redbear(레드베어)X[편집]

화면 중앙에 "Block: Jumpscare"칩이 나타났을 때 클릭하면 레드베어가 점프스케어하고 몇 초 동안 중앙에 마우스를 고정시킬 거야.
When the "Block: Jumpscare" chip appears in the middle of the screen, quickly click it or else Redbear will jumpscare you and keep your mouse stuck in the middle of the screen for a few seconds.
FNaF World에서 등장하는 적 캐릭터로, 꽃잎 놀이방이라는 장소에서 등장하는 적 중 하나다.
2.5.55. White Rabbit(화이트 래빗)O[편집]

그는 가끔씩 임무 시스템에 나타나고 코를 클릭해서 그를 떠나게 해야 해. 그가 너무 오랫동안 임무 시스템에 머물고 있으면, 그는 널 죽일 거야.
He will appear on the Task System every once in a while, simply click his nose to make him leave. If he stays there for too long, he'll kill you.
FNaF World에서 등장하는 적 캐릭터로, 꽃잎 놀이방이라는 장소에서 등장하는 적 중 하나다.
2.5.56. Tangle(탱글)O[편집]

그녀는 때때로 책상에 나타날 거야. 선풍기를 켜서 그녀를 날려버려야 할 거야. 그러지 않으면 그녀가 너에게 점프스케어를 하고 널 죽일 거야.
She will sometimes appear on your desk. Turn on the fan to blow her off the desk, otherwise she will jumpscare you.
FNaF World에서 등장하는 적 캐릭터로, 꽃잎 놀이방이라는 장소에서 등장하는 적 중 하나다.
2.5.57. $__^^& X[편집]

인터넷 수치를 체크해 글리치 층에 보관하지 않으면 문제가 발생해 카메라 시스템에 감염돼 손전등, 소리 미끼, 전기충격 등을 사용할 수 없어.
Not keeping them sealed on the Glitch Floor by keeping your internet meter in check will result in them breaking out and infecting the CAM System, disabling the flashlight, audio lure, and controlled shock.
FNaF World의 &*___TWRE에서 나오는 각종 잡몹들이 섞인 오류가 있는 적이다.
2.5.58. !2222 X[편집]

전기 수치를 확인해서 글리치 층에 보관하지 못하면 문제가 발생해 환풍구 시스템에 감염돼 환풍구 덫을 사용할 수 없어.
Not keeping them sealed on the Glitch Floor by keeping your usage meter in check will result in them breaking out and infecting the VENT System, disabling the vent snares.
FNaF World의 &*___TWRE에서 나오는 각종 잡몹들이 섞인 오류가 있는 적이다.
2.5.59. >>>>>> X[편집]
파일:>>.png
독성 수치를 확인해서 글리치 층에 보관하지 않으면 문제가 발생해 배관 시스템에 감염돼 배관 봉쇄와 소리 미끼를 사용할 수 없어.
Not keeping them sealed on the Glitch Floor by keeping your toxic meter in check will result in them breaking out and infecting the DUCT System, disabling the seal ducts and audio lure.
FNaF World의 &*___TWRE에서 나오는 각종 잡몹들이 섞인 오류가 있는 적이다.
2.5.60. Jangle(쟁글)O[편집]

그것은 밤새도록 사무실 주변을 걸어다닐 거야. 그것은 때때로 그 위에 불을 뿜을 거야. 커서가 불에 닿으면 온도가 120도로 상승할 거야. 커서가 불에 여러 번 맞으면 그것이 널 죽여버릴 거야.
It will walk around your office all night. It will sometimes breathe fire above it. If your cursor touches the fire, the temperature will raise to 120°. If you get hit by it multiple times, you will die.
FNaF World에서 등장하는 적 캐릭터로, 정신의 은식처라는 장소에서 등장하는 적 중 하나다.
2.5.61. Neon(네온)X[편집]

그는 너의 화면의 가장자리에서 튕겨져 나올 거야. 마우스 커서가 그에게 닿으면 화면이 매우 밝은 노란색으로 변할 거야.
He will bounce off of your screen's edges. If at any point your mouse cursor touches him, your screen will change color to a very bright yellow.
FNaF World의 정신의 은식처에 등장하는 적이다.
2.5.62. Snowcone(스노우콘)O[편집]
그의 십자선은 랜덤으로 나타나고, 스노우콘이 그 십자선을 향해서 눈덩이를 쏠 거야. 눈덩이가 커서에 너무 많이 명중하면, 그는 널 죽일 거야.
A crosshair will randomly appear on your screen, and shortly after snowballs will begin to shoot towards it from all directions. If too many of them hit your cursor, Snowcone will kill you.
FNaF World에서 등장하는 적 캐릭터로, 설원이라는 장소에서 등장하는 보스다.
2.5.62.1. Snowcone 스킨[편집]

1번째 스킨은 Snow Golem(눈 골렘) 이라는 이름의 스킨이다. 마인크래프트에 나오는 호박머리를 쓴 눈사람.
2.5.63. Eyesore(아이소어)X[편집]

그가 사무실에 나타나면 재빨리 눈을 클릭해서 그를 떠나게 해. 그가 너무 오랫동안 사무실에 있으면 그는 너의 시야를 흐릿하게 만들 거야. 그가 다시 사무실에 오면 너의 시야는 더 흐릿해질 거야.
When he appears in your office, quickly spam-click his pupil to make him leave. If he's kept in the office for too long he'll make your vision blurry. Your vision gets blurrier if he gets to do it again.
FNaF World에서 등장하는 적 캐릭터로, 미지의 탄광이라는 장소에서 등장하는 보스다.
2.5.64. Mad Endo(매드 엔도)X[편집]

그는 너에게 무료 포인트를 줄 거야 :)
He will give you free points :)
매드 엔도는 FNaF World의 깊은 철광에서 나오는 엔도 보스다.
2.5.65. Browboy(브로우보이)X[편집]

그가 오른쪽 환풍구에 나타나면 문을 닫아. 그가 들어오면 그는 지속적으로 웃어서 소음 수치를 올릴 거야. 프레디 파즈베어 마스크 또한 쓰지 못하게 할 거야. 그는 몇 초 후에 사라질 거야.
When he appears in the right vent, close it. If he gets in, he will constantly laugh, which will add to the noise meter, and disable your Freddy Fazbear Mask. He will go away after a few seconds.
FNaF World에서 등장하는 적 캐릭터로, 꽃잎 서커스라는 장소에서 등장하는 보스다.
여담으로 이 캐릭터는 밈으로 사용되기도 한다.
2.5.66. Gold Endo(골드 엔도)X[편집]

그의 코인 중 하나를 누르면 5개의 파즈코인이 나오지만 전기는 4% 더 빠져나가는데, 카메라 화면에 나타나는 일반적인 코인 외에 골드+5 코인도 나타난다.
Besides the usual coins that appear on the monitor screen, gold +5 coins also appear (the higher the AI, the more often they appear), mousing over one of these coins gives you five Faz-Coins but subtracts your power by 4 percent.
FNaF World의 꽃잎 놀이방에 등장하는 시크릿 보스다.
2.5.67. Bubba(부바)O[편집]

그는 3층 그림 복도(CAM 7)에 남아 FNaF 팬아트를 그릴 거야. 그가 그림을 다 그릴 때마다, 그는 그것에 대한 너의 의견을 물을 거야. 만약 너가 그것을 너무 낮게 평가하면 그는 화를 낼 것이지만, 만약 너가 그것을 너무 자주 높게 평가한다면 그는 널 의심할 거야.
He'll stay in the Drawing Hall, making FNaF fanart. Every time he finishes a piece, he will ask for your opinion on it (with a 5 star system.) He'll get angry if you rate it too low, but he'll get suspicious if you keep rating it high too often.
FNaF World의 꽃잎 놀이방에 등장하는 적이다.
2.5.68. Overclock(오버클락)X[편집]

그는 너에게 그대로인 지불 점수를 줄 거야 :(
He will give you paid points :(
오버클락은 FNaF World의 깊은 철광에서 나오는 매드 엔도의 더 강력한 버전이다. 지불 점수가 뭐냐면 파즈 코인이 있는 상태로 지불 점수에 마우스를 대면 모두가 밤에 포인트를 추가하지만 1개의 파즈 코인을 빼앗기게 된다.
2.5.69. Chipper's Revenge(치퍼의 복수)O[편집]

모든 층에서 열쇠가 나타날 거야. 오전 2시 전에 열쇠를 모두 얻어서 치퍼의 복수가 널 죽이는 걸 막아야 해.
There will be a key on any camera on any floor between 1 and 4. Click it before 2AM to collect it and prevent Chipper's Revenge from killing you.
FNaF World에서 등장하는 적 캐릭터로, 미지의 탄광이라는 장소에서 등장하는 히든 보스다.
2.5.70. Security(시큐리티)O[편집]

네온 방벽이 사무실에 떠있을 거야. 한 배관에서 다른 배관으로 이동시키려면 클릭해야 해. 시큐리티가 알람을 사용할 때, 알람이 어디서 오는지 듣고 알맞은 곳에 네온 방벽을 사용 해.
A Neon Wall will float in your office. You can click it to move it from one duct tube to another. When Security shoots an Alarm ball, listen for which side it's coming from and use the Neon Wall to block it and keep yourself alive.
FNaF World에서 등장하는 적 캐릭터로, 노멀 모드의 최종 보스다.
2.5.71. PurpleGeist(퍼플가이스트)O[편집]

그것은 사무실에 머무르며 천천히 거대해질 거야. 레버를 사용해서 그것을 원래대로 되돌려. 그것이 정상적인 크기가 되면, 그는 널 죽일 거야.
He stays in your office, slowly un-flattening himself, becoming taller and taller. Use the Lever to make him flat again. If he becomes his normal size, he will jumpscare you.
FNaF World에서 등장하는 적 캐릭터로, 업데이트 2의 페이크 최종 보스다.
2.5.72. Chica's Magic Rainbow(치카의 마법 무지개)X[편집]

화면 왼쪽 상단에 HP 수치가 나올 거야. HP 수치를 0 이상으로 유지하면 치카의 마법 무지개가 밤을 끝낼 때 주는 점수가 두 배가 돼(그녀가 20이라면 그녀는 너에게 200점 대신 400점을 줄 거야.).
해바라기 :그것들은 오전 1시에 화면에 나타나기 시작하고 모든 방향으로 꽃잎을 날릴 거야. 넌 꽃잎에 부딪히면 1 HP를 잃을 거야.
나비 : 오전 3시에, 그것들이 여러 명 소환돼서 화면 주위를 날아서 화면의 맨 아래까지 레이저를 쏠 거야. 커서가 레이저에 맞으면 1 HP를 잃어버릴 거야.
눈 : 오전 4시에 화면 구석에서 눈이 날아갈 거야. 눈이 너의 커서에 맞으면 너는 1 HP를 잃을 거야.
작은 무지개 : 오전 5시에 그것들이 여러 명 소환되고 패턴이 존재해. 그것들은 수직선, 수평선, X자, +자 그리고 O자의 이동 패턴이 있어. 커서가 그것에게 닿으면 넌 2 HP를 잃을 거야.
In the top left corner, an HP bar will be shown, specific to her. While she will not kill you if it reaches 0, keeping the HP bar above 0 to the end of the night will grant you two times the amount of points for her (if she’s on 20, she will give you 400 points, instead of 200).
Sunflowers: They start to appear at 1 AM on your screen and will shoot petals in all directions. Getting hit by a petal will result in losing 1 HP.
Butterflies: At 3 AM, multiple of them will spawn and fly around the screen, shooting lasers down to the very bottom of the screen. Getting hit by a laser will result in losing 1 HP every half a second your mouse is over it.
Eyes: At 4 AM, eyes will start shooting out from the corners of the screen. Getting hit by one of them will make you lose 1 HP.
Mini-Rainbows: At 5 AM, multiple of them will spawn on your screen and float in patterns. They will go in a vertical line, horizontal line, X pattern. + pattern, or an O pattern. Getting hit by any of them will make you lose 2 HP.
FNaF World에서 등장하는 적 캐릭터로, 업데이트 2의 진 최종보스이기도 하다. 메커니즘은 전부 원작의 미니게임에서 가져왔다.
2.5.73. Challenger Nightmare Freddy(챌린저 나이트메어 프레디)O[편집]

그와 그의 프레들즈는 환풍구 시스템에 나타날 거야. 걱정 마, 프레디는 널 공격하지 않을 거야 (아직까진). 그는 프레들즈를 모두 잡으려고 돌아다닐 거야. 프레들즈가 너의 사무실에 들어가는 걸 막는 유일한 방법은 환풍구 덫을 사용하는 거야. 만약 그들이 미끄러져 들어오면, 그들은 환풍구에서 바닥으로 떨어져 추락사 할 거야. 그럼 프레디는 프레들즈가 몇 명 없다는 걸 깨닫고 널 공격하겠지.
He and his Freddles will appear on the Vent System. Don't worry, Freddy will not attack you, as he has no reason to do so (yet). He'll try to catch every Freddle. The only way to stop the Freddles from getting into your office is by using the Vent Snares. If they slip in, they will fall from the vent and literally die upon landing on the floor. Freddy will eventually realize some Freddles are missing and will attack you.
상술한 어드벤처 나이트메어 프레디는 플레이어블 나이트메어 프레디이고, 챌린저 나이트메어 프레디는 원본 FNaF World에서 나이트메어 프레디를 해금하려면 상대 나이트메어 프레디를 죽이는 것이 해금 조건인데 전투 도중 상대팀의 나이트메어 프레디만 보는 위치가 다르다는 이유로 캐릭터를 따로 만들었다.
2.5.74. Adventure Fan(어드벤처 선풍기)X[편집]

그것은 선풍기 앞의 책상 위에 놓여 있어. 그것이 가끔씩 레이저를 발사해 전기를 빠르게 닳게 해. 선풍기를 키면 멈출 거야.
It sits on the desk in front of the regular fan. It will sometimes start shooting out lasers and rapidly draining power. Turn the actual fan on to make it stop.
2.5.75. Adventure Lolbit(어드벤처 롤빗)O[편집]

그녀는 히터, 소리 미끼에 면역인 상태로 배관을 통해서 갈 거야. 그녀는 출구 앞에 있을 때만 볼 수 있어. 오전 1시, 오전 3시, 오전 5시에 오른쪽 배관에서 공격 해. 그녀에게 죽기 싫다면 오른쪽 배관을 막아두는 게 좋을 거야.
She goes through the Duct System, immune to the Audio Lure or the Heater. She will only be visible when she's at the exit. She'll attack from the right side at exactly 1AM, 3AM and 5AM. Have the right duct shut to avoid her jumpscare.
FNaF World에 등장하는 NPC이자 롤빗이다.
2.5.75.1. Adventure Lolbit 스킨[편집]


1번째 스킨은 VR Lolbit(VR 롤빗)이라는 이름의 스킨이다. FNaF AR에 존재하는 VR 토이 프레디의 스킨을 토대로 만든 롤빗의 스킨이다.
2번째 스킨은 CircusRama(서커스라마)라는 이름의 스킨이다.
2.5.76. DeeDee(디디)X[편집]

"Uh-oh, how unfortunate! Uh-oh, how unfortunate! I'm gonna do a sneaky thing, and throw a new contender in the ring!"
"아-아, 운도 없네요! 아-아, 지지리도 없네요! 나는 교활한 짓을 하고, 새로운 경쟁자를 링에 던질 거야!"
"Uh, oh, how unfortunate! Uh-oh, how unfortunate! I know how much you like to fight, so I'll add a new problem to your night!"
"아, 아, 운도 없네요! 아-아, 지지리도 없네요! 난 네가 얼마나 싸우는 걸 좋아하는 지 알아, 그러니 너의 밤에 새로운 문젯거리를 추가할게!"
대사
그녀는 때때로 사무실에 나타나고 밤에 활성화 되지 않은 다른 캐릭터를 추가 할 거야. 그녀의 난이도가 1로 설정돼있고, 아무 캐릭터도 활성화 되지 않았다면 XOR이 밤새도록 끊임없이 나오고 XOR이 소환한 캐릭터가 모두 20인 것만 제외하면 원래 디디와 똑같은 역할을 해.
She will sometimes appear in your office and add a random character from the roster that isn't already active to your night. If her difficulty level is at 1 and no one else is active, XOR will spawn instead of DeeDee. She works the same, except XOR will constantly reappear throughout the night, and all characters spawned by XOR will be at 20 from the get-go.
FNaF World에 등장하는 NPC이자 원작인 UCN에서도 등장해 빡치게 하는 장본인이다.
2.5.77. Mendo(멘도)X[편집]

데스 코인을 사용하고나서 멘도가 오른쪽 환풍구에 나타나기 시작 할 거야. 문을 닫아서 사무실을 들어가지 못하게 해. 그가 들어오면, 그는 데스 코인을 사용한 애니매트로닉스를 다시 소환 할 거야.
After using the Death Coin, Mendo will start to appear in your right vent. Close the door to prevent him from getting in your office. If he gets in, he will re-enable the character who was Death-Coined.
FNaF World에 등장한 NPC다.
프레디 모든 엔도 중 최초로 파란색[31]으로 도색되어있다.
2.5.78. Titanium Endo(티타늄 엔도)O[편집]

너가 사용하는 처음 몇 개의 파즈코인은 티타늄 엔도에서 자동으로 지출되어서 방어력이 +100만큼 올릴 수 있어. 방어력을 +100만큼 올리면 1시에 자동으로 나올 티타늄 엔도의 점프스케어를 피할 수 있는 유일한 방법이야.
The first few Faz-Coins you spend will be automatically spent on the Titanium Endo so that you may have +100 defense. Having +100 defense is the only way to avoid Titanium Endo's jumpscare, which automatically happens at 1AM.
티타늄 엔도는 멘도의 상점에서 구매할 수 있는 업그레이드 중 하나에서 따온 캐릭터다.
2.5.79. Old Man Consequences(노인의 결과)X[편집]

그의 미니게임이 나타나면 C를 눌러서 십자 위에 있을 때 물고기를 잡아. 안 그러면 카메라가 짧은 시간 동안 잠겨있을 거야.
When his minigame appears, press C to catch the fish when it is over the crosshair, otherwise your monitor will be locked for a short time.
FNaF World의 글리치 서브 터널이라는 곳에서 등장하는 NPC다. 원작인 UCN에서도 등장했다.
2.5.80. The Dancing One(춤추는 자)X[편집]

그들은 춤추고 있어.
They're grooving.
설명만 보면 춤만 추는 시각적 애니매트로닉스로 끝날 것 같지만 갑자기 노래가 시작되고 미러볼이 내려와 인터넷 수치가 멈추고 인터넷 수치가 0으로 내려간다. 저소음 환기로 막을 수 있다.
2.5.81. Ghost Freddy(유령 프레디)X[편집]

유령 프레디는 때때로 오른쪽에서 왼쪽으로 화면을 가로질러 날아 갈 거야. 커서가 그에게 닿으면 마우스가 몇 초동안 중앙에 고정 될 거야.
Ghost Freddy will sometimes fly across the screen from right to left. If your mouse cursor hits him, your cursor will become stuck for a few seconds.
FNaF World에서 Haunting(빙의)라는 기술을 사용하면 나오는 프레디다.
2.5.82. Virtua-Freddy(버추어 프레디)X[편집]

녹색 커서는 느리지만 너의 커서를 따라 갈 거야. 녹색 커서에 닿으면 나이트마리오네, 어드벤처 퍼플가이, 엔도플러시, 어드벤처 치카, 어드벤처 나이트마리오네, 엄청 배부른 치카, 네온 치카, 스노우콘, 유령 프레디와 토템 패닉을 활성화[32]
시킬 거야.
A green cursor will follow your real cursor around, albeit slower. It can activate Nightmarionne, Adventure Purpleguy, Endoplush, Adventure Chica, Adventure Nightmarionne, Already-Ate Chica, Neon Chica, Snowcone, Ghost Freddy and Totem Panic.
FNaF World에서 Mimic Ball(흉내 공)이라는 기술을 사용하면 등장하는 프레디다. 메커니즘은 원작의 기술처럼 플레이어의 행동을 흉내 내는 것에서 가져왔다.
2.5.83. Mimic Ball(흉내 공)X[편집]

그것은 밤새 화면에 머물고 있으며 특정 사운드 효과가 들릴 거야. 노크, 대사 등의 소리가 들릴 거야.
t will stay on your screen the entire night and will repeat certain sound effects, like knocking, voicelines, and several others.
FNaF World의 바이트다.
2.5.84. Bomb Bytes(폭탄 바이트)X[편집]

밤새 비가 내리며 몇 초마다 폭탄 바이트들이 소환 될 거야. 드래그를 하고 놓을 수도 있어. 폭탄이 비에 부딪히면 폭발해서 터진 곳의 시야는 볼 수 없고 커서가 들어가지 못해서[33]
폭발하지 못하게 하는 게 좋을 거야.
It will rain the whole night. Every few seconds a Bomb Byte will spawn on the screen. You can drag and drop it. If the bombs gets hit by the rain, it will explode and leave a mark, where you can't see anything in that hole and your cursor cannot go into it, so make sure the bombs doesn't explode.
FNaF World의 바이트 들이다.
2.5.85. Desk Men(데스크 맨)O[편집]

오전 1시, 오전 2시, 오전 3시, 오전 4시에 게임을 플레이 해야 해. 다음 시간 전에 게임을 끝내지 못하면 넌 결국 죽을 거야.
오전 1시 : 폭시 파이터즈 : 마우스 커서로 폭시를 조종할 수 있어. 총알을 발사하려면 좌클릭을 눌러. Souldozer(소울도저)를 파괴하면 게임이 끝날 거야.
오전 2시 : 치카의 마법 무지개 : 화살표 키로 치카를 조종할 수 있어. 화면의 오른쪽에 도달하면 게임이 끝나. 그녀의 무지개는 끊임없이 움직이고 그녀의 무지개가 치카에게 계속 레이저를 쏠 거야.
오전 3시 : FNaF 57[34]
: 화살표 키를 이용해서 프레디를 조종하고 점프시킬 수 있어. 모든 컵케이크를 모으면 게임이 끝나.
오전 4시 : 폭시.EXE : 화살표 키를 이용해서 보니를 조종할 수 있어. 화면의 오른쪽에 도달하면 게임이 끝나. 구형 프레디가 나타나면 뒤로 달려가서 그를 사라지게 해. 네가 그에게 닿으면, 바로 죽어버릴 거야.
After 1AM, 2AM, 3AM and 4AM, you will have to play one of his games. Not beating it before the next hour will result in a jumpscare from him.
1AM: Foxy Fighters: You control Baron Foxy with your mouse cursor. Click to fire one bullet. You must destroy Souldozer to beat the minigame.
2AM: Chica's Magic Rainbow: Control Adventure Chica using the arrow keys. You must reach the right side of the screen to beat the minigame. Her rainbow will constantly move and shoot rainbows below her. If you touch one, you will instantly lose the minigame.
3AM: FNaF 57: Control Adventure Freddy using the left and right arrow keys to move and space to jump. Collect all the Space Cupcakes to beat the minigame.
4AM: FOXY.EXE: Control Adventure Bonnie using the left and right arrow keys. Reach the right side of the screen to beat the minigame. If Withered Freddy appears, run backwards to make him disappear. If you touch him, you will instantly lose the game.
FNaF World에 등장했던 캐릭터로, 메커니즘은 모두 FNaF World 업데이트 2로 추가된 미니게임들을 패러디한 것이다.
2.5.86. Baby(베이비)O[편집]

밤에 딱 한 번, 그녀는 너의 앞에 있는 환풍구에 나타나서 너의 자리에 머물어도 되냐고 물어볼 거야. 그녀의 말이 끝나고, 잠시동안 모든 화면은 검은색으로 바뀔 거야. 검은색 화면이 된 동안 마우스를 움직이거나 키보드를 치면 널 죽일 거야. 화면이 검은색인 동안 돌아올 때까지 다른 캐릭터들은 움직이지 못 할 거야.
Once per night, she will appear in the vent in front of you and ask you to stay in your seat. After her speech, your entire view will turn black for a second. Moving your mouse or typing using the keyboard during that time will result in a jumpscare. While your screen is black, everyone will be delayed until your screen is back to normal again.
FNaF World의 업데이트 2 끝에 나오는 컷신에 나오는 베이비다. FNaF SL을 예고한 베이비인듯.
FNaF World의 최신 버전에서는 시작하자마자 연두색 눈만 보이는 상태로 나온다.
2.5.87. Space Camera(우주 카메라)O[편집]

둘 다 Fury's Rage층 맨 위쪽 구석에 있어 몇 초에 한 번씩 너에게 총을 쏠 거야. 피하는 게 살아남을 수 있는 유일한 방법이야.
Two of them are both on top corners of the Fury's Rage floor, shooting down at you every few seconds. Dodging is the only way to survive.
FNaF World 의 스페이스 미니게임에 등장하는 적이다.
2.5.88. Souldozer(소울도저)O[편집]

"Fools! How dare you challenge me!"
"멍청한 놈들! 감히 나에게 도전하는 것이냐!"
"I wasn't fully appreciated in my last outing, But now I'm back to show you my full power!"
"지난 번에 나왔을 때는 인정받지 못했지만, 이제 다시 돌아왔으니 내 전력을 보여주마!"
"Fools! Turn back now and I'll spare your lives! Or, more likely, I'll just chase you around and kill you anyway!"
"멍청한 놈들아! 지금 돌아가면 목숨만큼은 살려주지! 아니면 끝까지 쫓아가서 너흴 죽여버리겠다!"
"IMPOSSIBLE! You haven't seen the last of me! Well, actually yes this is the last you'll see of me."
"말도 안 돼! 이것으로 끝이라 생각하지 말아라! 뭐, 사실 이게 너희가 날 마지막으로 보게될 모습이긴 하지만."
대사
그는 4층의 왼쪽 복도 또는 오른쪽 복도에 나타날 거야. 그가 왼쪽 복도에 있으면 왼쪽 문을 닫아. 그가 오른쪽에 있을 때는 오른쪽 문을 열어놔. 네가 행동을 잘 못하면 그는 너를 죽일 거야.
He will appear in either Left or Right Hall cameras on floor 4. If he's on the left, close the left door. If he's on the right, keep the right door open. He will kill you if you do the incorrect action.
FNaF World의 미니게임인 폭시 파이터즈에 등장하는 보스 소울도저다.
2.5.89. FOXY.EXE(폭시.EXE)O[편집]

"Listen to my voice, and you will find the key."
"내 목소리를 들어봐, 그러면 열쇠를 찾을 수 있을 거란다."
"When you can see, how fast can you flee?"
"네가 볼 수 있다면, 넌 얼마나 빨리 도망칠 수 있을까?"
"Be sure your step, through the heart of madness."
"광기의 심장으로 너의 발걸음을 확실히 기억해두렴."
"All your base are belong to us."
"모든 네 기지 다 내 거다요."
대사
그는 오른쪽 환풍구로 너를 공격할 거야. 너는 그가 말하는 소리를 들으면, 폭시.EXE를 막기 위해서 오른쪽 환풍구 문을 닫는 게 좋을 거야. 그러지 않으면 폭시.EXE는 너에게 점프스케어를 할거야.
He will attack through the right vent. If you hear him talking, shut the right vent door, otherwise FOXY.EXE will end your run with a jumpscare.
FNaF World의 업데이트 2로 추가된 폭시.EXE 미니게임에서 등장하는 구형 폭시다.
다른 애니매트로닉스와 달리 특유의 점프스케어 소리를 낸다.[35]
여담으로 폭시.EXE에 메커니즘은 원래 구형 폭시에 메커니즘이었지만
업데이트로 인해 구형 폭시에 메커니즘이 바뀌고 그 메커니즘을 폭시.EXE가 사용하고 있다.
2.5.90. Kitty(키티)X[편집]

그것은 때때로 야옹 소리와 함께 사무실에 나타날 거야. 사무실 어딘가에서 그것을 찾아서 클릭해야 해. 네가 너무 늦으면 밤의 점수에서 몇 점 정도 없앨 거야.
It will randomly appear in the office along with a meowing sound. You must find and click it somewhere in the office. If you take too long, it will remove a few points from the point value of the night.
Kitty in the Crowd라는 게임에서 등장하는 고양이이며, FNaF World에서 업데이트 2로 추가된 FNaF 57 : 우주의 프레디!라는 미니게임에서 우주를 날아다닌다.또 폭시.EXE 라는 미니게임에 장해물로도 등장한다.
2.5.90.1. Kitty 스킨[편집]


1번째 스킨은 Garfield(가필드)라는 이름에 스킨이다. 어디서 많이 본거 같은 얼굴이다.
2번째 스킨은 Meevin(미빈)이라는 이름의 스킨이다.
2.5.91. Overworld Freddy(오버월드 프레디)X[편집]

그가 활성화 돼있으면 넌 마우스 커서를 제어하지 못 할 거야. 대신, 오버월드 프레디는 제어할 수 있어. 화살표 키를 이용해서 그를 제어할 수 있어. 마우스를 사용해서 클릭을 할 수도 있어.
If he is active, your mouse will not control your cursor. Instead, Overworld Freddy will. Use the arrow keys to move him and your cursor. You can still click using the mouse.
FNaF World의 오버월드에서 나오는 프레디다. 사진에서도 보이다시피, 눈썹이 날아가있다.
2.5.92. Overworld Lolbit(오버월드 롤빗)X[편집]

몇 초마다, 그녀는 하단에 있는 버튼 중 하나 사이를 돌아다닐 거야. 바닥에 있는 그녀는 너의 파즈 코인을 하나 하나씩 잃게 할 거야.
Every couple of seconds, she will move between one of the floor buttons. Being on the floor she currently marks will make you lose Faz-Coins one by one.
FNaF World의 2D 오버월드에 나오는 롤빗이다.
2.5.93. Seagulls(갈매기들)X[편집]

1층이나 2층에 머무는 갈매기들이 너의 화면을 산만하게 할 거야. 그것들은 오직 너의 시야를 방해하는 역할만 할 거야.
Staying on Floor 1 or 2 will cause seagulls to spawn on your screen, they only serve to block your view.
FNaF World 의 아무 배경에서나 가끔 날아가는 새들이다.
2.5.94. Glitched Objects(오류난 물건들)X[편집]

그것들 중 하나가 화면에 나타날 거야. 커서가 그것에 맞으면 화면이 다른 위치로 이동하게 될 거야.
One of them will appear on your screen every few seconds. Getting your mouse hit by it will cause your cursor to teleport to a random location on your screen.
FNaF World의 다양하고 불투명하게 빛나는 오브젝트[36]들이다.
2.5.95. Demo Barrier(데모 장벽)O[편집]

네가 상품 카운터에서 정품을 구입하지 않으면 오전 2시에 밤이 끝나게 될 거야. 난이도가 높을 수록 가격이 더 높아질 거야.
Your night will end at 2AM unless you buy the full release of the night from the Prize Counter (CAM 07). The higher difficulty level, the more it will cost.
FNaF World 데모 버전에서 더 앞으로 나아가는 걸 막아서는 데모 장벽이다.
2.5.96. Adventure Scarecrow(어드벤처 허수아비)O[편집]

1시, 3시, 5시 동안 카메라를 내려놓을 때마다 사무실에 천천히 생기는데, 완전히 생겨나면 죽을 거야. 2시, 4시에 다시 서서히 사라져.
During 1AM, 3AM and 5AM, everytime you put down the monitor, it'll slowly form in your office. It'll kill you if it forms completely. At 2AM and 4AM, it will slowly disappear again.
2.5.97. 옥락위의 나무 X[37][편집]

Lumber Company 카메라의 모든 나무가 완전히 자라면 CAM[38]
을 제외한 모든 시스템의 시야를 가리게 됩니다.
FNaF World에 등장하는 미니게임, FOXY.EXE에 등장해 그냥 지나가는 컴퓨터 화면 배경이다. 특이하게 게임 내에서 이름과 공략법이 한국어로 적힌 애니매트로닉스다.
2.5.98. Platform(플랫폼)?[편집]

여러 플랫폼이 특정 수직 레벨에서 왼쪽에서 오른쪽으로 화면을 돌 거야. 너의 커서는 그것들을 통과할 수 없어.
Multiple platforms (amount depends on AI level) will move around the screen left to the right at certain vertical levels. Your cursor cannot go through them.
플랫폼은 FNaF 월드의 치카의 마법 무지개 미니게임에 등장하는 플랫폼이다.
2.6. Five Nights at Freddy's: Sister Loction[편집]
2.6.1. Circus Baby(서커스 베이비)O[편집]

"Want to see the scooping room?"
"분해실을 보고 싶은거야?"
"Looks like something bad happened."
"끔찍한 일이 일어났나 봐."
"I guess you forgot about me."
"날 잊어버렸나 보네."
대사
그녀가 오른쪽 복도에 나타나면 그녀의 공격을 피하기 위해 상품 카운터(CAM 07)에서 베이비의 봉제 인형을 구입해. AI가 높을 수록 봉제 인형의 가격도 높아질 거야.
When she appears on the Right Hall (CAM 02) camera, buy the Baby plush on the Prize Counter (CAM 07) to avoid her attack. The higher his AI is, the more expensive the plush will be.
성우는 Heather Masters(헤더 마스터즈). FNaF SL에 등장했던 그 베이비다.
2.6.2. Ballora(발로라)O[편집]

"These are strange circumstances that have brought us together."
"이것들은 우릴 하나로 묶은 이상한 상황이야."
"I could hear you... breathing."
"네 소리를 들을 수 있었어... 숨쉬는 소리."
"Don't be shy."
"부끄러워 하지마."
"Admit it, you wanted to let me in."
"인정해, 나를 들여보내고 싶었잖아."
"Why do you hide inside these walls?"
"왜 벽들 안에 숨는거야?"
대사
그녀는 왼쪽 복도나 오른쪽 복도에서 접근할 거야. 그녀가 어느 복도에 있는지 듣고 적절한 문을 닫아. 그녀는 공격할 때, 자신이 떠날 때까지 카메라를 정지 상태로 만들 거야.
She will approach from either the left or right hallway. Listen to which hall she is in and shut the appropriate door. When she attacks, she will cause the cameras to turn into static until she leaves.
성우는 Michella Moss(미셸라 모스). FNaF SL에 등장했던 그 발로라다.
2.6.2.1. Ballora 스킨[편집]

1번째 스킨은 Toriel(토리엘)이라는 이름의 스킨이다. 언더테일의 나오는 그 토리엘이다.
2.6.3. Funtime Freddy(펀타임 프레디)O[편집]

"Well, well hello again!! Hahahaha!! Are you re-ready for round two?"
"으-음, 다시 안녕!! 하핳하핰!! 2라운드 준비는 다 했겠지?"[39]
"Bo-BonBon, go get em'!!"
"보-본-본, 가서 그를 잡아!!"
"Get ready for a surpriise!!"
"깜짝 놀랄 준비 하시지!!"
펀타임 프레디의 대사
"Calm down and go back to sleep! No one is here!"
"진정하고 자러 가자! 여긴 아무도 없어!"
"Shhh! Go back to your stage. Everything is okay."
"쉿! 무대로 돌아가. 아무런 문제 없어."
"Everything is okay, let's go back to sleep."
"아무런 문제 없어, 어서 자러 가자."
"Oh, calm down, I think it was just a mouse!"
"오, 진정해, 생쥐 소리가 아닐까!"
"N-N-N-Nope! No one is here!"
"아-아-아-아니! 아무도 없는데!"
"Shhh! It's bedtime, let's go back to our stage!"
"쉿! 잘 시간이야, 무대로 돌아가자!"
"You must be hearing things, silly!"
"네가 착각한 거야, 하하!"
본본의 대사
그는 널 공격하기 위해 그의 손 인형인 본본을 보낼 거야. 본본에게 "잡아"라고 명령하면 왼쪽 문을 닫아. '깜짝 놀랄 준비 하시지!!'라고 하면 오른쪽 문을 닫아.
He will send his hand puppet BonBon to attack you. If he commands BonBon to "go get 'em", close the Left Door. If he announces a surprise, close the Right Door.
FNaF SL에 등장했던 그 펀타임 프레디와 본본이다.
2.6.3.1. Funtime Freddy 스킨[편집]


1번째 스킨은 mattt(매트) 라는 이름의 스킨이다. 앞서 서술했던 양상추라는 구형 프레디의 스킨과 닮은 꼴이다.
2번째 스킨은 Chimin Funtime Freddy(침민 펀타임 프레디) 라는 이름의 스킨이다. 피부색이 무지개처럼 되어 있어 인기가 있다.
2.6.4. Funtime Foxy(펀타임 폭시)O[편집]

"It seems you couldn't make it to my show... So I brought the show to you!"
"제 공연을 보러 오지 못 하신 것 같군요... 그래서 제가 당신을 위해 직접 공연을 하러 왔습니다!"
"Showtimes are on the hour, not a moment before and not a moment later."
"쇼타임은 정시에 있습니다, 절대 앞당겨지거나 연기되지 않아요."
"I'm sorry, but there was never enough room on this stage for both of us!"
"죄송합니다, 하지만 이 무대는 우리 둘이 있기엔 좀 좁은 것 같군요!"
"It's time to take your final bow!"
"최후의 인사를 할 시간입니다!"
"A performance was demanded of me, and now I have delivered! Encore!"
"전 공연 요청을 받았고, 지금 왔습니다! 앙코르!"
대사
펀타임 코브(CAM 06)를 봐서 공연이 언제 시작되는지 확인한 다음, 정확한 시간에 캠을 봐서 공연을 연기해. 그렇지 않으면 그가 널 죽이고 게임을 끝낼 거야. 그는 데스코인으로도 돌려보낼 수 있어.
Check Funtime Cove (CAM 06) to see when his show is set to begin, then be sure to watch his cam at that exact time to postpone the show, otherwise he will jumpscare you and end your run. He can also be death-coined, removing him as a threat.
FNaF SL에 등장했던 그 펀타임 폭시다.
2.6.5. Ennard(에너드)O[편집]

환풍구 덫에 면역인 상태로 환풍구 시스템을 통해서 너에게 갈 거야. 그는 레이더에 거의 잡히지 않아. 그가 환풍구 입구에 도착했을 때, 끽끽거리는 금속 소리가 들려와. 그의 공격을 피하려면 문을 닫아.
He will go through the Vent System, immune to the Vent Snare. He is barely visible on the radar. When he gets to the vent opening, a sound of squeaking metal can be heard. Close the door to avoid his attack.
FNaF SL에 등장했던 그 에너드다. 원작 UCN과 똑같이, 에너드에게 죽으면 이상한 기계음을 낸다.
2.6.5.1. Ennard 스킨[편집]


1번째 스킨은 Beta Ennard(베타 에너드) 라는 이름의 스킨이다. UCN 에 나오는 에너드의 베타버전 아이콘이다.
베타버전이어도 그냥 눈썹 1개만 없었던 거였다. 당연히 점프스케어를 할 때도 눈썹이 없었다.
2번째 스킨은 RIP Ennard(에너드 편히 잠들다) 라는 이름의 스킨이다.
3번째 스킨은 Rust Ennard(러스트 에너드) 라는 이름의 스킨이다. 사람의 얼굴과 유사한 가면을 벗은 에너드의 모습.
에너드의 스킨 2번째와 3번째는 쓸데없이 공포감이 좀 있다.[40]
2.6.6. Bidybabs(비디밥)O[편집]

"Hello in there..."
"반가워..."
"Is it the same person?"
"예전에 그 사람이 아닌 것 같은데?"
"Knock knock..."
"똑똑..."
"I don't want to play hide-and-seek!"
"숨바꼭질은 하고 싶지 않아!"
"I'm going to find a way inside!"
"반드시 들어갈 방법을 찾아내겠어!"
"I'm gonna get inside!"
"꼭 들어가고 말거야!"
대사
비디밥 두 명이 환풍구 시스템으로 너에게 접근 할 거야.. 환풍구 덫 아니면 문을 사용해서 돌아가게 할 수 있어.
Two Bidybabs will go through the Vent System. You can stop them either with the Vent Snare or the door.
FNaF SL에 등장했던 그 비디밥이다.
2.6.7. Minireena(미니리나)X[편집]

때때로 너는 산소를 잃기 시작할 거야. 산소 저장소(CAM 05) 카메라로 이동해서 미니리나들이 더이상 산소를 고갈시키지 못하도록 전기 충격을 줘.
You will sometimes start to lose Oxygen. You must go to the Oxygen Storage (CAM 05) camera and shock the Minireenas to stop them from taking anymore of your Oxygen.
FNaF SL에 등장했던 그 미니리나다.
2.6.8. Lolbit(롤빗)X[편집]

롤빗은 때때로 화면에 나타나 소리를 내기 시작해. 키보드를 사용하여 L-O-L을 입력하여 롤빗을 빼내.
Lolbit will sometimes appear on your screen and start making noise. Type L-O-L using your keyboard to get them away.
FNaF SL에 등장했던 그 롤빗이다.
2.6.8.1. Lolbit 스킨[편집]

1번째 스킨은 Fazbear Entertainment Logo(파즈베어 엔터테인먼트 로고) 라는 이름의 스킨이다. 로고의 색이 없다. 그냥 하얗다.
2.6.9. Yenndo(옌도)O[편집]

그는 카메라를 내린 후 사무실에 무작위로 나타날 수도 있어. 산소 손실을 방지하기 위해 다시 카메라를 위로 올려. 그는 만약 네가 그곳에 있는 동안 산소를 모두 잃으면, 그가 너를 죽여 버릴 거야.
He can randomly appear in the office after lowering the monitor. Pull it up again to avoid losing oxygen. He will jumpscare the player if they lose all their oxygen while he is there.
FNaF SL에 등장했던 그 옌도다. FNaF SL의 DLC인 커스텀 나이트가 나오기 전까지는 이스터 에그로만 존재했던 캐릭터이기도 하다.
2.6.9.1. Yenndo 스킨[편집]


1번째 스킨은 Wide Yenndo(와이드 옌도) 라는 이름의 스킨이다. 프로필 사진과 행동이 전부 늘어난 상태이다...
2번째 스킨은 Mono Freddy(모노 프레디) 라는 이름의 스킨이다. Ultra Custom Night 에서도 이 캐릭터는 있는데 그 캐릭터가 엔도 스킨으로 나왔다.
3번째 스킨은 Blacklight Yenndo(블랙 라이트 옌도)라는 이름의 스킨이다. 이 스킨을 혐오하는 사람들도 있다.
2.6.10. Bonnet(보넷)O[편집]

그녀는 무작위로 사무실을 가로질러 오른쪽에서 왼쪽으로 달려갈 거야. 그녀가 왼쪽 끝으로 가기 전에 그녀의 코를 클릭해. 그렇지 않으면 그녀가 너를 죽일 거야.
She will randomly run across the office, from right to left. Click on her nose before she gets to the very left side, otherwise she will lethally jumpscare you.
FNaF SL의 DLC인 커스텀 나이트에 등장했던 그 보넷이다.
2.6.10.1. Bonnet 스킨[편집]

1번째 스킨은 Troll Fan(트롤 선풍기) 라는 이름의 스킨이다. 유일하게 트롤 스킨 중 트롤 페이스가 없다...
2.6.11. Electrobab(일렉트로밥)X[편집]

그녀는 파워 수치 옆에 일렉트로밥 얼굴과 함께 왼쪽 옷장(CAM03) 또는 오른쪽 옷장(CAM04) 카메라에 나타나. 그녀가 그곳에 몇 초간 있으면, 그녀는 너의 전기를 고갈시키기 시작할 거야. 전기 충격으로 그녀를 막아.
She will appear on either the Left Closet (CAM 03) or Right Closet (CAM 04) camera, along with an Electrobab symbol next to the Power meter. After a few seconds of her being there, she will begin to drain your power. Use the Controlled Shock to stop her.
FNaF SL의 DLC인 커스텀 나이트에 등장했던 전기를 빼가는 비디밥이다.
2.6.12. Minireena 2(미니리나 2)X[편집]

그들은 무작위로 사무실에 나타나 게임 내 한 시간 동안 시야를 가려.
They will randomly appear in your office and cover your view for one in-game hour.
FNaF SL의 DLC인 커스텀 나이트에 등장했던 미니리나들이다.
2.6.12.1. Minireena 2 스킨[편집]


1번째 스킨은 Virtual Minireenas(가상현실 미나리나들) 이라는 이름의 스킨이다.
2번째 스킨은 Mini Optimized Popgoes(작은 최적화된 팝고즈)라는 이름의 스킨이다.
2.6.13. HandUnit(핸드유닛)X[편집]

그의 메커니즘은 폰 가이와 엄청 비슷해. 그는 무작위로 전화를 거는데, 화면 어딘가에 있는 DEL. 버튼을 눌러서 빠르게 음소거 시킬 수 있어. 너무 오래 걸리면 단추가 사라지고 나머지 통화 내용을 들어야 해서 소리에 민감한 캐릭터가 활발해지고 임무 시스템에 임무 하나가 추가돼.
His mechanic is very similar to Phone Guy's. He will call at random, quickly mute him by pressing the DEL. button located somewhere on the screen. If the player takes too long, the button will disappear, and they will have to listen to the rest of the call, which will agitate sound-sensitive characters, and will also add one task on the Task System.
FNaF SL에 등장했던 AI 가이드다.
2.6.14. Module Heads(모듈 헤드)X[편집]

그들은 너의 사무실에 있을 거고 1개의 사용량 수치를 더 추가할 거야. 이 아이콘을 클릭해서 추가 전기 사용을 중지하고 10초 동안 추가 소음을 추가할 수도 있어. 이 작업은 하룻밤에 몇 번만 수행할 수 있어.
They will be in your Office and will add 1 extra bar of usage. You can click on them to stop the extra power usage, but add extra noise for 10 seconds. This can only be done a few times per night.
FNaF SL의 제어 모듈에 배경으로 있던 물건이다.
2.6.15. Little Joe(리틀 조)X[편집]

오전 3시에 그가 너의 사무실에 나타나서 소음 수치를 올리며 웃을 거야. 그는 소음 수치의 사용량이 1이 오르고, 리틀 조 본인이 내는 소리 말고는 아무 소리도 나지 않을 때 떠날 거야.
At 3AM, he will appear in your office and laugh, raising the Noise Meter. He will only leave once the noise meter is on 1 bar, when no sounds are being made outside of Little Joe himself.
FNaF SL의 서커스 제어실에 배경으로 있던 물건이다. FFPS에서 광고로 등장하기도 했다.
2.6.16. Magician Toy(마술사 장난감)O[편집]

그는 양손에 파란 지팡이와 빨간 지팡이를 들고 천장에 머무를 거야. 카메라를 열기 전에 파란 지팡이를 클릭해야 살아남을 수 있어. 빨간 지팡이를 클릭하면 넌 죽을 거야.
He stays on the ceiling, holding a blue wand and a red wand in both of his hands. You must click the blue wand before opening the monitor to survive. Clicking the red wand will kill you as well.
FNaF SL에서 배경으로 있던 물건이다.
2.6.17. Exotic Butters(수입산 버터)X[편집]

수입산 버터가 활동하기 시작하면 카메라를 내렸을 때 위치가 바뀔 때도 있어.
When Exotic Butters is active, it has a chance of changing position after you lower your monitor.
FNaF SL의 5일차에서 플레이어가 주급 보너스 선물로 받았던 버터로 가득 찬 바구니. 활동하는 상태가 아닐 때 밤새도록 책상 위에 있다. 클릭하면 핸드유닛이 "Exotic Butters"라고 말하는 사운드 효과가 있다.
2.6.17.1. Exotic Butters 스킨[편집]


1번째 스킨은 Sans Mug(샌즈 머그) 라는 이름의 스킨이다. 샌즈의 얼굴이 그려져있는 머그컵이다.
2번째 스킨은 Pickle Rick(피클 릭) 이라는 이름의 스킨이다. 밈으로도 사용되는 캐릭터이기도 하다.
2.6.18. Fredbear Plush(프레드베어 인형)X[편집]

그는 너의 책상에 머물러서 리모컨을 사용해서 몇 초마다 현재 보고 있는 카메라를 바꿀 거야. 코를 충분히 클릭하면 그가 카메라를 돌리는 것을 막을 수 있어.
He will stay on your desk and switch the currently viewed camera every few seconds using his remote. Clicking his nose enough will prevent him from switching the camera.
FNaF 4에서 주인공에게 말을 걸던 인형이자 FNaF SL의 제한 구역에도 배경으로 등장했던 프레드베어의 봉제인형.
2.6.19. Vlad(블라드)O[편집]

그는 너의 밤을 TV 쇼로 바꿀 거야! 1시부터 매시간마다 에피소드 타이틀 카드가 화면에 나타나. 줄거리를 진행시키려면 다음 타이틀 카드 전에 특정한 작업을 완료해야 해.
He will turn your night into a TV show! With an episode title card appearing on the screen at every other hour, starting at 1AM. You must complete certain tasks before the next title card to advance the plot.
FNaF SL의 밤마다 나오는 드라마의 등장인물이다.
2.6.20. The Sun(태양)X[편집]

그것은 온도가 100도를 넘을 때마다 GPS 시스템에서 천천히 널 향해 움직일 거고 결코 되돌아가지 않을 거야. 가까이 다가갈수록 온도가 높아져서 결국 120도로 고정 돼.
It will slowly move towards you on the GPS System whenever the temperature is above 100 degrees and will never go back. The closer it gets to you, the higher the minimum temperature will become, eventually locking you at 120 degrees.
FNaF SL의 미니게임에서 배경으로 등장했던 태양.
2.6.21. Prototime Baby(프로토타임 베이비)O[편집]

니가 상품 카운터에서 물건을 살 때마다, 그녀는 오른쪽 복도(CAM 02)에 나타날 거야. 글로벌 뮤직 박스를 연주하는 것과 동시에 오른쪽 문을 닫는 건 그녀를 멀어지게 할 거야. 그녀가 너무 오래 있으면 널 죽일 거야.
Whenever you buy something from the Prize Counter (CAM 07), she will appear at the Right Hall (CAM 02). Playing the Global Music Box and closing the Right Door at the same time will make her go away. If she's there for too long, she'll kill you.
FNaF SL의 엑스트라 메뉴에서 감상할 수 있는 서커스 베이비의 초기 버전. 현재의 베이비보다는 머리카락의 색상이 살짝 더 연하다.
2.6.22. Prototime Freddy 1(프로토타임 프레디 1)O[편집]

너가 프레디 파즈베어 마스크를 착용할 때마다, 그는 한쪽 눈으로 눈구멍을 통해 널 바라보려고 할 거야. 넌 그가 널 너무 오랫동안 보지 않도록 사무실을 둘러봐야 해. 그렇지 않으면 넌 죽을 거야.
Whenever you put on the Freddy Fazbear Mask, he will try to look at you through one of the eye holes with his one eye. You must look around the office in a way so that he will never look at you for too much time, otherwise you will die.
FNaF SL의 엑스트라 메뉴에서 감상할 수 있는 펀타임 프레디. 제작 과정 GIF에서 가져온 것이라 얼굴밖에 없다.
2.6.23. Prototime Freddy 13(프로토타임 프레디 13)X[편집]

Come closer, I sing a song for you!
가까이 와, 내가 노래 불러줄게!
대사[41]
그는 어느 파티방 카메라에 나타날 수도 있어. 그가 너에게 "가까이 와"고 하면 문을 닫아. 그가 파티방 A(CAM 07)에 있다면 왼쪽 문을 닫아. 그가 파티방 B(CAM 08)에 있다면 오른쪽 문을 닫아. 양쪽 문을 닫으면 5%의 전기를 빼앗아가.
He can appear on either Party Room camera. If he tells you to "come closer", close the door. If he's in Party Room A (CAM 07), shut the left door. If he's in Party Room B (CAM 08), shut the right door. If you close both doors, he takes away 5% of your power.
FNaF SL의 엑스트라 메뉴에서 감상할 수 있는 펀타임 프레디의 초기 버전. 원래의 이름은 그냥 프로토타임 프레디였지만, 프로토타임 프레디 1이 추가되면서 변경됐다.
2.6.24. Prototime Foxy(프로토타임 폭시)O[편집]

프로토타임 폭시는 번호가 적힌 표지판을 들고 파티방 B(CAM 08) 카메라에 머물어. 이 숫자는 일정 전기를 나타내. 녀석은 일단 네가 그 정도의 전기가 되면 공격할 거야. 너의 전기가 표지판의 전기가 됐을 때 녀석을 보지 않는 한에서만 말이야. 만약 그렇게 한다면, 녀석은 더 이상 표지판을 들고 있지 않을 거고, 아무것도 하지 않고 밤새도록 그 카메라에 남아 있을 거야.
Prototime Foxy stays on the Party Room B (CAM 08) camera holding a sign, which has a number written on it. This number signifies a certain amount of power. They will attack once you reach that amount of power, unless you are looking at them when your power reaches that amount on the sign. If you do, they will no longer hold up the sign, and will stay on that camera for the rest of the night, not doing anything.
2.6.25. The Technicians(기술자들)O[편집]

기술자 중 한 명이 조명 시스템에 나타날 거야. 4층 각 면에 있는 복도 카메라에게 전기 충격을 주면 없앨 수 있어. 일단 둘 다 나타나면, 넌 사무실의 전기 충격으로 둘 다 없앨 수 있어. 그가 널 죽일 때까지 그렇게 할 시간은 많지 않지만 말야.
One'll appear on the Light System. You can get rid of it by shocking a Hall Camera on the respective side of floor 4. Once both appear, you can use the office shock to get rid of both, though there isn't much time to do so before they kill you.
FNaF SL의 5일차에서 발로라 갤러리와 펀타임 공연장을 확인하면 볼 수 있는 기술자들의 목 매단 시체.
2.6.26. The Neighbors(이웃들)O[편집]

그들은 Lumber Co. 층 카메라에 보여. 하룻밤에 딱 한 번, 그들은 모두 나무 뒤에 숨어. 오렌지색 셔츠를 입은 사람이 있는 곳의 나무를 베고 녹색 셔츠를 입은 사람이 죽지 않기 위해 그곳의 나무를 베는 것을 피해야 해.
왜 오렌지색 셔츠 입은 놈들은 죽여버리냐
They're on the Lumber Co. camera. Once per night, they will all hide behind the trees. You must cut down the tree where the one with an orange shirt is and avoid cutting the trees where the ones with green shirts are to not get killed.
FNaF SL의 커스텀 나이트를 별 4개로 클리어 할 때마다 해금되는 미니게임 컷신에서 배경으로 등장한 캐릭터들.
2.6.27. Dark Springtrap(다크 스프링트랩)O[편집]

다크 스프링트랩은 하룻밤에 한 번씩 사무실 맨 오른쪽에 나타나며 글리치 효과도 재생돼. 히터를 켜서 그를 나가게 하기까지는 아주 짧은 시간이 주어져. 제대로 하지 않으면 넌 죽어버리고 말 거야.
Dark Springtrap will appear on the far right side of your office once per night, along with a glitch sound playing. You will only have a moment to turn on the Heater to make him leave, otherwise he will get you.
FNaF SL의 커스텀 나이트 최고 난이도인 골든 프레디 모드를 V. Hard로 클리어할 시 해금되는 마이클의 컷신에서 등장했던 스프링트랩의 모습.
2.6.28. Red Baby(레드 베이비)O[편집]

그녀는 카메라를 떠날 때 빨간 필터를 남겨둔 채 환풍구를 제외한 모든 4층 카메라에서 움직일 거야. 만약 모든 카메라에 빨간 필터가 있다면, 그녀는 널 죽여버릴 거야. 카메라의 전기 충격을 사용해서 빨간색 필터를 제거해.
She will move through every Floor 4 camera except the Vent, leaving behind a red filter when she leaves the camera. If all cameras have red filter, she will jumpscare you. Use the Shock on a camera to remove the red filter.
FNaF SL의 파일 내에만 존재하는 미사용된 서커스 베이비의 이미지.
2.7. Freddy Fazbear's Pizzeria Simulator[편집]
2.7.1. Pizza Freddy(피자 프레디)X[편집]

네가 클릭할 때마다[42]
, 피자는 너의 마우스가 아래부터 위까지 있는 바로 그 장소에서 날아올 거야. 만약 그게 너의 마우스에 닿으면, 넌 너의 점수에서 50점을 잃게 될 거야. 그의 난이도가 높을수록 피자는 더 빨리 움직일 거야.
Everytime you click, a pizza will fly in the same place your mouse is from down to up. If it hits your mouse, you will lose 50 points from your score. The higher his difficulty level is, the faster the pizza will move.
FFPS를 처음 실행 했을 때 플레이 가능한 미니게임 속 프레디.
계속 피하지 않는다면 플레이 점수가 0점이 되버리는 대참사를 만드는 짜증나는 애니매트로닉스이다.
2.7.2. Gray Freddy(그레이 프레디)X[편집]

그레이 프레디는 너의 마우스 커서를 계속 따라다닐 거야. 만약 네가 그와 너무 많이 닿으면, 그는 너의 화면에 아케이드 스크린 같은 효과를 만들어 낼 거고, 그건 밤새도록 지속될 거야. 설정[43]
에서 효과를 낮출 수 있어.
Gray Freddy will constantly follow your mouse cursor. If you get hit by him too many times, he will create an arcade-screen like effect on your screen that will last the rest of the night. You can tone down the effect in the settings.
FFPS를 처음 실행 했을 때 플레이 가능한 미니게임 속의 적 캐릭터인 프레디.
마우스 커서를 밤새도록 움직여야 되기에 꽤 귀찮은 애니매트로닉스.
2.7.3. Helpy(헬피)X[편집]

사무실에서 그를 보면, 재빨리 그를 클릭해. 그렇지 않으면 그는 뮤직 맨과 같이 소리에 민감한 애니매트로닉스를 자극해서 너에게 한 방 먹일 거야.
When you see him in your office, quickly click him, otherwise he will get in your face with an airhorn, agitating sound-sensitive animatronics like Music Man.
FFPS에 등장했던 헬피다.
2.7.3.1. Helpy 스킨[편집]


1번째 스킨은 Little Bon(작은 본) 이라는 이름의 스킨이다. 인형이다.
2번째 스킨은 Marsh(마쉬) 라는 이름의 스킨이다. 우는 아이 인형[44]이다.
3번째 스킨은 Clicky(클리키) 라는 이름의 스킨이다. 밈이다.
4번째 스킨은 Crewmate(크루원) 이라는 이름의 스킨이다. Among Us 라는 인디게임의 나오는 역할이다.
2.7.4. Bucket Bob(버킷 밥)O[편집]

그는 사무실의 오른쪽 아래나 왼쪽 아래 구석에서 조금씩 튀어나와. 그를 클릭하면 그가 뒤로 물러날 거고, 다음 코너는 무작위로 나타날 거야. 그가 너무 튀어나오면 너에게 점프스케어를 선물 할 거야.
He gradually pokes out from either the bottom right or bottom left corners of the office. Clicking him will cause him to retract and the next corner he'll pop up is random. If he pops out too much he'll jumpscare you.
FFPS에 등장했던 버킷 밥이다.쓰레기와 갱단 중 리더라고 알려져 있는 캐릭터.[45]
2.7.4.1. Bucket Bob 스킨[편집]

1번째 스킨은 Creeper(크리퍼) 라는 이름의 스킨이다. 마인크래프트의 나오는 그 크리퍼다.
2.7.5. Mr. Can-Do(미스터 캔 두)X[편집]

그는 사무실에 있을 거야. 만약 너의 커서가 풍선을 쓰레기통에 연결하는 밧줄을 통과한다면, 그의 밧줄이 끊어지고 그의 머리는 위로 떠서 유일한 공기 통풍이 막히고 너의 환기구가 고장나기 쉽게 만들 거야.
He will be in the office. If your mouse passes over the rope that connects the balloon to the trash can, his rope will break and his head will float upwards, clogging the only air-vent and making your ventilation prone to failure.
FFPS에 등장했던 미스터 캔 두다. 여자라고 오해하는 사람들이 많다.
2.7.6. Mr. Hugs(미스터 허그)X[편집]

그는 오른쪽 복도(CAM 02) 카메라에 남아 작동 상태가 아닌 상태로 있어. 그는 때때로 작동되고 큰 진공 소음을 내 소음 수치를 증가시킬 거야. 전기 충격 패널을 사용하여 그를 비활성화해.
He stays on the Right Hall (CAM 02) camera, deactivated. He will sometimes activate and make loud vacuum noises, which will increase the noise meter. Using the Shock Panel will deactivate him.
FFPS에 등장했던 미스터 허그다.
2.7.7. No. 1 Crate(넘버 원 크레이트)X[편집]

그녀는 밤의 시작 때 너의 책상 앞에 나타날 거야. 10초가 지나기 전에 발전기 키를 연타해야 사라져. 그렇지 않으면 그녀는 밤 내내 계속해서 너에게 점프스케어를 해줄 거야.
She will appear in front of your desk at the beginning of the night. You must spam-press 1 enough times before 10 seconds pass to make her disappear, otherwise she will constantly jumpscare you for the rest of the night.
FFPS에 등장했던 넘버 원 크레이트다. 남자라고 오해하는 사람들이 많다.
2.7.8. Pan Stan(팬 스탠)O[편집]

카메라를 내릴 때 오른쪽 문에 나타나는 경우가 있어. 오른쪽 문을 닫은 채로 카메라를 올리면, 그는 그걸 모욕으로 받아들이고 널 죽일 거야. 점프스케어를 피하기 위해 카메라를 올릴 때는 열어 두는 게 좋을 거야.
He will sometimes appear at the right doorway when lowering the monitor. If you put the monitor up with the Right Door closed, he will take that as an insult and kill you. Keep it open when putting up the monitor to avoid his jumpscare.
2.7.9. Happy Frog(해피 프록)O[편집]

"Everyone underestimates me, but then they turn their back, and I'm like 'BOO!', and they're like 'BLEEEGH!'"
"다들 나를 과소평가하지만, 그들이 뒤돌아섰을 때, 내가 '와악!' 하면 그들은 '으에에엑!' 하곤 하지."
"You and I don't get to talk as often as I'd like."
"우린 내가 원하는 만큼 자주 대화를 못 나누네."
"I bet you weren't expecting me, were ya? Turn your back for one second, and I'm like WASHOO, ninja skills!"
"날 기대하지는 않았지, 응? 일 초라도 뒤돌아보면 내가 막 샤삭, 닌자처럼!"
"Move over, Freddy Fazbear! Happy Frog is the new star of the show!"
"저리 비켜, 프레디 파즈베어! 해피 프록이 공연의 새 스타야!"
"We've only just begun. I will never let you leave. I will never let you rest.
"이제 막 시작했을 뿐이야. 절대로 널 보내 주지 않을 거야. 절대로 널 쉬게 해 주지 않을 거야."
대사
히터에 면역인 상태로 배관 시스템으로 너에게 가게 될 거야. 소리 미끼를 사용하서 그녀를 제자리에 유지해.
She will go through the Duct System, immune to the Heater. Use the Audio Lure to keep her in place.
FFPS에 등장했던 해피 프록이다. 여담으로 원작의 프레드베어와 비슷한 이스터에그가 존재한다. 다른 애니매트로닉스의 AI를 0으로 맞춰놓고 해피 프록의 AI를 1로 맞춰놓으면 Le Frog라는 캐릭터가 등장하는데, 이 녀석은 본작의 제작자인 KamilFirma의 예전 게임(LE FROG)에 등장했던 캐릭터로, 이 녀석에게 죽으면 트로피 룸에 Le Frog의 트로피가 추가된다.
2.7.10. Mr. Hippo(미스터 히포)O[편집]

[ 대사 펼치기 · 접기 ] ''My friend, you have met a terrible, terrible demise. But, i, uh, y'know, I-I-I don't feel too bad about it. After all, if it weren't for me it would've just been from someone else, y'know? I guess what I'm trying to say is life - life goes on. Well... Well for everyone else life goes on. Not - not for you.. uh.. You're dead. That's neither here nor there. It reminds me of one summer day in the park. I was having just a delightful picnic with my good friend Orville, and I said to him - I said "Orville, I-I have a story." And he said to me "What's the significance of the story?" and... I said to him "O-Orville, not every story has to have significance, y'know? Sometimes, uh, y'know, sometimes a story is just a story. You try to read into every little thing and find meaning in everything anyone says you'll just drive yourself crazy. Had a friend do it once - Wasn't pretty. We talked about it for years. And not only that, but you'll likely end up believing something you shouldn't believe, thinking something you shouldn't think, o-or assuming something you shouldn't assume, y'know? Sometimes I said "A story is-is just a story, so just be quiet for one second in life and eat your sandwich, okay?" Of course, it was only then I realized I'd made sandwiches. Poor Orville was... having such difficulty eating it. Elephants have those clumsy hands, y'know? Actually, I-I suppose that's the problem. They don't have hands at all, do they? The-they're all feet! An-I-I couldn't imagine someone asking me to eat a sandwich with my feet. Now, if I recall correctly there was a bakery nearby. I said to him, "Orville, let me go get you some rye bread. Now, I-I'm unsure if elephants enjoy rye bread, but I assure you that Orville does. Now this was on a Tuesday, which was good because rye bread was always fresh on Tuesday. They made sourdough bread on Monday, and threw it out Wednesday... or rather they sold it at a discount for people wanting to feed the ducks, and probably at the end of the day finally they threw it all out - I don't recall. I do remember a man who would bring his son to the bakery every Wednesday and go feed the ducks. He would buy all of the sourdough bread. Of course, y'know, you're not supposed to feed the ducks sourdough bread at all. It swells up in their stomach and then they all die. At, uh.. at least... at least that's what I've heard. Y'know I-I never saw any ducks die myself, but I did notice a substantial decrease in the duck population over the course of a few years. I just never thought to stop the man and tell him that he was killing the ducks by feeding them sourdough bread! And if you want my opinion on the matter, heh - and I told Orville this as well - "if you wanna feed ducks, or birds, or any kind for that matter, it's best to buy seed." I mean, when you think about it, breads of any sort don't occur in nature. They don't grow on trees, or spring up from the bushes. I don't think birds know what to do with bread. What was I saying? Oh-oh, yes yes. So I Bought Orville some rye bread. What a fine day it was.
참 끔찍한 최후를 맞이한 것 같구나, 친구야. 하지만 뭐, 난 그것에 대해 딱히 기분이 나쁘진 않아. 결국 내가 아니었어도 다른 아이들에게 죽을 거였잖아, 맞지? 내가 하고 싶은 말은 삶이란 건 항상 흘러간다는거야. 뭐, 너 말고 다른 사람들에게 해당되는 이야기겠지만.. 넌 죽었잖아. 너한테는 전혀 해당되지 않지. 이 말 하니까 한 여름날에 공원에서 있었던 일이 생각나네. 나는 내 친한 친구, 오빌과 함께 피크닉을 즐기고 있었어. 난 오빌에게 말했지- '오빌, 이야기를 하나 해 주고 싶어.' 그러자 오빌이 '그 이야기의 의미가 뭔데?'라고 대답했어. 그 말에 나는 '오-오빌, 모든 이야기에 의미가 있는 건 아니야. 일부 이야기는 그냥 이야기일 뿐일 수도 있어.'라고 말했어. 이 세상의 모든 사소한 것들에 의미를 부여하려 한다면 그건 그냥 너 스스로를 미치게 만드는 것 뿐이라고. 그런 종류의 친구가 하나 있었는데, 영 좋지 않았지. 이런 이야기는 두고두고 했었어. 그리고 모든 것에 의미를 부여하다 보면, 믿어서는 안될 걸 믿거나, 생각해서는 안될 걸 생각해 보거나, 추정해선 안될 걸 추정하게 될 지도 모르잖아. 그래서 가끔씩 나는 '이야기는 그냥 이야기일 뿐이야, 그러니까 잠시만 조용히 하고 샌드위치나 먹자, 알았지?'라고 넘겨버렸지. 그 때 내가 샌드위치를 만들어 갔었는데, 불쌍한 오빌은 그걸 먹는데 어려움이 있었어. 코끼리들은 손을 다루는 게 서툴잖아? 사실 그게 문제야. 코끼리들은 손이 아예 없잖아. 손이 아니라 죄다 발인 거야! 내가 생각해도 남이 샌드위치를 주면서 발로 먹으라고 하면 슬플 것 같아. 다시 생각해 보니, 그 근처에 빵집이 있었어. 난 오빌에게 '오빌, 가서 호밀빵 좀 사 올게.'라고 말했어. 모든 코끼리들이 호밀빵을 좋아하는지는 잘 모르겠지만, 오빌은 확실히 호밀빵을 좋아하더라고. 그 날은 화요일이였는데, 화요일에 팔리는 호밀빵은 항상 품질이 괜찮아서 좋았어. 월요일에는 사워도우 빵을 팔았는데, 수요일에 죄다 버려버리더라고. 사워도우 빵을 오리 먹이로 팔다가 남는 걸 버리는 거였나? 나도 기억이 안 나. 확실한 건 수요일마다 아들과 함께 빵집에 들러 오리 먹이로 줄 사워도우 빵을 사 가는 남자가 있었단 거야. 당연히 오리 먹이로 사워도우 빵을 주는 건 좋지 않지. 사워도우 빵을 계속 먹이면 오리의 배가 부풀려져 죽게 된다고. 내.. 내가 들은 바로는 그래. 내가 오리가 죽는 걸 직접 본 적은 없지만, 최근 몇 년 동안 오리의 수가 상당히 줄어들었다는 건 알고 있어. 그런데 나는 오리가 죽게 된다는 이유로 남자를 말릴 생각조차 하지 않았지! 내 의견은 그렇다고, 헤- 오빌에게도 '오리나 새나 그런 종류의 동물 아무한테나 먹이를 주고 싶다면, 씨앗을 먹이는 게 최고야.'라고 말했어. 생각해 보면, 빵 같은 게 자연에서 만들어지지는 않잖아. 나무에서 자라거나, 풀숲에서 갑자기 튀어나오지도 않지. 그나저나 내가 무슨 얘기를 하고 있었더라? 그래 그래, 오빌. 아무튼 나는 오빌에게 호밀빵을 사다 줬지. 참 좋은 날이었어.
''well... It seems that your journey has ended. Very sorry about that - It Was always going to end this way, of course. If it weren't by me, it would've just been by some other.. y'know, terrible thing just... You could not imagine how terrible it would be. Just... I get scared thinking about it! Glad it's not me. Reminds me of a.. of a time I was speaking to my good friend Orville. We were... we were sitting on a park bench watching the pigeons. I was on the left, he was on the... oh wait. Was I on the right?.. or left? Anyways, it doesn't matter. We were sitting on there, watching the pigeons, and I.. uh.. I said to Orville "Friend, those birds are frozen!" He... Kinda looked at me like I'd lost my mind. But I reminded him that it was winter, y'know? And often birds will sit in a tree until they'd freeze... Then they'd, they'd, you know, sort of fall to the ground until the sun warms up, an- and they can, y'know, move around again. So I said to Orville "You'd might as well save those breadcrumbs until the birds thaw, because they can't very well enjoy them in the condition they're in." To which he asked what I meant, and asking what condition the crumbs should be in before he threw them to the birds, assuming that I had meant the birds couldn't enjoy the breadcrumbs in the condition that the crumbs were in, when in fact I had meant the birds couldn't enjoy them in the condition that the birds were in, considering the birds were frozen, y'know? So he took a moment and then threw his last handful onto the ground. I said to him "Orville, why did you throw the breadcrumbs to the birds when I just told you they're frozen?" To which he responded "The breadcrumbs are not frozen," again misunderstanding my words. I didn't mean to say that the breadcrumbs were frozen when I told you they're frozen. I've been referring to the birds. You know, in hindsight, what I - what I should've said was - and this would make perfect sense: "Why did you throw the breadcrumbs to the birds when the birds are frozen?" He misunderstood upon my correction, stating that he didn't know what else to do with the breadcrumbs, and that perhaps, y'know, when the birds thawed they'd still be able to eat the crumbs. So I...I..I said to Orville - I said - This is what I said to him - I said "Orville, the birds maybe dead."
뭐... 네 여정은 끝난 것 같네. 미안하지만- 나는 그걸 선택해야만 했어. 만약 그게 내가 한 짓이 아니었다면, 다른 누군가가 너를 죽였을 거야. 너도 알다시피, 끔찍한 일이... 너는 그것이 얼마나 끔찍할지 상상할 수 없을 거야. 그냥... 생각만 해도 무서워! 내가 아니라서 다행이야. 생각 나네.. 내가 나의 절친 오빌과 말하고 있을 때. 우린... 우리는 공원 벤치에 앉아 비둘기들을 보고 있었어. 난 왼쪽에 있었고, 그는... 어 잠깐만. 내가 오른쪽이었나? 아니면 왼쪽? 어쨌든, 그건 중요하지 않아. 우린 그쪽에 앉아서 비둘기들을 보고 있었는데.. 어.. 나는 오빌에게 말했어. "오빌, 저 새들은 얼어 있어!" 그가... 기분이 상한 것 같았어. 하지만 그때가 겨울이었다는 걸 같이 말해 줬지. 그리고 새들은 얼어 붙을 때까지 나무에 앉아 있기도 하고... 그리고 나서 그들은 해가 따뜻해질 때까지 땅에 떨어지곤 했어. 그리고 그들은 다시 움직일 수 있었지. 그래서 나는 오빌에게 말했어. "새들이 녹을 때까지 빵 부스러기를 아껴 두는 게 좋을 거야. 새들은 그들이 있는 상태에서 그것들을 즐길 수 없으니까." 내 말이 무슨 뜻이냐고 묻고, 새들에게 빵 부스러기를 던져 주기 전에 새들이 어떤 기분이었을 것 같은지 물어봤어. 새들이 그 상태에서 빵 부스러기를 즐길 수 없다는 것을 의미했지. 새들이 얼어 있는 것을 생각해 볼 때 새들이 있는 상태에서는 새들이 그것들을 즐길 수 없다는 것을 뜻할 때, 너희들도 알고 있었어? 그래서 그는 시간을 내서 마지막 한움큼을 땅에 던졌어. 나는 그에게 말했어. " 오빌, 방금 내가 너에게 새들이 얼어 있다고 말했을 때, 왜 빵 부스러기를 준거야?" 그가 "빵가루는 얼지 않았네." 라고 대답한 것도 내 말을 오해한 거야. 그 말은 빵 부스러기들이 얼어 있다고 말하려고 했던 게 아니었어. 난 새들에 대해 말한 거였는데.. 뒤늦게 생각해 보면 내가 말했어야 했던 것은 "왜 새들이 얼어 있을 때 새들에게 빵 부스러기를 던져 준 거야?"라고 말했어야 했어. 그는 내가 줄인 것을 오해했는데, 그는 빵가루를 어떻게 해야 할지 모르겠다고 했어. 그래서... 나는 오빌에게 말했어.. -나는- 내가 그에게 말한 것이 그것 이라고- 나는 말했어- " 오빌, 새들은 죽을지도 몰라.
"It seems that you've met your end. what a pity. You know, I-I don't feel too bad about it, though. After all, If it weren't me, It would have just been one of the others, I guess. I'm honestly just glad to be out of those air ducts, you know? It-It's not easy for a Hippopotamus to fit up there, and not easy to get down either. I'm not as young as I used to be, as you can see. I used to be able to do all sorts of things. You're young, you're vibrant, you have that sort of pep in your step. It reminds me of a conversation I was having with one of my good friends, Orville. We were having a nice picnic. I believe it was summerl- no...perhaps it was...was it the fall? Yes, yes, yes, it was the fall because the leaves had turned already but I said to Orville, I says "Orville, I have a story to tell you", and Orville, he looked at me kinda odd, and-and said "What's it about?", I said "Not every story has to be about something, Orville, sometimes a person just wants to talk. Why does Everything to be a story?" I said to him. He just looked at me and he said "Well, you-you said you had a story" and you know, he was quite right. I did, in fact. I told him I had a story. I suppose if a person wants to talk, then it's best to not announce that you're telling a story. Telling a story does come with its own pressures and expectations, I-I suppose. After all, If you're just talking to a friend, then, there's no more expectations, than if you were talking into the wind! words by themselves aren't expected to carry, aren't expected to stick.but if you know if you announce you're telling a story, well, then there'd better be a point to it all, you know? No one wants to listen to someone ramble on and on and on, with absolutely no end in sight, so, you know, It's good to be mindful that when you tell someone that you're about to tell a story, that you have something to say. telling someone that you're gonna tell them a story is tantamount to asking them to stop what they're doing and-and pay attention. you're basically sayin' "Hey! Hey! Hey, buddy, stop everything, stop what you're thinking, I have a solution to everything!" and well, I didn't really have a story to tell. In hindsight, I probably just misspoke when I said I had a story. I think It would have just been better to tell Orville that I wanted to tell him something rather than tell him I had a story, but you know, even then it might have put too much importance on the whole thing. either way, It was quite a nice day. I remember-I remember that we were drinking tea."
"끝을 맞이하고 만 것 같네. 참 안 됐다. 미안하지만 알다시피, 결국 내가 아니었더라도, 다른 녀석들 중 하나가 했을거야. 배관 밖으로 나와서 정말 기뻐. 하마가 거기에 적응하기는 쉽지 않고, 내려오는 것도 쉽지 않잖아. 보다시피 난 예전만큼 젊지 않아. 나는 여러가지 일을 할 수 있었지. 넌 젊고, 활기 차고, 네 발걸음에 활력이 있어. 그걸 보니 내가 좋은 친구들 중 하나인 오빌과 나누었던 대화가 생각나. 우리는 멋진 소풍을 즐기고 있었어. 그 때가 아마 여름이었던 것 같아. -아니... 아마도 그건... 가을이었나? 그래, 응, 맞아. 왜냐하면 나뭇잎들의 모습이 변했었으니까. 그때 내가 오빌에게 하고 싶은 이야기가 있다고 했어. 그리고 오빌은 이상하게 나를 보았어. "무슨 이야기인가?" "모든 이야기가 주제를 갖고 있는 것이어야 하는 건 아니야. 가끔 사람들은 그냥 이야기하고 싶어해. 왜 모든 것이 하나의 이야기가 될까?" 나는 그에게 말했어. 그는 나를 쳐다보더니 이렇게 말했어. "음, 자넨 이야기가 있다고 했다네." 그리고 알다시피 그의 말이 옳았지. 나는 그에게 제가 이야기를 가지고 있다고 말했으니까. 어떤 사람이 말하고 싶어 한다면, 이야기를 하고 있다는 것을 알리지 않는 것이 가장 좋을 것 같아. 이야기를 하는 것은 그것만의 압박감과 기대를 가지고 오는 것 같고. 결국, 너희들이 친구와 이야기를 하고 있다면, 기대 이상의 것이 있을 수 없지. 너희들이 바람에 대고 이야기하는 것보다 말들이 더 이상 지켜지지 않을 거야. 하지만 만약 발표를 한다면, 이야기에 대한 요점이 있어야 해. 아무도 누군가의 도저히 끝날 것 같지가 않은 이야기를 듣고 싶어 하지 않잖아. 그래서 누군가에게 이야기를 할 때 할 말이 있다면 다른 사람에게 이야기를 들려주겠다고 말하는 것은 그들이 하고 있는 일을 멈추고 집중하라고 요구하는 것과 같다는 걸 아는 게 좋은 것 같아. 기본적으로 "이봐! 어이! 이봐, 그만해. 생각하는 걸 멈추라고. 나에겐 모든 문제에 대한 해결책이 있어!" 그리고 나는 말할 이야기가 없었어. 돌이켜 생각해 보면, 내가 이야기가 있다고 말한 건 아마도 그냥 실수였던 것 같아. 오빌한테 내가 이야기가 있다고 말하는 것보다는 그에게 하고 싶은 말이 있다고 하는 것이 더 나았을 것 같아. 그런데 그렇게 하는 것도 대화에 너무 무게를 실었을 지도 모르겠지만. 어쨌든, 꽤 좋은 날이었어. 기억 나네. 차를 마시고 있었던 게 기억나."
It seems that you have met a horrible demise, my friend. But uh, you know, these… these things happen and... and life... life goes on. N-not for you, obviously, uh, you're dead, but uh, it reminds me of a time I was having a conversation with my friend Orville. We were, uh, where were we? We were by the... the river, we were sitting by the river and watching the fish leap over the falls and uh, I said to Orville "You know, sometimes I feel like a fish leaping over and over again, always trying to get somewhere. Though, I don't know where only to find myself in the jaws of a beast." He, of course, looked at me surprised, you know? "Have you been in the jaws of a beast, friend?" To which I said, "No, of course not Orville". I said, "No no no, I... I simply meant that life can seem like a relentless endeavor to overcome meaningless obstacles, only to meet an equally meaningless fate regardless of your efforts, regardless of the obstacles you passed. And, uh, Orville he... he stood and proceeded to drape me with a picnic cloth, to which I... I asked him, I said, 'Friend, what... what are ya doing?" He looked at me very concerned really. "I feel like you've gotten too much sun". Indeed, heh, indeed I had. He proceeded to pour me a glass of just... ice cold lemonade. Ooh, you ever mix it with iced tea? Ya do, like... half lemonade ha... ooh, you should try it so well, you can't, because you're dead, but, anyways, so you may be asking yourself, "How did I go from sitting by the falls and drinking lemonade to being wedged in the air duct, not only with Orville, but with an entire assortment of fruity-colored friends?" Well, there's uh... there's really no good answer to that, but... perhaps I met a demise of my own at some point and... this is my afterlife or my dream or whatever it might mean, I... I honestly don't know. Or... maybe it doesn't mean anything at all. Maybe it doesn't mean anything at all...
보아하니 끔찍한 죽음을 맞이한 것 같네, 내 친구여. 하지만 어, 알다시피, 이... 이것들은 발생하고... 그리고 삶... 삶은 계속되지. ㄴ-넌 아니지, 당연히, 어, 넌 죽었어, 하지만 어, 내가 내 친구 오빌과 대화를 했던 때가 기억나네. 우리는 어, 어딨었지? 우리는... 강에 있었어, 우리는 강에 앉아 있었고 물고기가 계곡을 뛰어다니는걸 보고 어, 난 오빌에게 말했어 "알다시피, 가끔 나는 항상 어딘가에 가려고 해서 계속 뛰어넘는 물고기 같이 느껴져. 어딘지는 모르고 그저 짐승의 턱안에서 자신을 찾게 될것이긴 하지만." 그는 당연히 나를 보면서 놀라워 했지, 알아? "넌 짐승의 턱 안에 있었던 적이 있어, 친구?" 그러자 난 "아니, 당연히 아니지 오빌." 난 말했어 "나는 인생이 의미없는 장애물을 극복하기 위해 끊임없이 노력하는 것처럼 보일 수 있으며, 지나친 장애물에 관계없이 당신의 노력에 관계없이 똑같이 의미없는 운명을 만날 수 있음을 의미한거야." 그리고 어, 오빌 그는... 그는 서서 피크닉 천으로 나를 덮었고, 나는 그에게 물었어. "친구, 뭐... 뭐하는거야?" 그는 나를 매우 정말 걱정하듯이 보았어. "내 생각에 넌 햇빛을 너무 많이 받은 것 같아." 당연하지, 헤, 당연히 내가 그랬지. 그는 나에게.... 차가운 아이스 레모네이드 병을 나에게 부었어. 오, 너 그거 아이스티랑 섞어봤어? 그러니까 그... 반은 레모네이드, 반은... 오, 그거 꼭 해봐. 뭐, 넌 죽어서 못하지만, 어쨌든, 그래서 너는 네 자신에게 물어볼수도 있어, "나는 어떻게 낙숫가에 앉아서 레모네이드나 마시다가 오빌뿐만 아니라 온갖 과일 색깔의 친구들과 함께 배관에 머물게 되었을까?" 음, 저기... 좋은 답은 없지만... 아마도 나는 어느 시점에서 내 자신의 죽음을 만났고... 이게 내 사후세계든 내 꿈이든 뭐든간에, 난... 솔직히 모르겠어. 아니면... 아무 의미도 없을지도 몰라. 어쩌면 아무 의미도 없을지도...
대사[46]
그는 배관 시스템으로 너에게 접근 할 거야. 소리 미끼를 사용해서 그를 제자리에 유지하거나 히터를 사용해서 그를 뒤로 밀어야 해.
He will go through the Duct System. Use the Audio Lure to keep him in place or the Heater to push him back.
FFPS에 등장했던 미스터 히포다. UCN에서
2.7.10.1. Mr. Hippo 스킨[편집]

1번째 스킨은 Jack-O-Mr. Hippo(잭-오 미스터 히포) 라는 이름의 스킨이다.
2.7.11. Pigpatch(피그패치)O[편집]

"I consider it a dignified death. Not really, It was actually quite pathetic."
"장엄한 죽음이었다고 생각해. 거짓말이야, 꽤 한심했어
"If you sit by the river long enough, you will see the body of your enemy float by. Heh-Heh-Heh-Heh."
"강에 오래 앉아 있다 보면 적의 시체가 떠내려가는 것을 보게 되지. 헤-헤-헤-헤."
"Even monkeys fall from trees."
"원숭이조차도 나무에서 떨어지지."
"The nail that sticks out, gets hammered down."
"튀어 나온 못은 망치질을 당하기 마련이지."
"The talented hawk, hides his claws."
"재능 있는 매는 발톱을 숨기는 법이야."
대사[47]
그는 배관 시스템으로 너에게 접근 할 거야. 소리 미끼를 사용해서 그를 제자리에 유지하거나 히터를 사용해서 그를 뒤로 밀어야 해.
He will go through the Duct System. Use the Audio Lure to keep him in place or the Heater to push him back.
FFPS에 등장했던 피그패치다.
2.7.12. Nedd Bear(네드 베어)O[편집]

"Don't you hate getting killed by obscure secondary characters?"
"애매한 조연 캐릭터한테 죽는게 싫지 않니?"
"Stranger danger!"
"낯선 사람은 위험해!"
"I was just waiting for you to drop your guard!"
"난 네가 방심할 틈을 노리고 있었지!"
"Whoops! That's gonna leave a mark!"
"어이쿠! 그거 흉터 좀 남겠는걸!"
"This is how it feels, and you get to experience it over, and over, and over again. Forever. I will never, let you leave."
"이게 어떻게 느껴지든지, 너는 계속해서 느끼게 될 거야. 계속, 계속해서, 영원히 말이야. 나는 절대로, 널 놓아주지 않을 거야."
대사
그는 배관 시스템으로 너에게 접근 할 거야. 히터를 사용해서 그를 밀어내. 그는 때때로 소리 미끼에 이끌리는데, 이는 약 50%에 해당해.
He goes through the Duct System. Use the Heater to push him back. He is sometimes attracted by the Audio Lure, about 50% of the time.
FFPS에 등장했던 네드 베어다.
2.7.12.1. Nedd Bear 스킨[편집]

1번째 스킨은 Negate Rainbow Freddy(네게이트 레인보우 프레디) 라는 이름의 스킨이다. 왜 스킨으로 나왔는지 모르겠다.
2.7.13. Orville Elephant(오빌 엘리펀트)O[편집]

"What did you think of my act?"
"내 공연에 대해 어떻게 생각하는가?"
"I hope you enjoyed the grand finale!"
"멋진 최종장을 즐겼기를 바란다네!
"Now is my time to shine!"
"지금이야말로 내가 빛날 시간인 게야!"
"I don't get out much, so you'll have to forgive my enthusiasm."
"나는 자주 나가지 않으니, 내 열정을 용서해야 할 걸세."
"He tried to release you. He tried to release us! But I'm not gonna let that happen. I will hold you here, I will keep you here. No matter how many times they burn us."
"그는 자네를 놓아주려고 했다네, 그는 우리를 놓아주려고도 했지! 하지만 난 그렇게 두지 않을 걸세. 난 자네를 여기에 묶어둘거고, 여기에 붙잡아둘게야. 그들이 우리를 얼마나 많이 불태울지라도 말일세."
그는 배관 시스템으로 너에게 접근 할 거야. 히터를 사용해서 그를 밀어내. 그는 때때로 소리 미끼에 이끌리는데, 이는 약 10%에 해당해.
He goes through the Duct System. Use the Heater to push him back. He is rarely attracted by the Audio Lure, about 10% of the time.
FFPS에 등장했던 오빌 엘리펀트다.[48]
히터를 지속적으로 틀어줘야 하기에 굉장히 짜증나는 녀석이다.
2.7.13.1. Orville Elephant 스킨[편집]

1번째 스킨은 Bromine(브로마인) 이라는 이름의 스킨이다. Ultra Custom Night 측 에서 직접 만든 스킨이다.
2.7.14. Rockstar Freddy(락스타 프레디)O[편집]

"Please deposit five coins."
"동전 5개를 지불해 주십시오!"
"You are attempting to trick Freddy!"
"당신은 프레디를 속이려 하고 있습니다!"
"Freddy doesn't like this!"
"프레디는 이것이 마음에 들지 않습니다!"
"Thank you for depositing five coins."
"동전 5개를 지불해 주셔서 감사합니다!"
대사
그는 밤새도록 너의 사무실에 머물 거고, 때때로 작동해서 5개의 파즈코인을 요구할 거야. 점프스케어를 피하려면 잠시 동안 히터를 켜거나 지불해. 그는 네가 카메라 안에 있을 때만 파즈코인을 요구할 수 있어.
He will stay in your office for the entire night, and will sometimes activate and ask for 5 Faz-Coins. Deposit them or turn on the Heater for a short while to avoid his jumpscare. He can only ask for Faz-Coins when you are inside the monitor.
FFPS에 등장했던 락스타 프레디다.
2.7.14.1. Rockstar Freddy 스킨[편집]

1번째 스킨은 Piglin(피그린) 이라는 이름의 스킨이다. 마인크래프트의 나오는 그 피그린.
2.7.15. Rockstar Bonnie(락스타 보니)O[편집]

"So good to see you again, my truest friend, but now your life must end."
"다시 만나서 참 기쁘군, 내 진정한 친구여, 하지만 이제 네 삶은 끝나야만 한다네."
"What a fine day, to come here and say, that your face and flesh, I must flay."
"참으로 좋은 날이군. 이곳에 와서, 너의 얼굴과 살점을 찢어 버리기에 말이야."
"What a treat, to come here and meet, your face as it hits concrete!"
"여기 와서, 콘크리트에 부딪히는 너의 얼굴을 보니, 얼마나 기쁜지!"
"I found my guitar, now reach for the stars, as I plunge it through your heart!"
"내 기타를 찾았으니, 이제 별을 향해 손을 뻗을 차례라네. 마치 내가 네 심장을 뚫어버릴 때처럼!"
"Why so blue? You know I'll be true, and now, I'll make slivers out of you."
"왜 그리 우울해? 너도 내가 진실된 걸 알잖아, 그리고, 이제 너를 조각내 버릴 거야."
대사
락스타 보니가 활동할 경우 사무실 한가운데에 모습을 드러낼 수도 있지만 네가 카메라에 너무 오래 있을 경우에만 가능해. 만약 이런 일이 일어난다면, 카메라를 위로 올려서 1층에서 기타를 찾아야 해. 넌 특정 카메라에서 그의 기타를 찾을 수 있고, 기타는 왼쪽 복도, 오른쪽 복도, 펀타임 코브, 파츠/서비스에 나타날 수 있어. 제시간에 기타를 찾지 못하면 사무실의 불빛이 깜박이고 그가 널 죽임으로 게임이 끝나지.
If active, Rockstar Bonnie has a chance to appear in the middle of the office, but only if the player lingers too long on the monitor. Should this happen, the player must pull up the monitor and search for his guitar on Floor 1. The player has approximately 20 seconds to find his guitar on certain cameras, the guitar can appear on the left hall, right hall, Funtime Cove, and Parts/Service. If the player fails to find his guitar in time, the lights in the office will flicker and he will then proceed to jumpscare the player, causing a game over.
FFPS에 등장했던 락스타 보니다.
2.7.15.1. Rockstar Bonnie 스킨[편집]


1번째 스킨은 Villager(주민)이라는 이름의 스킨이다. 마인크래프트에 나오는 그 주민이다.
2번째 스킨은 Pickle Chin(피클 친)이라는 이름의 스킨이다.
2.7.16. Rockstar Chica(락스타 치카)O[편집]

"That's right! And don't you come back now, y'hear?"
"잘했어! 그리고 이제 다시는 돌아오지 마, 알아들었어?"
"That'll teach you fer trying to trick this ol' bird!"
"이 늙은 새를 속이려 하면 어떻게 되는지 똑똑히 알았겠지!"
"Thought you could fool me with that sign, but I was too smart for ya!"
"그 표지판으로 날 속일 수 있다고 생각했겠지, 하지만 난 너보다 똑똑해!"
"I may not like wet floors, but the smell fresh meat is just too enticing! Haha!"
"비록 젖은 바닥은 마음에 안 들지 모르지만, 신선한 고기 냄새가 너무 매력적이야! 하하!"
"Whoops! Looks like you're the one that slipped up this time!"
"이런! 이번엔 네가 실수한 것 같네!"
대사
왼쪽과 오른쪽 복도를 확인한 다음 미끄러움 바닥 표지판을 클릭해서 그녀와 같은 쪽에 배치해. 표지판이 제자리에 있으면 그녀는 들어가지 않을 거야.
Check the left and right hallways, then click the Wet Floor Sign to place it on the same side as her. She won't enter if the sign is in place.
FFPS에 등장했던 락스타 치카다.
2.7.16.1. Rockstar Chica 스킨[편집]


1번째 스킨은 Rockstarolette 라는 이름의 스킨이다. FNaF SL 에 나오는 인형.
2번째 스킨은 The Hobos(호보들) 이라는 이름의 스킨이다.
구형 보니와 구형 프레디가 같이 있는 모습. 밈이다. 상점에서 1000 파즈코인으로 구매할 수 있다.
3번째 스킨은 Delivery Rockstar Chica(딜리버리 록스타 치카) 라는 이름의 스킨이다. 곧 FNaF AR 스페셜 딜리버리의 나올 록스타 치카의 모습.
2.7.17. Rockstar Foxy(락스타 폭시)O[편집]

"Yarr! what can I do for ya?"
"얄! 뭘 해주면 될꼬?"
"Yargh! how may I be of service to ya?"
"얄! 내가 어찌 도움이 되어줄꼬?"
"Yarr! Who touched me bird?"
"얄! 내 새 건든 게 누군디?"
"Yarr! Me bird likes you, so I'll do ye a favor."
"얄! 내 새가 자네를 좋아하니, 부탁을 하나 들어주겠소."
"Yarr! Ye win some, ye lose some!"
"얄! 얻는 게 있으면 잃는 것도 있는거여!"
"Yargh! Ye play with fire an' sometimes ye get burned!"
"얄! 불장난질하면 언젠가 데이게 되어 있데이!"
대사
그의 앵무새를 볼 때, 그걸 클릭하면 록스타 폭시가 도움을 줄 수 있어. 1%의 전기를 공급하거나, 사무실 온도를 60도로 설정하거나, 10개의 파즈코인을 수집하거나, 잠시 동안 모든 소음을 제거할 수 있어. 하지만 이건 위험과 함께 와, 그는 기분이 나빠서 그의 앵무새를 클릭한 후 널 죽일지도 몰라. 그는 인공지능이 0임에도 활동해.
When you see his parrot, click it and Rockstar Foxy may offer you some help. You can choose to gain 1% Power, make the office a cool 60 degrees, gain 10 Faz-Coins, or remove all noise for a while. This comes with risk however, he may be in a bad mood and kill you after clicking his parrot. He is also active at 0.
FFPS에 등장했던 그 락스타 폭시다.
2.7.18. Music Man(뮤직 맨)O[편집]

"You and I will be making music together for a long, long time!"
"너와 난 아주 아주 오랫동안 함께 음악을 만들 거야!"
"You hear that? It's the sweet, sweet sound of your eternal silence!"
"들려? 네 영원한 침묵의, 아름답고도 아름다운 소리야!"
"Hey, keep it down, would ya?"
"어이, 조용히 좀 해줘?"
"When I'm here, you play by my rules!"
"내가 있을 땐, 넌 내 규칙을 따라야 해!"
"A song was requested of me, and now I sing it!"
"노래 요청이 들어왔으니, 이제 노래해야지!"
대사
그는 네가 더 많은 소음을 낼 수록 그의 심벌즈를 점점 칠 거고, 결국 점프스케어를 하게 될 거야. 그를 진정시키려면 소음을 줄여.
He will crash his cymbals faster and faster the more noise you make, eventually leading to a jumpscare. Turn the noise down to calm him down.
FFPS에 등장했던 그 뮤직 맨이다.
2.7.18.1. Music Man 스킨[편집]

1번째 스킨은 Snow Music Man(눈 뮤직 맨)이라는 이름의 스킨이다.
2.7.19. El Chip(엘 칩)X[편집]

가끔 그의 레스토랑 광고가 너의 화면에 나타날 거야. 스킵을 클릭하거나 엔터 키를 눌러 닫아.
An ad for his restaurant will sometimes appear on your screen. Click skip or press Enter to close it.
FFPS에 등장했던 그 엘 칩이다.
2.7.20. El Chip 스킨[편집]


1번째 스킨은 Nard(나드) 라는 이름의 스킨이다. 밈이다.
2번째 스킨은 July 10th, 2021(2021년 7월 10일)이라는 이름의 스킨이다.
3번째 스킨은 Optimized Popgoes(최적화된 팝고즈)라는 이름의 스킨이다.
2.7.21. Funtime Chica(펀타임 치카)X[편집]

"I'm ready for my close up!"
"클로즈업 받을 준비됐어!"
"Don't get distracted!"
"한눈팔지 마!"
"Today is all about me, me, me!"
"오늘의 주인공은 나야, 나! 나!"
"Say cheese!"
"치즈!"
"Smile!"
"스마일!"
대사
그녀는 너의 주의를 산만하게 하려고 번쩍이는 불빛과 함께 무작위로 나타날 거야. 그녀를 피할 방법은 없어.
She will appear at random along with flashing lights to distract you. There is no way to avoid her.
FFPS에 등장했던 펀타임 치카다. FFPS에서야 나온 치카의 펀타임 버전이기도 하다.[49]
2.7.21.1. Funtime Chica 스킨[편집]


1번째 스킨은 Swapped Funtime Chica 라는 이름의 스킨이다. 펀타임 치카가 나타났을 때에 나오는 실루엣이 그대로 스킨화 되었다.[50]
2번째 스킨은 Eggy(에기)라는 이름의 스킨이다.
2.7.22. Molten Freddy(몰튼 프레디)O[편집]
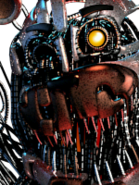
그는 환풍구 시스템으로 너에게 접근 할 거야. 그의 웃음소리를 듣고 문을 닫아. 그는 환풍구 덫에 면역이야.
He will go through the Vent System. Listen for his laugh and close the door. He is immune to the Vent Snare.
FFPS에 등장했던 몰튼 프레디다. 이 놈에게 죽으면 늘 들었던 웃음 소리를 낸다.
2.7.22.1. Molten Freddy 스킨[편집]

1번째 스킨은 We Clown 이라는 이름의 스킨이다. 병맛적인 스킨이다.
2.7.23. Scrap Baby(스크랩 베이비)O[편집]

"Time for your controlled shock."
"전기 충격 받을 시간이야."
"Let's see how many pieces I can cut you into."
"널 얼마나 많은 조각으로 자를 수 있을지 보자고."
"You won't die, but you'll wish you could."
"넌 죽지 않을 거야, 하지만 죽기를 바라게 될 걸."
대사
그녀는 너의 책상 맞은 편에 나타날 거야. 그녀가 움직일 때, 전기 충격을 사용해. 그녀가 전기 충격 받지 않고 카메라를 올리면 점프스케어로 직행할 거야.
She will appear on the opposite side of your desk. When she moves, use a controlled shock. Pulling up the monitor without shocking her will result in a jumpscare.
FFPS에 등장했던 그 스크랩 베이비다.
2.7.24. Afton(애프튼)O[편집]
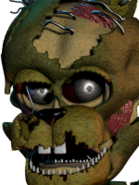
"I always come back."
"난 언제나 돌아온다."
대사[51]
하룻밤에 한 번씩 그는 환기구로 들어가려고 할 거고, 환기구 소리가 많이 나고 불빛이 깜박거리게 할 거야. 그가 너를 잡지 못하도록 문을 닫아.
Once per night he will try to get in through the right vent, making lots of vent-banging noises and making the lights flicker. Close the door to prevent him from getting you.
FFPS에 등장했던 애프튼이다[52]. 한쪽 팔이 없다.
2.7.25. Lefty(레프티)O[편집]

"Shhhh...come spend eternity inside with me."
"쉬이이잇... 와서 영원히 살아 이 안에서 나와 함께."
"Shhhh...I've been looking for you and now I will never let you go."
"쉬이이잇... 난 계속 널 찾고 있었어, 그리고 이젠 널 절대로 보내주지 않을 거야."
"Shhhh...I'm so glad that I found you, let me make room for you."
"쉬이이잇... 널 찾아내서 정말 기뻐, 너를 위한 방을 마련해줄게."
"Shhhh...it will all be over soon."
"쉬이이잇.... 곧 다 끝날 거야."
"Shhhh...there is room for one more."
"쉬이이잇... 또 다른 한 명을 위한 공간이 있어."
대사
그는 공급 옷장(CAM03)에 머물면서 더 활동적이 될 거고 소음이나 온도가 높으면 방을 나가기 시작할 거야. 글로벌 뮤직 박스를 켜는 건 그를 달래줄 거야. 레프티는 데스 코인에 취약하며, 그것에 의해 밤부터 제거될 수 있다는 점에 유의해야 해.
He stays in the Supply Closet (CAM 03) and will get more agitated and start to leave the room if there's a lot of noise or heat. Turning on the Global Music Box will soothe him. It should be noted that Lefty is vulnerable to the Death Coin and can be removed from the night by it.
FFPS에 등장했던 레프티다.
2.7.26. Simulator Paperpals(시뮬레이터 종이 친구들)X[편집]

???
FFPS에 등장했으며, 구입할 수 있는 상품 중 하나였다. 또한 UCN에서는 오른쪽 복도 카메라에 장식으로서 이스터에그로 출연했다.
공략은 종이 친구들과 똑같이 행동한다. 에어혼 소리와 함께 무작위로 점프스케어를 한다.
2.7.27. Gumball Swivelhands(검볼 스위블핸드)O[편집]

프레디 파즈베어 마스크나 카메라를 너무 오랫동안 쓰면 그는 너의 사무실의 맨 왼쪽에 머물며 손을 점점 더 빠르게 회전시킬 거야. 만약 손이 너무 빨리 회전한다면, 그는 널 죽일 거야. 마스크나 카메라를 사용하지 않으면 손의 회전 속도가 점점 느려져.
He stays at the very left side of your office and will swivel his hands faster and faster if the Freddy Fazbear Mask or cameras are put on for too long. If they swivel too fast, he will jumpscare you. His hands will start to swivel slower and slower if you aren't using the mask or cameras.
FFPS에 등장했으며, 구입할 수 있는 상품 중 하나였다.
2.7.28. Candy Cadet(캔디 커뎃)X[편집]

"Now I will tell you a story..."
"이제 내가 이야기를 해줄게..."
"He pieced the remains together..."
"그는 남은 시체를 하나로 모아..."
"But he could not choose..."
"차마 고르지 못했지..."
"He promised to never leave them..."
"그는 아이들을 절대로 떠나지 않겠다고 약속했고..."
대사
그는 너의 사무실에 머무를 거야. 네가 발전기를 사용할 때, 그가 작동해서 오작동을 일으킬 가능성이 있어. 그는 빠르게 끊겨 소음 수치가 채워지는 몇 개의 문장을 반복해서 말하기 시작할 거야. 그를 멈추게 하려면 발전기를 꺼.
He will stay in your office. When you're using the Power Generator, there is a chance he'll activate and start malfunctioning. He will start repeatedly saying some sentences that quickly cut off, causing the Noise Meter to fill up. Turn off the Power Generator to make him stop.
FFPS에 등장했으며, 구입할 수 있는 상품 중 하나였던 캔디 커뎃. UCN에서는 배경으로 등장했었지만, 여기서는 정식으로 출현했다.
2.7.29. Ballpit Tower(볼풀장 타워)X[편집]

그는 반인륜적 범죄 때문에 너의 사무실 천장에 붙어 있어. 사무실이 너무 오랫동안 120도일 경우 테이프가 닳아 천장에서 떨어져 땅에 부딪혀 폭발하고 볼풀장에서 나온 공들이 사무실 여기저기에 널려 있을 거야.
He stays duct taped to the ceiling of your office due to his crimes against humanity. If the office is 120 degrees for too long, the tape will become worn out, and he will fall from the ceiling, hit the ground, explode, and the balls from the ballpit will be all over the office.
FFPS에 등장했으며, 구입할 수 있는 상품 중 하나였다.
2.7.30. Lemonade Clown(레모네이드 광대)O[편집]

하룻밤에 한 번씩 그는 어린이와 함께 광대코 경적 소리와 함께 너의 책상 위에 나타날 거야. 겁을 주려면 화살표 키를 사용해서 아이를 아이에게로 옮겨. 너무 오래 걸리면 그가 너에게 점프스케어 할 거야.
Once per night he will appear on your desk with the sound of a clown nose honking, along with a child. Use your arrow keys to move him to the child to scare it. Take too long and he will jumpscare you.
FFPS에 등장했으며, 구입할 수 있는 상품 중 하나였다. 메커니즘은 원작의 미니게임에서 가져왔다.
2.7.31. Fruit-Punch Clown(과일 음료 광대)O[편집]

하룻밤에 한 번씩 그는 어린이와 함께 광대코 경적 소리와 함께 너의 책상 위에 나타날 거야. 겁을 주려면 화살표 키를 사용해서 아이를 아이에게로 옮겨. 너무 오래 걸리면 그가 너에게 점프스케어 할 거야.
Once per night he will appear on your desk with the sound of a clown nose honking, along with a child. Use your arrow keys to move him to the child to scare it. Take too long and he will jumpscare you.
FFPS에 등장했으며, 구입할 수 있는 상품 중 하나였다. 메커니즘은 원작의 미니게임에서 가져왔다.
2.7.32. Neon Jukebox(네온 주크박스)O[편집]

그것은 너의 글로벌 뮤직 박스를 대체할 것이기 때문에, 몇 초마다 넌 너의 전력의 5%를 지불해야만 해. 지불을 너무 오래 기다리면 점프스케어를 당할 걸 감수해야 해.
It will replace your Global Music Box, so every few seconds you're using it you must pay it 5% of your power. Waiting too long to pay will result in a jumpscare.
FFPS에 등장했으며, 구입할 수 있는 상품 중 하나였다.
2.7.33. Disco Pizza Light(디스코 피자 라이트)X[편집]

디스코 피자 라이트는 빠르게 화면을 가로질러 움직여 회전하면서 밤새 화면의 벽에서 튕겨져 나올 거야. 피자를 클릭하면 디스코 피자 파티를 더 할 수 있도록 더 늘어나.
The Disco Pizza Light quickly moves across the screen, bouncing off the walls of the screen for the entire night while spinning. Clicking on the pizza will duplicate it so that you can have a disco pizza party.
FFPS에 등장한 구입할 수 있는 상품 중 하나다.
2.7.34. Egg Baby(에그 베이비)X[편집]

몇 초마다 블루프린트가 카메라에 나타나서 보이지 않게 할 거야. 카메라 오른쪽 아래에 있는 파란색 버튼을 눌러 블루프린트를 꺼.
Every few seconds, a blueprint will appear on your monitor, obscuring your view. Press the blue button on the bottom right corner of the monitor to turn off the blueprint.
FFPS에 등장했으며, 구입할 수 있는 상품 중 하나였다.
2.7.35. Prize King(프라이즈 킹)X[편집]

카메라에 그의 상금이 걸린 공이 보이면, 그걸 클릭하면 그가 너의 사무실에 나타날 거야. 운이 좋으면 파즈코인을 5~20개 줄 거야. 만약 네가 운이 나쁘다면, 그는 캐릭터 명단에서 밤새도록 새로운 캐릭터를 소환해 낼 거야.
When you see one of his prize balls on the cameras, click it and he will appear in your office. If you're lucky, he will give you 5 to 20 Faz-Coins. If you're unlucky, he will spawn a new character from the roster to the night.
FFPS에 등장했으며, 구입할 수 있는 상품 중 하나였다.
2.7.35.1. Prize King 스킨[편집]

1번째 스킨은 ZOV 라는 이름의 스킨이다. 거부된 커스텀 나이트 2 에서 나온다.
2.7.36. Security Puppet(시큐리티 퍼펫)O[편집]

그의 뮤직 박스는 네가 더 많은 소음을 낼수록 점점 더 빨리 재생되고 결국 점프스케어를 유발하게 만들어. 그녀를 진정시키는 유일한 방법은 글로벌 뮤직 박스를 켜는 거야.
Its music box plays faster and faster the more noise you make, eventually leading to a jumpscare. The only way to calm it down is to turn on the Global Music Box.
FFPS에 등장했으며, 구입할 수 있는 상품 중 하나였다. UCN에서는 SL테마 사무실의 배경으로만 등장했었지만, 여기서는 정식으로 출현했다.
2.7.37. Funtime Cupcake(펀타임 컵케이크)X[편집]

카메라가 오랫동안 내려 가있을 수록, 그가 너의 오른쪽 환풍구 문에 나타날 가능성이 커져. 그가 거기 있을 때, 넌 카메라를 몇 초 동안 볼 때까지 그 문을 닫을 수 없을 거야.
The longer the cameras are down, the more chance of him appearing at your Right Vent Door. When he's there, you will be unable to close it until looking at the cameras for several seconds.
펀타임 치카가 들고있는 컵케이크.
2.7.38. Pickles(피클)X[편집]

그것은 밤새도록 책상 위에 있을 거야. 한 개의 피클을 먹기 위해 병을 클릭할 수 있어. 피클을 너무 많이 먹거나 한 시간 동안 한 개도 먹지 않으면, 항아리가 넘어져서 선풍기가 작동하지 못하게 돼.
It will stay on your desk the entire night. You can click the jar to eat one pickle. If you eat too many pickles or don't eat one for an hour, the jar will fall over and short-circuit the fan, preventing it from working.
FFPS에 등장했으며, 구입할 수 있는 상품 중 하나였다.
2.7.39. Remade Afton(리메이드 애프튼)[편집]
그는 다른 오른쪽 통풍구를 리메이크해서 현재 환풍구를 바꿔놓을 거야! 불행하게도, 그는 환풍구의 문을 리메이크하는 것은 잊었지. 그가 널 찾아왔을 때 그를 막기 위해 임무 시스템의 환풍구 문 리메이크 임무를 완료해야 해! 그에게 오른쪽 환풍구 문은 통하지 않아..
He will remake another right vent and put it on top of the current one! Unfortunately, he forgot to remake a door for it. When he comes for you make sure to complete the Remake Vent Door task on the Task System to close him out! He is not affected by the side vent door at all.
FFPS의 업데이트된 버전에 나오는 애프턴의 점프스케어.
2.7.40. Remade Lefty(리메이드 레프티)O[편집]

네가 카메라를 올리면, 넌 때때로 그가 밀치는 소리를 들을 거야. 그가 돌아갈 때까지 카메라를 내리고 다시 올리지 마. 글로벌 뮤직 박스를 켜면 그는 더 빨리 떠나게 될 거야.
When you have the monitor up, you will sometimes hear his shushing. Lower the monitor and do not open it again until he leaves the office. Turning on the Global Music Box will make him leave faster.\
FFPS의 업데이트된 버전 속 레프티의 점프스케어. 원작인 UCN의 레프티는 구버전의 레프티 모델을 사용했었는데, 울커나의 레프티도 그대로 구버전을 사용하면서 이렇게 따로 분리된 듯 하다.
2.7.40.1. Remade Lefty 스킨[편집]

1번째 스킨은 Fazbear Tycoon Lefty(파즈베어 타이쿤 레프티)라는 이름의 스킨이다.
2.7.41. Surprised BB(깜짝 놀란 BB)X[편집]

4층에서 전기 충격을 사용할 때마다 다른 한 명이 카메라 화면을 차단하기 시작해. 만약 너무 많이 나타난다면, 큰 에어혼 소음이 날 거야.
Every time you use the controlled shock on Floor 4, another one will begin to block your camera screen. If too many of them appear, a loud airhorn noise will play.
FFPS의 레모네이드 광대와 과일 음료 광대 미니게임에 등장했던 BB의 깜짝 놀란 버전.
2.7.42. The Enterepreneur(기업가)X[편집]

매 시간마다, 넌 그 시간에 얼마나 잘했는지에 따라 점수를 받을 거야. 점수가 높으면 게임은 계속되고 아무 일도 일어나지 않아. 점수가 낮으면 밤 사이 온도가 120도 이상으로 유지 돼.
After every hour, you'll get a grade based on how good you did on that hour (enemies blocked, Faz-Coins gained, etc). If it's high, you continue and nothing happens. If it's low, the temperature will be kept on over 120° for the rest of the night.
FFPS의 컷신에서 등장했던 곰 캐릭터.
2.7.43. Cassette Man(카세트 맨)X[편집]

"Connection terminated. I'm sorry to interrupt you, Elizabeth, if you still even remember that name, but I'm afraid you've been misinformed. You are not here to receive a gift, nor have you been called here by the individual you assume. Although you have indeed been called. You have all been called here into a labyrinth of sounds and smells, misdirection and misfortune. A labyrinth with no exit, a maze with no prize. You don't even realize that you're trapped. Your lust for blood has driven you in endless circles, chasing the cries of children in some unseen chamber always seeming so near, yet somehow out of reach."
"연결 전환. 말을 끊어서 미안하다, 엘리자베스, 네가 아직도 그 이름을 기억하고 있다면 말이다. 하지만 넌 잘못 알고 있단다. 넌 여기에 선물을 받기 위해 온 게 아니고, 네가 생각하는 그 사람한테서 불려온 것도 아니야. 사실 너희가 불려온 것은 맞단다. 이 소리와 냄새, 혼란과 불운으로 가득 찬 미궁으로 말이야. 탈출구 없는 미궁, 선물 없는 미로로. 너는 아직 너 자신이 갇혔다는 사실조차 모르고 있어. 너의 피에 대한 욕망이, 언제나 너무나도 가까워 보이지만 어찌 된 일인지 닿지 않는, 아이들의 울음소리가 들리는 보이지 않는 방을 향해, 한없이 의미없이 돌아다니게 만들었지."[53]
대사
그의 메커니즘은 폰 가이와 매우 비슷해. 그는 무작위로 전화를 거는데, 화면 어딘가에 위치한 일시 정지 버튼을 눌러 빠르게 음소거할 수 있어. 너무 오래 걸리면 버튼이 사라져 버려서 나머지 통화 내용을 들어야 하는데, 소리에 민감한 캐릭터가 활발해지고, 온도도 120도까지 올라가.
His mechanic is very similar to Phone Guy's. He will call at random, quickly mute him by pressing the pause button located somewhere on the screen. If the player takes too long, the button will disappear, and they will have to listen to the rest of the call, which will agitate sound-sensitive characters, and will also raise the temperature to 120 degrees.
FFPS에 등장해 가이드를 맡았던 카세트 맨(헨리)이다. 막지 못하면 온도가 상승하는 것은 원작인 FFPS의 진엔딩에서 헨리가 가게 내부에 불을 질렀던 것에서 오마주 했다.
2.7.44. Tutorial Unit(튜토리얼 유닛)X[편집]

그는 임무 시스템에 11개의 임무를 추가해. 임무를 눌러 시작할 수 있지만 임무 시스템을 무시하고 한눈을 팔면 임무 시스템이 일시 정지되고 임무 시스템을 다시 보면 재시작 돼. 오전 6시에 모든 업무가 끝나야 밤이 끝나. 그의 AI가 높을수록 완성하는 데 더 느린 작업이 필요할 거야.
He will add 11 tasks to the Task System. You can click a task to start it, however if you look away from the Task System it will pause, and will resume once you look at the Task System again. The night will only end when it's 6 AM and all of the tasks are finished. The higher his AI is, the slower tasks will take to complete.
FFPS에 등장해 컷신 속 설명을 맡았던 튜토리얼 유닛이다.
2.7.45. Ad Crew(광고 멤버)X[편집]

후원 버튼이 카메라에 표시될 거야. 파즈코인을 원하는 횟수만큼 언제든지 누를 수 있어. 누르면 누를수록 광고가 더욱 더 자주 뜨지.
A Sponsorship button will be visible on your monitor. You can press it at any time, as many times as you want to get Faz-Coins. The more times you press it, the more frequently ads will pop up.
FFPS에서 나오는 광고 5개의 마스코트 캐릭터들이다.
2.7.46. Lawyer Helpy(변호사 헬피)X[편집]

네가 죽이지 않는 캐릭터로부터 점프스케어를 당할 때마다, 넌 몇 개의 파즈코인을 잃어. 그가 너의 코인을 빼앗으면 네 파즈코인이 0 이하로 내려갈 수 있어.
Every time you get a jumpscare from a non-lethal character, you lose several Faz-Coins. Your Faz-Coins can go below 0 if he takes away your coins.
FFPS에서 소송 화면이 나올때마다 등장했던 안경 쓴 헬피의 모습.
2.7.47. Winking Sign(윙크하는 표지판)X[편집]

카메라를 바꿀 때 무작위로 나타나. 이 캐릭터가 있으면 다른 캐릭터가 보이지 않아. 카메라를 돌려서 사라지게 해.
It will appear at random when changing cameras. When it's there, no other characters will be visible. Switch cameras to make it go away.
FFPS에서 레프티를 구조할때 이미 레프티를 구매하였다면 대신 등장했던 표지판.
2.7.48. Advertisement Unwithered Freddy(광고 속 망가지지 않은 프레디)X[편집]

Lumber Co. 층 카메라의 나무가 너무 많이 자라면, 그는 널 가리키며 비웃으면서 너의 화면 위에 나타나기 시작할 거야. 그가 사라지도록 나무를 잘라.
When the trees on the Lumber Co. camera grow too much, he will begin to fade onto your screen, pointing and laughing at you. Cut the trees to make him disappear.
FFPS의 튜토리얼 컷신에서 등장했던 망가지지 않은 구형 프레디의 모습.
2.7.48.1. Advertisement Unwithered Freddy 스킨[편집]

1번째 스킨은 Springtroll(스프링 트롤) 이라는 이름의 스킨이다. 이름의 유래는 스프링 트랩 같은데 외형이 닮지 않아서 모티브가 무엇인지 헷갈린다.
2.8. ULTIMATE CUSTOM NIGHT[편집]
2.8.1. The Feet(발)X[편집]

전기 충격을 사용할 때마다 책상 위에 나타나. 책상 위에 있으면 카메라나 마스크를 사용할 수 없어. 그것이 나가도록 문들 중 하나에 끌어다 놔.
They will appear on your desk every time you use the shock. When they're on the desk, you will be unable to use the monitor or mask. Drag and drop them at one of the doors so that they walk out.
원작인 UCN에서 토이 프레디가 활동중이 아닐때 카메라에 보이는 토이 프레디의 발이다.
2.8.2. Remade JJ(리메이드 JJ)X[편집]

카메라를 올리면 오른쪽 환풍구로 나올 수 있으며, 넌 그녀가 떠났음을 알리는 쿵 하는 소리가 들릴 때까지 문을 닫아야 해. 만약 네가 그녀가 그곳에 있는 동안 카메라를 다시 올리거나, 그녀가 환풍구에 너무 오래 있는 동안 네가 카메라에 머무른다면, 그녀는 너의 사무실로 몰래 들어갈 거야. 만약 그녀가 잠입한다면, 그녀는 일시적으로 모든 문 컨트롤을 비활성화하고 웃으면서 소음 수치를 추가하게 될 거야.
When the monitor is pulled up, she has a chance to appear in the right vent, the player must shut the door on her until they hear a thud indicating she has left. If the player brings up the monitor again while she's there, or if they stay in the monitor while she's in the vent for too long, she'll sneak into their office. If she manages to slip in, she will temporarily disable all door controls and laugh, adding to the Noise Meter.
원작인 UCN에서 등장했던 JJ. FNaF 2에서의 모습과는 달리 얼굴 양 옆의 볼과 머리 위 프로펠러의 색이 푸른색이다.
2.8.2.1. Remade JJ 스킨[편집]


1번째 스킨은 Stretched JJ(늘어난 JJ)라는 이름의 스킨이다.
2번째 스킨은 Fishing JJ(낚시꾼 JJ)라는 이름의 스킨이다.
3번째 스킨은 Freddy Fazbear(프레디 파즈베어)라는 이름의 스킨이다.
2.8.3. Wireless Withered Chica(무선 구형 치카)O[편집]

오른쪽 환풍구 문이 열려 있으면, 그녀는 너의 사무실로 몰래 들어갈 수 있어. 아주 빨리 프레디 파즈베어 가면을 쓰고 그녀를 속여서 떠나게 해.
If the Right Vent Door is open, she can sneak into your office. Very quickly put on the Freddy Fazbear Mask to fool her into leaving.
원작인 UCN에서 구형 치카가 중앙 환풍구에 꼈을 때 확인할 수 있는 모습. 양 손의 전선 다발이 사라져있다.
2.8.3.1. Wireless Withered Chica 스킨[편집]

1번째 스킨은 Good Wednesday(좋은 수요일) 이라는 이름의 스킨이다. 아마 외국밈에서 따온 스킨같다.
2.8.4. Remade Phantom Freddy(리메이드 팬텀 프레디)X[편집]

그는 서서히 너의 사무실에서 선명해질 거야. 그가 완전히 선명해져서 너에게 점프스케어 하는 것을 피하려면, 그에게 너의 손전등을 비춰. 그는 건물의 온도가 더 높아지면 더 빨리 나타나.
He will slowly fade in in your office. To avoid him fully appearing and jumpscaring you, flash your light on him. He appears faster when the building gets hotter.
원작인 UCN에서 등장했던 팬텀 프레디.
2.8.4.1. Remade Phantom Freddy 스킨[편집]

1번째 스킨은 Chrome Freddy(크롬 프레디) 라는 이름의 스킨이다. 생김새는 토이 프레디와 비슷하게 생긴 듯.
2.8.5. Remade Nightmare(리메이드 나이트메어)O[편집]

"I am your wickedness, made flesh."
"난 육체로 만들어진, 네 사악함이다."
"I am here to claim what is left of you."
"난 네게 남은 것들을 가지러 왔다."
"The shadow fears me."
"그림자는 날 두려워하지."
"You will not be spared, you will not be saved."
"넌 용서받지 못할 거다, 넌 구원받지도 못할 거다."
"I will vomit you back, to relive your horror."
"네 공포를 되살리기 위해, 널 다시 괴롭혀주마.
대사
그는 카메라에 보이지 않고 너의 오른쪽 문에 도착해야만 볼 수 있어. 어둠 속으로 그를 돌려보내기 위해 그의 얼굴의 문을 닫아.
He is invisible to the cameras and can only be seen when he reaches your right doorway. Close the door on his face to send him back into the darkness.
원작인 UCN에서 등장했던 나이트메어. FNaF 4의 모델보다 살짝 더 밝다.
2.8.6. Mirrored Jack-O-Chica(반사된 잭 오 치카)[편집]

그녀는 배관 시스템의 중앙에 머물며 예고없이 없이 매 [400 / AI]초마다 배관에서 사무실로 가게 될 거야. 그녀를 막으려면 사무실의 네온 벽을 사용해!
She stays in the center of the Duct System and will speed towards either duct exit every [400 / AI] seconds, without any audio or visual clue. Use the Neon Wall in the office to block her!
잭 오 치카의 메커니즘이 양쪽 문 카메라에 잭 오 치카가 나오는 것인데 이 치카의 반대편 쪽에 또 다른 잭 오 치카를 따온 잭 오 치카다. 그래서 그런지 배관 시스템에서의 아이콘도 그냥 주황색 위험 아이콘이 아니라 반대로 뒤집어진 아이콘인 웃긴 모습이다.
2.8.7. XOR(섀도우 디디)O[편집]

화면 왼쪽 가장자리에 아이템 버튼이 있어. 냉동창고, 배터리, 동전 3개. 그것들을 클릭하면 제거돼 사무실이 10도 더 뜨거워지고,전기가 2% 빠지며, 파즈코인이 각각 3개씩 소모된다. 피하려면 새벽 1시 전에 3개를 모두 제거해.
There will be 3 power-up buttons at the left edge of the screen: Frigid, Battery, and 3 Coins. Clicking them will remove them, making the office 10 degrees hotter, drain 2% power, and take 3 Faz-Coins respectively. Remove all 3 before 1AM to survive.
디디의 섀도우 버전으로, 원작인 UCN의 50/20 모드에서 잘 나타나며[54], 일반 모드에서는 나타날 확률이 희박하다.
2.8.8. Fredbear(프레드베어)O[편집]

그가 공격할 때, 너는 왼쪽이나 오른쪽 문에서 그의 빛나는 하얀 눈과 함께 웃음소리를 들을 수 있을 거야. 하지만 이건 속임수이고, 그는 실제로 반대쪽 문을 통해서 공격해. 그의 공격을 막으려면 그의 눈이 있는 반대쪽 문을 닫아.
When he attacks, you will see his glowing white eyes in either the left or right doorway and hear his laugh. This is a trick however, and he is actually attacking through the opposite door. Close the opposite door of where his eyes are to block his attack.
원작인 UCN에서도 이스터에그로 등장했던 프레드베어.
2.8.9. Circus Baby Doll(서커스 베이비 인형)O[편집]

그녀는 때때로 소리 신호 없이 조명 시스템에 나타날 거야. 그녀를 떠나게 하려면 조명을 비춰. 그렇지 않으면 그녀가 널 죽일 거야. 만약 너의 파즈코인 카운터가 그녀의 AI 번호 이상이라면, 그녀는 나타날 수 없을 거야.
She will sometimes appear on the Light System, without any audio clues. Shine your light on her to make her go away, otherwise she will kill you. If your Faz-Coins counter is her AI number or more, she will be unable to appear.
원작인 UCN에서 CAM 7을 통해 확인할 수 있는 베이비의 봉제인형.
2.8.10. Mono Freddy Mask(모노 프레디 마스크)X[편집]

소음 수치가 너무 높으면 그가 나타나 4층 시야를 가려. 소음 수치를 낮게 유지하는 건 그를 사라지게 할 거야.
If the noise meter is too high, he will appear and block your view of Floor 4. Keeping it low will make him disappear.
원작인 UCN에서 SL 테마의 사무실에 배경으로 걸려있던 펀타임 프레디의 가면.
2.8.11. Samurai Foxy(사무라이 폭시)X[편집]

소음 수치가 너무 높으면 화면 하단에 일본어 자막이 나타날 거야.
Japanese subtitles will appear at the bottom of the screen if the noise meter is too high.
UCN의 애니메이션에 등장하는 사무라이 복장을 입은 폭시다.
2.8.12. UCN Yellow Bear(UCN 옐로우 베어)O[편집]

그의 메커니즘은 골든 프레디와 거의 똑같아. 카메라를 내리면 사무실 오른쪽에 가끔 그가 앉아있을 거야. 카메라를 다시 올려서 그를 사라지게 해. 네가 너무 늦는다면 너는 점프스케어와 함께 죽임을 당하겠지. 너의 카메라가 왼쪽 복도 (캠 01)에 있다면 그는 나타나지 않을 거야. 그의 AI가 높을 수록 너의 사무실에 더 자주 앉아있을 거야.
His mechanic is almost the same as Golden Freddy. He can occasionally appear in the right side of your office after putting the monitor down. Pull the monitor up again to make him vanish. Not doing it in time will result in a jumpscare and a game over. If the camera was on the Left Hall (CAM 01), he will be unable to appear. The higher his AI is, the more often he will appear.
FNaF 1과 같이 사무실에 나타나면 카메라를 올렸다 내리면 간다. 여담으로 카메라를 왼쪽 복도에 뒀을 때 나타나지 않는 건 FNaF 1에서 왼쪽 복도 구석을 보면 골든 프레디가 나왔던 것에서 따온 듯하다.
2.8.12.1. UCN Yellow Bear 스킨[편집]

1번째 스킨은 Golden Toy Freddy(골든 토이 프레디) 라는 이름의 스킨이다. 밈이며 상점에서 1000 파즈코인으로 구매할 수 있다.
2.8.13. The Bronze One(더 브론즈 원)O[편집]

궁극의 창조물인 그는 그의 모든 영광 속에서 당신의 사무실에 나올 거야. 너가 그를 존경하지 않으면 그는 널 파괴할 거야. B를 눌러 박수를 쳐 그가 받을 만한 존경을 받으면 떠날 거야.
The Ultimate Creation, he'll self-insert himself into your office in all his glory. If you do not appreciate him enough he will destroy you. Press B to clap your hands together and applaud him, he will leave once he has the respect that he deserves.
원본 UCN에서 8000점 이상의 점수를 받으면 메인 메뉴에 이 청동색의 프레디 트로피가 생기는데, 그 트로피에서 따왔다.
2.8.14. Books Freddy(책 프레디)O[편집]

그는 자신이 시뮬레이션을 하고 있다는 것을 깨달았버렸어! 그가 사무실을 떠나는 것을 막기 위해 문을 사용 해. 만약 그가 탈출했으면 GPS 시스템의 포스필드를 사용해서 그가 가까이 오지 못하게 해! 만약 그가 탈출하면 그는 너가 예상하지 못한 때에 정말 널 죽일 거야!
He has realized that he is in a simulation! Use the doors to keep him from leaving the office. If he makes it out then use the forcefield in the GPS system to keep him at bay! If he gets out of that he'll escape and kill you in real life when you least expect it!
원본 UCN에서 9000점 이상의 점수를 받으면 메인 메뉴에 은색의 프레디 트로피가 생기는데, 그 트로피에서 따왔다.
2.8.15. Games Freddy(게임 프레디)X[편집]

(그는 죽었어) 그의 유령은 GPS 시스템을 통해 북쪽에서 접근 할 거야. 그가 너에게 닿기 전에 포스필드를 켜! 포스필드가 활성화되면 그는 다시 초기화될 거야. 그가 너의 사무실에 도착하면 그는 20%의 전기를 빼앗을 거야. 그는 네게이트 레인보우 캐릭터가 활성화 되어있으면 더 공격적이야.
(He died) His ghost approaches from the north on the GPS system. Turn on the forcefield before he reaches you! When he hits the forcefield he will reset. If he reaches your office he'll take 20% power. He's more aggressive if any Negate Rainbow characters are enabled.
2.8.16. The Monkey(원숭이)O[편집]

그는 가끔 사무실에 나타날 거야. 작업 시스템에는 녹색 바나나 4개와 노란색 바나나 1개가 있을 거야. 원숭이를 행복하게 하기 위해 노란 바나나를 클릭해. 너무 오래 걸리거나 녹색 바나나를 클릭하면 죽을 거야.[55]
It'll sometimes appear in the office. There will be 4 green bananas and 1 yellow banana on the Task System. Click on the yellow banana to make The Monkey happy. You will die if you take too long or click a green banana.
UCN에서 "원숭이조차도 나무에서 떨어지지."라는 피그패치의 대사 중 하나에서 가져왔다.
2.8.17. The Monkey 2(원숭이 2)O[편집]

그것은 Lumbers Co. 층에 걸려 있을 거야. 나무가 자라면 멋진 경치를 볼 수 있도록 나무를 올라가 보고서 다시 내려와. 나무 1이나 3은 홀수 번째니까 오르게 하지 마. 홀수 번째의 나무를 경고 기호로 표시해서 짝수 번호의 나무를 오르게 해야 해. 경고 기호는 45초가 지나거나 경고 기호가 있는 나무가 잘리면 사라져. 나무를 오르다 떨어질 수도 있어. 그 전에 마우스 커서 위에 경고 기호가 나타 나. 나무 아래에 있는 큰 베개™를 빨리 끌어와서 원숭이 2가 안전하게 떨어지게 해. 만약 땅에 떨어지거나 홀수 번호의 나무를 오르면 너에게 점프스케어를 할 거야..
It'll be hanging out in the Lumber Co. Floor. If a tree has grown, it will climb it so it can see great views, then climb back down again once it has seen enough. Do NOT let it climb trees 1 or 3, as they are odd numbered. Make sure it climbs an even numbered tree by marking the odd numbered trees with a caution symbol. The caution symbol will go away after it has been 45 seconds or if the tree with the caution symbol gets chopped. When it climbs a tree, there is a chance that it may fall. Before that happens, a warning symbol will appear over the mouse cursor. Quickly drag Big Pillow™ under the tree The Monkey 2 is on so it may land safely. If it falls to the ground or if it climbs an odd numbered tree then it'll jumpscare you.
UCN에서 "원숭이조차도 나무에서 떨어지지."라는 피그패치의 대사 중 하나에서 한 번 더 가져왔다.
2.8.18. Static(정적)X[편집]

카메라의 정적이 밤새 시야를 가려. 마우스를 클릭하면 카메라를 바꾼 것처럼 잡음 기능이 작동해서 완전히 희미해졌다가 다시 서서히 선명해지게 돼.
Camera static will cover your view for the entire night. Clicking with your mouse will cause the static to act like you changed cameras, it will fade in fully and then slowly fade back again.
FNaF 시리즈에서 카메라를 확인할때 지직거리던 그 화면.
2.8.19. Stretched JJ(늘어난 JJ)X[편집]

만약 너무 많은 소음이 들리면, 그녀가 나타나서 천장까지 쭉 뻗어진 상태[56]
로 문 중 하나를 막을 거야.
If too much noise is being made, she will appear and stretch out all the way to the ceiling and block one of the doorways.
늘어난 JJ는 UCN 모바일 에디션 메뉴에 등장하는 리메이드 JJ의 늘어난 버전이다.
2.8.20. Loading Freddy(로딩 프레디)O[편집]

그는 때때로 버튼, 카운트다운과 함께 오른쪽 아래 구석에 나타날 거야. 카운트다운이 0이 되기 전에 기호에 표시되는 적절한 작업을 수행해서 점프스케어를 피해야 해.
닫힌 문(문 색깔이 노란색): 카운트다운이 0이 되기 전에 올바른 문을 닫아.
문 열기(문 색깔 흰색): 카운트다운이 0이 되기 전에 올바른 문을 열어.
선풍기 키기(선풍기 색깔 녹색): 카운트다운이 0이 되기 전에 선풍기를 켜.
선풍기 끄기(흰색 선풍기): 카운트다운이 0이 되기 전에 선풍기를 꺼.
He will sometimes appear in the bottom right corner, alongside a symbol and a countdown. You must do the appropiate thing that is said on the symbol when the countdown reaches 0 to avoid his jumpscare.
Closed Door (door colored yellow): Have the correct door closed when the countdown reaches 0.
Open Door (door colored white): Have the correct door open when the countdown reaches 0.
Fan ON (fan colored green): Have the fan on when the countdown reaches 0.
Fan OFF (fan colored white): Have the fan off when the countdown reaches 0.
로딩 프레디는 UCN 모바일 포트에서 로딩 화면에 나오는 회색 골든 프레디다.
2.8.21. Meme Jumpscares(밈 점프스케어)X[편집]

9개의 파즈코인이 수집될 때마다 화면에 나타나.
Every 9 Faz-Coins collected, they will appear on your screen.
밈 점프스케어는 세인트루이스에서 사용된 개조된 UCN에서 온 메커니즘이다. 맷 팻이 운영하는 주드 병원 자선 스트림에서 나왔다. 게임 이론을 운영하는 사람으로 알려져 있는 사람이다. 아이콘은 유튜버인 DJ Sterf의 사진이다.
2.9. TROLL GAMES[편집]
2.9.1. Freddydude(프레디듀드)X[편집]

무작위로 많은 프레디듀드가 화면 왼쪽에서 오른쪽으로 달려가서 나타날 거야. 그를 막으려면 저소음 환풍기를 켜.
At random, multiple Freddydudes will appear running across the screen from left to right, and they will keep appearing until you turn on the Silent Ventilation for a few seconds.
FNaF 3의 출시 이전에 나왔던 트롤 게임의 주인공 캐릭터이다. 모델링은 스콧의 캐릭터[57]에 프레디 머리를 씌운 것.
2.9.1.1. Freddydude 스킨[편집]

1번째 스킨은 Yendo Freddydude(옌도 프레디듀드)라는 이름의 스킨이다. 리틀 트롤드 원에 나온다.
2.9.2. Dragon Duo(드래곤 듀오)O[편집]

한밤중에 동그라미와 화살표가 화면에 나타날 거야. 만약 그렇게 된다면, 두 드래곤은 건물 전체에 걸쳐 두 대의 아무 카메라에 생성될 거야. 넌 6시가 될 때까지 그들을 찾고 살려면 그들을 두 번 클릭해.
Once Per Night, a circle and arrows will appear on the screen. When it happens, both dragons will form on two random cameras throughout the entire building. You have time until the end of the hour to find and double-click them both to survive.
FNaF 3의 트롤 게임에 등장하는 캐릭터다.
2.9.3. Fighter Freddy(파이터 프레디)X[편집]

소리 미끼(배관 시스템과 3층)를 너무 자주 사용하면 파이터 프레디가 나타나서 히터를 일시적으로 비활성화하는 물기 능력을 사용할 수도 있어.
If you use the Audio Lure (Both the duct and Floor 3 one) too frequently, Fighter Freddy may appear and use his Bite ability to temporally disable the heater.
FNaF World의 트롤게임 할로윈 에디션에 등장하는 캐릭터다.
2.9.4. Mage Bonnie(마법사 보니)X[편집]

네가 전기 충격을 너무 많이 사용하면 그가 사무실에 나타나 발전기를 일시적으로 사용하지 못하게 할 거야.
If you're using the Shock Panel or thecontrolled shock on Floor 4 too much, he may appear in your office and temporarily disable the Power Generator.
FNaF World 할로윈 에디션 트롤 게임에서 등장하는 보니다. 중요한 발전기를 일시적으로 사용하지 못하게 해서 위험한 캐릭터다.
2.9.5. Halloween Tnagle(할로윈 탱글)O[편집]

그녀는 환풍구 시스템을 돌아다니며 환풍구 덫의 위치를 바꿀 때마다 리셋 될 거야. 만약 그녀가 환풍구 덫에 닿으면 그녀는 너에게 점프스케어를 할 거야. 문도 그녀를 막지 못 해.
She will move around the Vent System and will reset himself whenever you switch which Vent Snare is active. If she hits an active vent snare, she will instantly jumpscare you. The door does not block her either.
FNaF World 할로윈 에디션 트롤 게임에서 등장하는 탱글이다.
2.9.6. Big Jack(빅 잭)X[편집]

그는 캠 시스템에 머무르며 시간이 지남에 따라 점점 더 커져서 점점 더 많은 시야를 차단 할 거야. 그의 크기를 되돌리려면 글로벌 뮤직 박스를 사용 해.
He stays on the Cam System and becomes larger and larger over time, thus blocking more and more of your view. Use the Global Music Box to reverse his progress.
FNaF 할로윈 에디션 트롤 게임에서 등장하는 캐릭터다.
2.10. Xangle(쟁글)O[편집]

너의 독성 수치는 가끔씩 채워지기 시작할 거야. 흰색 대신 주황색을 제외하면, 저소음 환기를 빨리 켜고 레버를 내려 멈추게 해. 그것이 완전히 채워지면 샹글이 널 죽일 거야.
Your toxic meter will occasionally begin filling up, except with the color orange instead of white. Quickly turn on Silent Ventilation and flip the lever in order to get it to stop. If it fills up completly Xangle will kill you.
FNaF World의 트롤게임 할로윈 에디션에 등장하는 적이다.
2.10.1. Mini-P(미니 P)O[편집]

미니-P는 무작위로 나타날 거야. 그럼 RPG와 같은 전투가 시작 될 거야. 너는 4개의 공격을 사용 할 수 있어. Bite는 그에게 피해를 입히고 대신 네가 그에게 피해를 입을 수도 있어. Heal은 너를 치유 하지만 그가 너를 공격 할 가능성이 있어. Boost는 그에게 가하는 데미지를 약간 높일 것이고 네가 그것을 사용하면 피해를 입을 거야. 그리고 AMP는 네가 그에게 가하는 데미지를 과감하게 높일 것이고 네가 그것을 사용하면 굉장한 손상을 입을 거야. HP가 0이 되거나 너무 오래 전투를 하면 그가 너에게 점프스케어를 할 거야.
Mini-P will appear at random. When he does, an RPG-like battle will begin. You can use 4 attacks: Bite, which will damage him, with the chance of him damaging you instead; Heal, which will heal you, though he can attack you while you're healing; Boost, which will slightly raise the damage you do to him, you will also get slightly damaged if you use it; and Amp, which will drastically raise the damage you do to him, you will also get drastically damaged if you use it. If your HP hits 0 or you take too long to finish the battle, you will get jumpscared.
FNaF World 할로윈 에디션 트롤 게임에서 나오는 캐릭터다.
외모는 퍼플 가이[58]라는 캐릭터와 모습이 거의 똑같다.
2.10.1.1. Mini-P 스킨[편집]

1번째 스킨은 Mini-Popo(미니 포포)라는 이름의 스킨이다.
2.10.2. Party Hat A(파티 모자 A)X[편집]

파티 모자를 써.
Engage the party hat.
진짜 공략법은 화면 한가운데에 나와 파티 모자 위에 보스 체력이 생기고 아래에는 버튼 두 개가 있다. 첫 번째 버튼은 "공격"이고 다른 버튼은 "도망"이다. 그리고 버튼 아래에는 플레이어의 체력이 있다. 공격 받으면 체력과 2%의 전기가 닳는다. 공격 버튼을 누르면 체력을 닳게할 수 있다. 몇 번 하다보면 배틀이 끝난다. 배틀에서 이기면 클리어 후 40개 가량의 파즈코인을 얻는다. 한 번에 여러 번 나타날 수도 있다. 반대로 배틀에서 지면 바로 정전이 된다.
2.10.3. Doofred(두프레드)O[편집]

그는 오전 4시에 나타나서 너의 마우스 커서에 의해 조종될 거야. 스페이스를 눌러서 쏠 수 있어. 살아남으려면 오전 5시 전에 화면 주위의 모든 적을 쏴 죽여.
At Exactly 4AM, He will appear and be controlled by your mouse cursor. Press SPACE to shoot. Shoot and kill all flying enemies around the screen before 5AM to survive.
UCN의 트롤게임 데모 버전에서 등장한다.
2.11. Five Nights at Freddy's: Help Wanted[편집]
2.11.1. Malhare(멀헤어[59])O[편집]

그는 천천히 너의 사무실에서 선명해질 거고 그가 완전히 선명해지면 널 죽일 거야. 상품 카운터(CAM 07) 카메라에서 테이프를 사면 진행 상황을 돌려낼 수 있어. 파즈코인이 적당량만 있으면 원하는 만큼 테이프를 살 수 있어.
He will slowly form in your office and will kill you if he forms fully. Buying Tapes from the Prize Counter (CAM 07) camera will cause him to reset his progress. You can buy as many tapes as you want as long as you have the right amount of Faz-Coins.
FNaF HW에 등장했던 그 글리치트랩. 메커니즘도 원작에서 테이프를 모으던 것에서 가져왔다.
2.11.1.1. Malhare 스킨[편집]


1번째 스킨은 Ham(햄)이라는 이름의 스킨이다.
2번째 스킨은 Big Malgus(빅 말거스)라는 이름의 스킨이다.
2.11.2. The Anomaly(변칙)O[편집]

하룻밤에 한 번씩 그는 네 앞에 서서 너의 사무실에 나타날 거야. 글로벌 뮤직 박스를 켠 다음 레버를 뒤집어서 빼내야 해. 제때에 그렇게 하지 못하거나 잘못된 순서로 하면 점프스케어로 이어지게 될 거야.
Once per night he will appear in your office standing in front of you. You must turn on the Global Music Box and then flip the Lever in that order to get him away. Failing to do so in time or doing it in the wrong order will result in a jumpscare.
FNaF HW에 등장했던 글리치트랩. 로비에서의 모습이다. 메커니즘은 원작에서 글리치트랩을 봉인하던 방법에서 가져왔다.
2.11.3. Vitual Helpy(가상현실 헬피)X[편집]

그가 무작위로 너의 책상에 나타나서 너의 카메라를 훔쳐갈 거야. 레버를 뒤집어서 그가 나가게 하고 카메라를 돌려받아.
He will randomly appear on your desk and steal your monitor. Flip the Lever to make him leave and get your monitor back.
FNaF HW에 등장했던 헬피다.
2.11.4. Vitual Freddy(가상현실 프레디)O[편집]

그는 펀타임 코브 (CAM 06) 카메라에서 시작해서 주방 (CAM 04)과 오른쪽 복도 (CAM 02)를 통해 사무실에 단계별로 가까워질 거야. 그를 보면 앞으로 나아가는 걸 막을 수 있기 때문에 카메라가 그를 멈추게 할 필요는 없어. 문을 닫으면 그는 한 걸음만 물러나. 그는 오른쪽 복도에 두 단계가 있어.
He will start on the Funtime Cove (CAM 06) camera and get closer to the office in steps, going through the Kitchen (CAM 04) and the Right Hall (CAM 02). Looking at him will prevent him from going forward, the camera does not need to be up to stall him. Closing the door will only send him back one step. He has two steps in the Right Hall.
FNaF HW에 등장했던 프레디 파즈베어다.
2.11.5. Virtual Foxy(가상현실 폭시)O[편집]

그가 왼쪽이나 오른쪽에서 노래를 흥얼거리는 소리가 나면 4층에 있는 각각의 문 카메라를 보고 그가 공격하기 전에 사라지게 해. 전기가 30% 이하일 때는 다크 폭시로 변하고, 콧노래를 부를 때는 그를 쳐다보는 것을 피해야 해. 그렇지 않으면 그가 너에게 점프스케어 하게 될 거야.
When you hear him humming his song from the left or right, look at the respective door camera on Floor 4 to make him go away before he attacks. When the power is at 30% or lower, he will turn into Dark Foxy, and you must avoid looking at him when he hums, otherwise he will jumpscare you.
FNaF HW에 등장했던 폭시다.
2.11.6. Virtual Cupcake(가상현실 컵케이크)X[편집]

카메라가 오랫동안 내려가 있을 수록 그가 너의 책상 위에 나타날 가능성이 커져. 그가 그곳에 있을 때, 넌 카메라를 몇 초 동안 볼 때까지 손전등을 사용할 수 없을 거야.
The longer the cameras are down, the more chance of him appearing on your desk. When he's there, you will be unable to use your flashlight until looking at the cameras for several seconds.
FNaF HW에 등장했던 컵케이크다.
2.11.7. Virtual Phone Guy(가상현실 폰 가이)X[편집]

폰 가이는 책상 위에 있을 거고 언제든지 집어서 내려놓을 수 있어. 때로는 카메라가 글리치 층에 고정돼서 오류에 걸릴 수도 있어. 카메라를 고치려면 몇 초 동안 전화기를 들어.
The phone will stay on the desk and you can pick it up and put it down at any time. Sometimes, the monitor may glitch out and become stuck on the Glitch Floor. Pick up the phone for a few seconds to fix the monitor.
FNaF HW에 등장했던 폰 가이다.
2.11.8. Virtual Toy Freddy(가상현실 토이 프레디)O[편집]

그는 2층에 있는 무대장(CAM 01) 카메라에 머물게 되는데, 그가 움직이면 2층에 있는 다른 카메라에서 그를 찾아 조명을 깜빡여야 해. 그가 다른 카메라에 너무 오래 있으면 널 죽일 거야.
He will stay on the Show Stage (CAM 01) camera on Floor 2, if he moves, you must find him on any other camera on Floor 2 and flash the Flashlight at him like a strobe light to make him go back. If he lingers in another camera for too long, he will kill you.
FNaF HW에 등장했던 토이 프레디다.
2.11.9. Virtual Toy Bonnie(가상현실 토이 보니)O[편집]

그의 머리는 사무실 책상 위에 있을 거야. 커서가 움직이지 않을 때마다 그의 이빨은 점점 더 멀어질 거야. 마우스를 얼굴 위로 올려놓기만 하면 이빨이 돌아오게 돼. 이빨이 머리를 완전히 벗어나면 넌 죽어.
His head will stay on the far office desk. His teeth will move farther and farther apart whenever your cursor isn't moving. Simply hover your mouse over his face to make his teeth reset. If the teeth leave the head completely, you die.
FNaF HW에 등장했던 토이 보니다.
2.11.10. Virtual Mangle(가상현실 맹글)O[편집]

넌 때때로 시끄러운 잡음 소리를 듣게 될 거야. 프레디 파즈베어 마스크를 빨리 착용하고 멈추는 소리가 들릴 때까지 기다려. 만약 녀석이 사무실에 들어간다면, 녀석은 너에게 점프스케어 하기 전에 무작위의 시간을 기다릴 거야.
You will sometimes hear loud static. Quickly put on the Freddy Fazbear Mask and wait until you can hear the static stop. If they get in the office, they will wait a random time before jumpscaring you.
FNaF HW에 등장했던는 맹글이다.
2.11.11. Virtual Puppet(가상현실 퍼펫)O[편집]

그는 2층에 있는 부품과 서비스 카메라의 뮤직 박스 속에 머물고 있어. 만약 그의 뮤직박스가 열린다면 그는 너를 죽일 거야. 글로벌 뮤직 박스를 사용하면 상자가 열려. 저소음 환기 모드를 사용해서 상자를 다시 감아.
He stays in the Music Box on the Parts/Service camera on Floor 2. He will kill you if his music box winds down all the way. Usage of the Global Music Box winds down the box. Use Silent Ventilation to wind the box back up.
FNaF HW에 등장했던 퍼펫이다.
2.11.12. Vitual Withered Freddy(가상현실 구형 프레디)O[편집]

그는 2층 부품과 서비스(CAM 04)에서 시작해서 메인 복도(CAM 03)까지 걸어가서 파티룸 A(CAM 07)로 이동해. 파티룸 A에 도착하면, 플레이어는 그가 사무실에 나타날 때까지 카메라를 통해 그를 응시하고 프레디 파즈베어 마스크를 착용해야 해. 파티룸 A에 너무 오래 머물거나 마스크를 제때 착용하지 못하면 그는 널 죽일 거야.
He starts in the Parts/Service (CAM 04) on Floor 2 and will walk from there to the Main Hall (CAM 03), and then to Party Room A (CAM 07). When he reaches Party Room A, the player is required to stare at him through the cameras until he appears in the office, then put on the Freddy Fazbear Mask to fend him off. He will kill the player if he lingers in Party Room A for too long or if the player fails to put on the mask in time.
FNaF HW에 등장했던 구형 프레디다.
2.11.13. Virtual Withered Bonnie(가상현실 구형 보니)O[편집]

그는 2층 부품과 서비스(CAM 04)에서 시작해서 메인 복도(CAM 03)까지 걸어가서 파티룸 B(CAM 08)로 이동해. 파티룸 B에 도착하면, 플레이어는 그가 사무실에 나타날 때까지 카메라를 통해 그를 응시하고 프레디 파즈베어 마스크를 착용해야 해. 파티룸 B에 너무 오래 머물거나 마스크를 제때 착용하지 못하면 그는 널 죽일 거야.
He starts in the Parts/Service (CAM 04) on Floor 2 and will walk from there to the Main Hall (CAM 03), and then to Party Room B (CAM 08). When he reaches Party Room B, the player is required to stare at him through the cameras until he appears in the office, then put on the Freddy Fazbear Mask to fend him off. He will kill the player if he lingers in Party Room B for too long or if the player fails to put the mask on in time.
FNaF HW에 등장했던 구형 보니다.
2.11.14. Virtual Withered Chica(가상현실 구형 치카)O[편집]

그녀는 GPS 시스템에서 나타나 널 향해 천천히 움직일 것이고, 그녀가 가까이 있을수록 너의 화면은 더욱 더 지직거릴 거야. 미끼를 이용해서 그녀를 멀리 보내거나 방해기를 사용해서 그녀를 막을 수 있어.
She'll appear on the GPS system moving towards you slowly, the closer she is, the more static appears on your screen. You can use the lure to move her away or the jammer to stop her.
FNaF HW에 등장하는 구형 치카다.
2.11.15. Virtual Withered Foxy(가상현실 구형 폭시)O[편집]

그는 가끔 너의 사무실에 나타날 거야. 그가 공격하기 전에 그의 얼굴에 있는 손전등을 이용해 사라지게 해. 하지만 때때로 구형 폭시 대신 폭시가 등장할 거야. 그에게 손전등을 비추면 넌 죽을 거야.
He will sometimes appear in your office. Use the flashlight on his face to make him disappear before he attacks. Sometimes however, the classic Foxy will appear instead of Withered Foxy. If you shine your flashlight on him, you will die.
FNaF HW에 등장했던 구형 폭시다.
2.11.16. Virtual Paperpals(가상현실 종이친구들)X[편집]

???
FNaF HW에 등장했던 종이친구들이다. 다른 종이친구들과 똑같이 에어혼 소리를 내며 점프스케어만 한다.
2.11.17. Virtual Toy Cupcake(가상현실 토이 컵케이크)X[편집]

카메라가 오래 내려가 있을 수록 그가 너의 책상 위에 나타날 가능성이 커져. 그가 그곳에 있을 때, 넌 카메라를 몇 초 동안 볼 때까지 선풍기의 상태를 바꿀 수 없을 거야.
The longer the cameras are down, the more chance of him appearing on your desk. When he's there, you will be unable to change the fan's state until looking at the cameras for several seconds.
FNaF HW에 등장했던 토이 컵케이크다.
2.11.18. Virtual Spirngtrap(가상현실 스프링트랩)O[편집]

가상현실 스프링트랩이 3층에서 엘리베이터로 이동해서 널 죽이려 할 거야. 그가 다른 카메라로 갈 때마다, 그는 그 방의 조명을 만지작거릴 거야.
정상적인 상태. 이 경우, 그 전 카메라에 소리 미끼를 사용해서 그를 속여서 돌아가게 해.
빨간색으로 바뀐 상태. 그 경우 저소음 환기를 켜면 돌아가게 돼.
보라색으로 바뀐 상태. 그럴 경우, 너무 오래 쳐다보면 점점 더 빨리 움직이면서 밤을 끝낼 수 있어.
Virtual Springtrap goes through Floor 3, trying to get to the elevator and end your run. Every time he goes to another camera, he will mess with that room's lighting and either:
Keep it normal. In that case, use an Audio Lure in the previous camera to fool him into going back.
Change it to red. In that case, turning the Silent Ventilation on will make him go back.
Change it to purple. In that case, if you look at him for too long he will move faster and faster and end your run.
FNaF HW에 등장했던 스프링트랩이다.[60]
2.11.19. Virtual Phantom Freddy(가상현실 팬텀 프레디)X[편집]

사무실이나 2층에서 손전등이 너무 오래 켜져 있으면 가상현실 팬텀 프레디가 선명해지기 시작해. 그가 완전히 선명해지면, 그는 너에게 점프스케어 할 거야. 손전등을 다시 끄는 건 그를 사라지게 할 거야. 그의 AI가 높을수록, 그는 더 빨리 선명해질 거야.
If your flashlight is on (either in the Office or in Floor 2) for too long, Virtual Phantom Freddy will start fading in. If he fades in fully, he will jumpscare you. Letting the flashlight off again will make him to disappear. The higher his AI is, faster he will fade in.
FNaF HW에 등장했던 팬텀 프레디다.
2.11.20. Virtual Phantom BB(가상현실 팬텀 BB)X[편집]

가상현실 팬텀 BB는 카메라를 내릴 때 사무실 책상에 무작위로 앉아있을 수 있어. 점프스케어를 피하려면 다시 위로 올려. 그가 너에게 점프스케어 하면, 시스템 중 하나가 오류가 나게 될 거예요. 그의 AI가 높을수록 자주 나타날 거야.
Virtual Phantom BB can appear sitting in the desk of the Office at random when flipping down the monitor. Flip it up again to avoid a jumpscare. If he jumpscares you, one of the systems will error out. The higher his AI is, the more frequently he will appear.
FNaF HW에 등장했던 팬텀 BB다.
2.11.21. Virtual Phantom Foxy(가상현실 팬텀 폭시)X[편집]

가상현실 팬텀 폭시의 메커니즘은 팬텀 폭시와 거의 비슷해. 그는 아무렇게나 사무실에 나타날 거야. 그를 너무 오래 쳐다보지 마. 그러면 죽이지 않는 점프스케어와 시스템 중 하나가 오류가 나게 될 테니까. 가상현실 팬텀 폭시와 팬텀 폭시의 차이점은 팬텀 폭시가 사무실 맨 왼쪽에 나타나지만 가상현실 팬텀 폭시는 맨 오른쪽에 나타난다는 거야. 그의 AI가 높을수록 자주 나타날 거야.
Virtual Phantom Foxy's mechanic is almost the same as Phantom Foxy. He will appear at the office at random. Don't look at him for too long, as this will cause a non-lethal jumpscare and one of the systems to error out. The main difference between Virtual Phantom Foxy and Phantom Foxy is that, while Phantom Foxy appears on the far left side of the office, Virtual Phantom Foxy will appear at the far right. The higher his AI is, the more frequently he will appear.
FNaF HW에 등장했던 팬텀 폭시다.
2.11.22. Virtual Phantom Mangle(가상현실 팬텀 맹글)X[편집]

가상현실 팬텀 맹글이 환풍구 시스템에 나타나는 경우가 있어. 가상현실 팬텀 맹글이 점프스케어 하기 전에 다른 시스템으로 빠르게 전환해! 점프스케어 당하면 환기구 오류가 발생할 수 있어. 카메라를 닫으면 속도가 느려질 뿐이지만 다음에 열 때 바로 공격해. AI가 높을수록 더 자주 나타날 거야.
Virtual Phantom Mangle can sometimes appear on the vent radar. Quickly switch to an other system before Virtual Phantom Mangle jumpscares you! Their jumpscare can cause a ventilation error. Closing the monitor will only slow them down, but they will attack the next time you open it. The higher their AI is, more frequently they will appear.
FNaF HW에 등장했던 팬텀 맹글이다.
2.11.23. Virtual Plushtrap(가상현실 플러시트랩)O[편집]

가상현실 플러시트랩은 소품 저장소(CAM 06) 카메라의 상자에 보관돼 있어. 그가 곧 상자를 빠져나갈 것 같으면 전기 충격을 사용해. 그가 상자 안에 숨어 있거나 제때 사용하지 않을 때 전기 충격을 사용하면 그가 너에게 점프스케어 할 거야.
Virtual Plushtrap stays in a box on the Prop Storage (CAM 06) camera. If you see that he is about to exit the box, use the Controlled Shock on him. Using the controlled shock when he's hiding in the box or not using it in time will allow him to jumpscare you.
FNaF HW에 등장했던 플러시트랩이다.
2.11.24. Virtual Minireena(가상현실 미니리나)X[편집]

산소 수치 옆에 미니리나 아이콘이 깜박이는 걸 보면 여러 개의 가상현실 미니리나가 토템 복도(CAM 05)에 들어가 산소를 빼고 있음을 의미해. 소리 미끼를 사용하여 멀리 떨어뜨려.
When you see a Minireena icon flashing next to the oxygen meter, it means that several Virtual Minireenas have found their way into the Totem Hall (CAM 05) and are draining your oxygen. Use the audio lures to get them away.
FNaF HW에 등장했던 미니리나다.
2.11.25. Virtual Nightmare BB(가상현실 나이트메어 BB)O[편집]

가상현실 나이트메어 BB는 키즈 코브 카메라에 그대로 남아 있어. 그는 불이 꺼지면 움직이고 불이 켜지면 멈춰. 바닥에 있는 X에 오면 조명을 깜박여 완전히 멈추게 해. 그가 방에서 나오면 넌 죽을 거야. 가상현실 나이트메어 BB는 데스 코인에 삭제되며 데스코인 의해 밤부터 제거될 수 있다는 점에 유의해야 해.
Virtual Nightmare BB stays on the Kid's Cove (CAM 02) camera. He moves when the light is off and stops when it's on. Flash your Flashlight when he reaches the X on the floor to make him stop completely. If he gets out of the room, you will die. It should be noted that Virtual Nightmare BB is vulnerable to the Death Coin and can be removed from the night by it.
FNaF HW에 등장했던 나이트메어 BB다.
2.11.26. Plushbabies(플러시베이비)O[편집]

그녀는 무작위로 조명 시스템에 나타날 것이며, 웃음 소리가 그녀가 있다는 걸 나타낸다. 점프스케어를 피하려면 조명 시스템에서 조명을 빠르게 비춰봐.
They will randomly appear in the Light System, indicated by them laughing. Quickly shine your light on them in the Light System to avoid getting jumpscared.
FNaF HW에 등장했던 플러시베이비다.
2.11.26.1. Plushbabies 스킨[편집]

1번째 스킨은 Simulator Paperpals(시뮬레이터 종이친구들)이라는 이름의 스킨이다.
2.11.27. Virtual Funtime Foxy(가상현실 펀타임 폭시)X[편집]

조명 시스템의 조명이 플래시 비콘으로 바뀌어. 스페이스를 사용해서 플래시를 터뜨려.
The flashlight in the Light System will turn into a Flash Beacon. Use SPACE to flash.
FNaF HW에 등장했던 펀타임 폭시다.
2.11.28. Virtual Ennard(가상현실 에너드)O[편집]

그는 4층을 걸어다닐 거야. 그가 왼쪽 복도에 있을 때는 왼쪽 문을, 오른쪽 복도에 있을 때는 오른쪽 문을, 그리고 환풍구 안에 있을 때는 중앙 환풍구를 닫아. 그가 엘리베이터에 도착하면, 그는 너에게 점프스케어를 해서 죽일 거야.
He will walk around Floor 4. Close the Left Door when he's in the Left Hall, the Right Door when he's in the Right Hall, and the Front Vent Door when he's in the vent. If he gets to the elevator, he will jumpscare you and kill you.
FNaF HW에 등장했던 에너드다.
2.11.29. LOD Ennard(LOD 에너드)O[편집]

그는 너의 사무실에 머물면서 점점 더 그래픽이 망가질 거야. 발전기와 저소음 환기 사이를 반복 해서 바꾸면 그래픽이 다시 좋아져. 그의 그래픽이 너무 망가지면, 넌 죽을 거야.
He will stay in your office and become less and less detailed. Switching between Power Generator and Silent Ventilation will make him become more detailed again. If he loses too much detail, you will die.
FNaF HW의 오큘러스 퀘스트 이식판에서 등장한 에너드이다. 게임을 이식할때 어딘가 문제가 생겼었는지 그래픽에 맛이 가 있는 것이 특징. 메커니즘도 이걸 비꼬는 것으로 보인다.
2.11.29.1. LOD Ennard 스킨[편집]

1번째 스킨은 LOD Optimized Popgoes(LOD 최적화된 팝고즈)라는 이름의 스킨이다.
2.11.30. Enhard BonBon(엔하드 본본[61])O[편집]

그는 공급 옷장(CAM03)에 머무를 거야. 책상 위에 있는 그림에서 공급 옷장에서 누가 활동하는지 확인해. 엔하드 본본일 경우, 카메라를 내려놓기 전에 캠 시스템에 있는 상태로 두어야 해. 그렇지 않으면, 엔하드 본본이 점프스케어 너의 밤을 끝낼 거야. 엔하드 본본은 데스 코인에 취약해 밤부터 이를 통해 제거할 수 있다는 점을 유념해야 해.
He will stay in the Supply Closet (CAM 03). Check the figurine on the desk to see who is active in the Supply Closet. If it is Enhard BonBon, you must leave the monitor in the Cam System before putting it down. Otherwise, Enhard BonBon will end your run with a jumpscare. It should be noted that Enhard BonBon is vulnerable to the Death Coin and can be removed from the night by it.
FNaF HW의 에너드의 환기구 수리 스테이지를 플레이 할때 등장했던 망가진 형태의 본본이다.
여담으로 Ultra Custom Night 1.0.0 버전에서는 이름이 Withered BonBon(구형 본본)이었지만 업데이트로 인해 변경 되었다.
2.11.31. Virtual Circus Baby(가상현실 서커스 베이비)O[편집]

너의 카메라가 내려갈 때마다 그녀의 눈은 점점 더 밝아질 거야. 그녀의 눈이 완전히 밝아졌을 때 마스크를 써야 죽지 않아.
Her eyes will become lighter and lighter whenever your monitor is down. You must wear your mask when her eyes are fully lit up to not die.
FNaF HW에 등장했던 서커스 베이비다.
2.11.32. Virtual Bonnet(가상현실 보넷)X[편집]

카메라를 뒤집을 때마다 천장으로부터 가상현실 보넷이 나올 가능성이 있어. 그녀에게 손전등을 비추면 그녀가 다시 숨게 돼. 그녀가 아직 그곳에 있는 동안 네가 카메라를 올리면, 그녀는 널 깜짝 놀라게 할 거고 선풍기를 일시적으로 비활성화할 거야.
Whenever you flip down the monitor, there is a chance Virtual Bonnet will emerge from the ceiling. Flash your flashlight on her to make her hide again. If you bring up the monitor while she is still there, she will jumpscare you and temporarily disable the fan.
FNaF HW에 등장했던 보넷이다.특이하게도 FNaF SL에선 주인공을 죽이지만 Ultracn에서는 주인공을 죽이지 않는다.
2.11.33. Virtual Nightmarionne(가상현실 나이트마리오네)O[편집]

촉수는 때때로 너의 사무실에 나타날 거야. 촉수를 손전등으로 비추면 촉수가 사라져. 그렇지 않으면 가상현실 나이트마리오네가 점프스케어를 할 거야.
Its tentacles will sometimes appear in your office. Flash your flashlight on them to make them disappear, otherwise Virtual Nightmarionne will jumpscare you.
FNaF HW에 등장했던 나이트마리오네다.
2.11.34. Virtual Bidybab(가상현실 비디밥)O[편집]

배관 시스템의 집 맵에 있는 옷장에 나타나면 손전등 버튼을 연타해서 나가게 해. 만약 그녀가 그곳에 너무 오래 머무르면, 너에게 점프스케어 할 거야.
When she appears in the closet on the Duct System's House Map, spam click the flashlight button to make her leave. If she stays there for too long, you will be jumpscared.
FNaF HW에 등장했던 비디밥이다.
2.11.35. Virtual Nightmare Cupcake(가상현실 나이트메어 컵케이크)X[편집]

카메라가 오랫동안 내려가 있을 수록 그가 너의 책상 위에 나타날 가능성이 커져. 프레디 파즈베어 마스크를 착용하면 몇 초 동안 카메라를 볼 수 있게 돼.
The longer the cameras are down, the more chance of him appearing on your desk. When he's there, you will be unable to put on your Freddy Fazbear Mask until looking at the cameras for several seconds.
FNaF HW에 등장했던 나이트메어 컵케이크다.
2.11.36. Scrap Plushbabies(스크랩 플러시베이비)O[편집]

그녀는 무작위로 조명 시스템에 나타날 것이며, 웃음이 그녀가 있다는 걸 나타내. 점프스케어를 피하려면 조명 시스템에서 조명으로 그녀를 빠르게 비춰.
They will randomly appear in the Light System, indicated by them laughing. Quickly flash your light on them in the Light System to avoid getting jumpscared.
FNaF HW에서 적으로로 등장했던 스크랩 베이비의 모습을 하고있는 세 명의 인형이다.
2.11.36.1. Scrap Plushbabies 스킨[편집]

1번째 스킨은 Plushtryks(플러시트릭스)라는 이름의 스킨이다.
2.11.37. Decoy Plushbabies(미끼 플러시베이비)O[편집]

네가 조명 시스템으로 들어갈 때마다, 녀석들이 하나씩 생겨나. 새벽 5시가 되었을때 플러시베이비들이 너무 많이 소환됐거나 5마리 미만이면 너에게 점프스케어 할 거야.
Everytime you go into the Light System, another one spawns on it. If too many spawn, or there are less than 5 of them at 5AM, they will jumpscare you.
FNaF HW의 블랙라이트 모드에 등장했던 인형이다.
2.11.37.1. Decoy Plushbabies 스킨[편집]

1번째 스킨은 Negate Rainbow Decoy Plushbabies(네게이트 레인보우 미끼 플러시베이비)라는 이름의 스킨이다.
2.11.38. Virtual Lolbit(가상현실 롤빗)X[편집]

녀석이 메인 복도(CAM03) 카메라에 나타날 때, 녀석을 떠나게 하기 위해 몇 초 동안 손전등을 켜둬. 이 작업을 제때 수행하지 않으면 "Please Stand By" 팝업이 나타나고 소음 수치가 채워질 거야. L-O-L을 여러 번 입력하여 가상현실 롤빗을 사라지게 해.
When they appears on the Main Hall (CAM 03) camera, keep your Flashlight on them for several seconds to make them leave. Not doing it in time will result in a "Please Stand By" popup appearing, causing the Noise Meter to fill up. Type L-O-L multiple times to make it disappear.
FNaF HW에 등장했던 롤빗이다.
2.11.39. Beacon Bonnie(비콘 보니)O[편집]

조명 시스템으로 바꿀 때, 그가 나타날 가능성이 있어. 시스템을 신속하게 바꿔서 점프스케어를 피해.
When switching to the Light System, there's a chance of him appearing. Quickly switch systems to avoid getting jumpscared.
FNaF HW의 펀타임 폭시 스테이지를 하드 모드로 플레이할때 등장하는 보니.
2.11.39.1. Beacon Bonnie 스킨[편집]

1번째 스킨은 Beacon Troll Face(비콘 트롤 페이스)라는 이름의 스킨이다.
2.11.40. Neon Bonnie(네온 보니)O[편집]

밤 동안 어느 순간에 네온 보니가 소음 수치를 더하는 시끄럽고 느린 음악을 연주하기 시작할지도 몰라. 음악을 멈추려면 임무 시스템으로 들어가서 모든 색깔 버튼을 클릭해야 해. 너무 오래 걸리면 죽을 거야.
At random points during the night, he may begin to play loud, slow music which adds to the Noise Meter. You must go into the Task System and click all the colored buttons to make the music stop. If you take too much time, you die.
FNaF HW의 보니 수리 스테이지를 블랙라이트 모드로 플레이할때 등장하는 보니의 모습.
여담으로 ultra custom night 1.0.0 버전에서의 메커니즘은 현재와 달랐다.
전 메커니즘은 그냥 사무실에만 네온효과를 만들어내는게 끝이었지만 업데이트로 인해 메커니즘이 삭제되었다.
2.11.41. Neon Chica(네온 치카)O[편집]

바퀴벌레들이 화면의 왼쪽 상단부터 시작해서 밤새도록 네 화면을 기어다닐 거야. 커서에 바퀴벌레가 너무 많이 닿으면 네온 치카가 널 죽일 거야.
Roaches will walk on your screen for the entire night, starting at the top left of the screen. If your cursor touches too many of them, Neon Chica will kill you.
FNaF HW의 치카 청소 스테이지를 블랙라이트 모드로 플레이할때 등장하는 치카의 모습.
2.11.41.1. Neon Chica 스킨[편집]

1번째 스킨은 Fucking Insane Roach(빌어먹을 미친 바퀴벌레)라는 이름의 스킨이다.
2.11.42. Dark Freddy(다크 프레디)O[편집]

한 곳의 카메라를 너무 오랫동안 다른 카메라로 바꾸지 않고 보고 있다면 그가 화면을 완전히 덮게 할 거야. 그럼에도 계속 카메라를 보고 있으면, 그가 너에게 점프스케어 할 거야.
Looking at one camera without switching to another one for too long will cause him to cover it fully. If you're still looking at the camera after that, he will jumpscare you.
FNaF HW의 블랙라이트 모드에서 볼 수 있는 프레디의 모습.
2.11.42.1. Dark Freddy 스킨[편집]

1번째 스킨은 Blacklight RXQ(블랙라이트 섀도우 보니)라는 이름의 스킨이다.
2.11.43. Burnt Foxy(번트 폭시)X[편집]

그는 무작위로 파이럿 코브(CAM 05) 카메라에 등장해서 빠르게 온도를 올리기 시작할 거야. 또한 온도계 옆에서 번트 폭시의 아이콘이 깜박여. 그를 멈추려면 파이럿 코브 카메라를 보거나 에어컨을 켜. 또는 보니, 폭시와 함께 번트 폭시는 플레이어가 데스 코인을 사서 사용하면 물러나게 할 수 있어.
He will appear in the Pirate Cove (CAM 05) camera at random and start quickly raising the temperature. A Burnt Foxy symbol will also flash next to the temperature meter. To stop him, look at the Pirate Cove camera or turn on the Power A/C. Alternatively, Burnt Foxy, alongside Bonnie and Foxy, can be removed from the night if the player buys the Death Coin and uses it on them.
FNaF HW의 폭시 수리 스테이지를 블랙라이트 모드로 플레이할때 등장하는 폭시의 모습. 또한 DLC인 드레드베어의 저주에서도 이스터 에그로 나온다.
2.11.44. Shadow Mangle(섀도우 맹글)O[편집]

녀석은 환풍구 덫에 면역인 상태로 환풍구 시스템으로 너에게 갈 거야. 녀석을 문 앞에서 돌아가지 않고, 문이 열리고 카메라를 들 때까지 기다릴 거야. 환풍구 레이더로 보면 녀석을 돌아가게 할 거야.
They will go through the Vent System, immune to the Vent Snare. They are not reset by the door, instead they will wait until it is opened and the cameras are up. Watching them on the vent radar will make them go back.
FNaF HW의 맹글의 환기구 수리 스테이지를 블랙라이트 모드로 플레이할때 등장하는 맹글의 모습.
2.11.44.1. Shadow Mangle 스킨[편집]


1번째 스킨은 Shadow Nightmare Mangle(섀도우 나이트메어 맹글)이라는 이름의 스킨이다. 원본 애니매트로닉스에 나이트메어만 입힌 모습이다.
2번째 스킨은 Dust Mangle(먼지 맹글)이라는 이름의 스킨이다.
2.11.45. Virtual Endo(가상현실 엔도)X[편집]

너의 전기가 낮을 때 그가 너의 사무실에 나타날 수 있어. 그가 나타나면, 그는 몇 초 동안 화면을 위아래로 뒤집을 거야.
He can appear in your office when your power percentage is low. When he appears, he will turn the view of it upside down for a couple of seconds.
FNaF HW에 등장했던 엔도이다.
2.11.46. Nightmare Endo(나이트메어 엔도)O[편집]

나이트메어 엔도는 환풍구 시스템을 통과하지만 환풍구 레이더에는 보이지 않고 앞 환풍구까지 도달했을 때 눈만 보여. 넌 또한 그가 그곳에 있을 때 깊은 웃음소리를 듣게 될 거야. 그를 어둠 속으로 돌려보내기 위해 문을 닫아.
Nightmare Endo goes through the Vent System, however he cannot be seen on the vent radar and only his eyes can be seen when he reaches the front vent. You will also hear a deep laugh when he's there. Close the door to send him back into the darkness.
FNaF HW에 등장했던 나이트메어 애니매트로닉스의 내골격. 이스터에그로 등장하며, 갤러리에서도 볼 수 있다.
2.11.47. Enhard Nightmare BB(엔하드 나이트메어 BB)O[편집]

카메라가 충분히 올렸다 내려진 후, 그는 너의 책상 반대편에 나타날 거고, 다음에 카메라를 올리면 그가 널 죽일 거야. 너의 사무실의 레버를 이용해서 그를 떠나게 해.
After enough monitor flips, he will appear on the other side of your desk and on the next monitor flip, he will kill you. Use the lever in your office to make him leave.
FNaF HW의 에너드의 환기구 수리 스테이지를 하드 모드로 플레이 할때 등장했던 나이트메어 BB다.
2.11.48. Enhard Funtime Foxy Plush(엔하드 펀타임 폭시 인형)X[편집]

그것은 너의 사무실에 머물며 때때로 사라질 거야. 그가 사무실에 없으면 전기 충격 패널이 비활성화 돼. 환풍구(CAM 07) 카메라에서 그녀를 찾아 사무실로 돌아가도록 전기 충격을 줘야 해.
She stays in your office and will sometimes disappear. When he's not in the office, the Shock Panel will be disabled. Find her on the Vent (CAM 07) camera and shock her to make her go back into the office.
FNaF HW의 에너드의 환기구 수리 스테이지를 하드 모드로 플레이 할때 등장했던 찌그러진 모습의 펀타임 폭시 인형이다.
2.11.48.1. Enhard Funtime Foxy Plush 스킨[편집]

1번째 스킨은 Kiito(키이토)라는 이름의 스킨이다.
2.11.49. Enhard Bonnet(엔하드 보넷)O[편집]

그녀는 공급 옷장(CAM03)에 머무를 거야. 책상 위에 있는 그림을 보고 누가 공급 옷장에서 활동하고 있는지 확인해 봐. 그게 엔하드 보넷일 경우에는 캠 시스템이 아닌 다른 시스템에 카메라를 두고 내려. 그렇지 않으면 카메라를 내려놓을 때 엔하드 보넷이 너에게 점프스케어 할 거야. 엔하드 보넷은 데스 코인에 취약하며 밤부터 이를 통해 제거할 수 있다는 점을 유념해야 해.
She will stay in the Supply Closet (CAM 03). Check the figurine on your desk to see who's active in the Supply Closet. If it is Enhard Bonnet, then be sure to leave the monitor in any other system than the Cam System before flipping it down. Otherwise, Enhard Bonnet will jumpscare you when flipping down the camera. It should be noted that Enhard Bonnet is vulnerable to the Death Coin and can be removed from the night by it.
FNaF HW의 에너드의 환기구 수리 스테이지를 하드 모드로 플레이 할때 등장했던 망가진 형태의 보넷이다.
또 서술 했듯이 엔하드 본본 처럼 Ultra Custom Night 1.0.0 버전에서는 이름이 Withered Bonnet(구형 보넷)이었지만 업데이트로 인해 변경 되었다.
2.11.50. Enhard Phantom Freddy(엔하드 팬텀 프레디)X[편집]

조명, 임무, 또는 GPS 시스템을 보면 그가 너의 사무실로 오게 돼. 환기구가 일시적으로 오류가 날 수 있는 점프스케어를 피하려면 그가 완전히 선명해지기 전에 코를 클릭해.
Looking at the Light, Task, or GPS Systems will cause him to fade into your office. Click his nose before he fully fades in to avoid a jumpscare, which will cause your front vent to malfunction temporarily.
FNaF HW의 에너드의 환기구 수리 스테이지를 하드 모드로 플레이 할때 등장했던 팬텀 프레디이다.
2.11.51. Enhard BB(엔하드 BB)X[편집]

각 1층(1-4개)에 4개의 풍선이 나와. 1층에는 그의 표지판이 있을거야. 2층에는 그의 다리와 신발이 있을 거야. 3층에는 토이 프레디 머리 풍선이 있어. 4층에는 그의 몸통과 머리가 있을 거야. 이것들을 클릭해서 수집해. 몇 초마다 파즈코인 카운터가 아직 수집되지 않은 조각의 양만큼 감산돼.
Four pieces of him will appear on each of the main floors (1-4). Floor 1 will have his sign. Floor 2 will have his legs and shoes. Floor 3 will have the Toy Freddy Head Balloon. Floor 4 will have his torso and head. Click on them to collect them. Every few seconds, your Faz-Coins counter will be subtracted by the amount of pieces not collected yet.
FNaF HW의 에너드의 환기구 수리 스테이지를 하드 모드로 플레이 할때 등장했던 망가진 모습의 BB.
2.11.52. Party Freddy(파티 프레디)O[편집]

무해한 캐릭터들에 의해 점프스케어 당하는 건 파티 프레디를 더 화나게 할 거야. 만약 그가 충분히 화가 난다면, 그는 너의 밤을 끝낼 거야.
Getting jumpscared by non-lethal characters that can't kill you (for example, Phantoms or Helpy) will make Party Freddy get angrier and angrier. If he gets angry enough, he will jumpscare you ending your run.
FNaF HW의 Night Terrors(밤의 공포/야간 공포증) 속 피자 파티 스테이지에서 등장했던 프레디.
2.11.53. Dreadbear(드레드베어)O[편집]

그는 단계적으로 오른쪽 복도(CAM 02)를 통해서 너에게 갈 거야. 그가 문 앞에 서 있을 때는 문을 닫아야 해. 그의 AI가 높을수록 그는 더 빨라질 거야.
He will go though the Right Hall (CAM 02) in phases. You must shut the door when he's standing at the doorway. The higher his AI is, the faster he will be.
FNaF VR HW의 DLC의 그 드레드베어다.
2.11.53.1. Dreadbear 스킨[편집]


1번째 스킨은 Treadbear(트레드베어)라는 이름의 스킨이다.
2번째 스킨은 No. 1 Bucket Hugs(넘버원 버킷 허그)라는 이름의 스킨이다.
2.11.54. Grimm Foxy(그림 폭시)O[편집]

사무실 온도가 120도가 되면 가끔 그가 너의 사무실에 나타날 수 있어. 그를 떠나게 하려면 마스크를 써. 그의 메커니즘은 구형 프레디와 구형 보니와 매우 유사하지만, 이 두 명과는 달리, 그림 폭시는 너의 카메라를 올리지 않아도 나타날 수 있어. 그의 AI가 높을수록 더 빨리 나타날 거야.
He can sometimes appear in your office when the office reaches 120 degrees. Put on your mask to make him go away. His mechanic is very similar to Withered Freddy and Withered Bonnie, but unlike these two, Grimm Foxy can appear without you needing to put the monitor up. The higher his AI is, the faster he will appear.
FNaF VR HW DLC의 그 그림 폭시다.
2.11.54.1. Grimm Foxy 스킨[편집]

1번째 스킨은 OMC Grimm Foxy(OMC 그림 폭시)라는 이름의 스킨이다.
2.11.55. Plushkins(플러시킨)O[편집]

그녀는 무작위로 조명 시스템에 나타날 거고, 웃음이 그녀가 있다는 걸 나타내. 점프스케어를 피하려면 조명 시스템에서 조명을 빠르게 비춰.
They will randomly appear in the Light System, indicated by them laughing. Quickly flash your light on them in the Light System to avoid getting jumpscared.
FNaF VR HW DLC의 그 플러시킨이다.
2.11.56. Captain Foxy(캡틴 폭시)O[편집]

“Welcome aboard Cap'n Foxy's Pirate Adventure! Ye can help me with this here adventure by shooting the targets with that there hand cannon. Do yer best, or I'll send ye to Davy Jones’ Locker! For yer safety, keep yer hands inside the ride at all times. Or you'll end up like me!"
"폭시 캡틴의 해적 모험에 온 걸 환영한다! 손대포로 표적을 쏘면 이 모험을 도와줄 수 있으니 최선을 다해라, 그렇지 않으면 내가 데이비드 존스의 락커로 보내 버릴 거거든! 안전을 위해 항상 손을 놀이기구 안에 넣어두는 게 좋을 거야. 안 그러면 나처럼 될 거야!"
“Ahoy!”
"아이고!"
“Set sail for treasure!”
"보물을 향해 출항하라!"
“Batten down the hatches! A storm's a-brewin'!”
"해치를 쓰러뜨려라! 폭풍이 몰아치고 있다!"
“This be no normal storm! This be the Kraken!”
"이건 보통 폭풍이 아니야! 이건 크라켄이야!"
“Take that, ye scurvy mongrel!”
"그거나 받아라, 괴혈병 같으니라고!"
“Yarrrrrrrr!”
"야아아아아알!"
"구멍에서 불이 난다!"
"유령 해적들!"
“The real treasure was friendship all along! Happy Birthday!”
"진정한 보물은 내내 우정이었어! 생일 축하해!"
“Now--let's see how ye did...”
"자--어떻게 했는지 보자..."
대사
매일 밤 한 번씩 미니게임이 시작돼. 너의 위치에 패닉 도움말이 표시돼. 마우스 방향으로 공을 쏘려면 클릭해. 파란 표적을 쏘면 파즈코인으로 보상받을 수 있을 거야. 유일한 분홍색 표적을 쏘면 미니게임이 종료돼. 그가 너에게 가기 전에 미니게임을 멈추게 하려면 분홍색 표적을 쏴.
Once per night a minigame will start. Your location will be marked with a panicking Helpy. Click to shoot a ball in the direction of your mouse. Shooting blue targets will reward you with a Faz-Coin. Shooting the only pink target will cause the minigame to end. Shoot the pink target to stop the minigame before he reaches you.
캡틴 폭시는 FNaF VR HW의 DLC 해적 라이드 미니게임에 나오는 폭시다.
2.11.57. Virtual Nightmare Freddy(가상현실 나이트메어 프레디)O[편집]

네가 프레들의 웃음을 들으면, 그건 그가 조명 시스템에 나타났다는 것을 의미해. 빨리 세 명 모두 빛을 비춰서 그들을 겁먹게 해. 세 명 모두 너무 오래 내버려두면 가상현실 나이트메어 프레디가 널 죽일 거야.
When you hear Freddles' laughter, it means that they have appeared in the Light System. Quickly shine your light on all 3 of them to scare them off. If all 3 of them linger there for too long, Virtual Nightmare Freddy will kill you.
FNaF VR HW의 DLC에 나오는 나이트메어 프레디다.
2.11.58. Virtual Nightmare Bonnie(가상현실 나이트메어 보니)O[편집]

그가 왼쪽 문에 나타났을 때 문을 닫지 마. 그렇지 않으면 넌 죽을 거야. 그는 잠시 후 사라질 거야.
When he appears in the left doorway, do not close the door, otherwise you will get jumpscared. He disappears on his own after a short while.
FNaF VR HW의 DLC에 나오는 나이트메어 보니다.
2.11.59. Virtual Jack-O-Chica(가상현실 잭 오 치카)O[편집]

그녀는 키즈 코브(CAM 02)에 머물다가 온도가 70°가 넘으면 점점 선명해지고 완전히 선명해지면 널 죽게 할 거야. 리셋하려면 손전등을 켜고 2초간 응시하면 되지만 5%의 전기가 손실돼.
She stays at the Kid's Cove (CAM 02) and fades in when the temperature is over 70° and jumpscares you when she fades in fully. You can stare at her with the flashlight on for 2 seconds to reset her, but you will lose 5% power.
FNaF VR HW의 DLC에 나오는 잭 오 치카다.
2.11.60. Tape Girl(테이프 걸)X[편집]

그녀의 메커니즘은 폰 가이와 매우 비슷해. 테이프 걸은 무작위로 전화를 거는데, 화면 어딘가에 위치한 일시 정지 버튼을 눌러 빠르게 음소거할 수 있어. 너무 오래 걸리면 버튼이 사라져 버려서 나머지 통화 내용을 들어야 하는데, 소리에 민감한 캐릭터가 활발해지고, 너의 파즈 코인도 모두 빼앗기게 돼.
Her mechanic is very similar to Phone Guy's. Tape Girl will call at random, quickly mute her by clicking a switch tape located somewhere on the screen. If the player takes too long, the button will disappear, and they will have to listen to the rest of the call, which will agitate sound-sensitive characters, and will also take away all your Faz-Coins.
FNaF HW에 등장해 폰 가이 역할을 맡았던 캐릭터. 막지 못하면 파즈 코인을 잃는 것은 원작인 FNaF HW에서 파즈 코인이 테이프와 함께 수집 요소 중 하나였던 것에서 오마주 한 것으로 보인다.
2.11.61. Virtual Plush Gang(가상현실 인형 패거리)O[편집]

카메라를 내려놓을 때마다, 그리고 밤이 시작되면 책상 위에 인형이 놓여 있을 거야. 만약 네가 카메라를 들기 전에 인형들을 치우지 않으면, 넌 죽을 거야. 각각의 인형들마다 떼어낼 수 있는 방법이 따로 있어.
프레디: 코를 클릭해.
보니: 프레디 파즈베어 마스크를 써.
치카: 환풍구 입구 옆에 있는 레버를 뒤집어.
폭시: 왼쪽 문을 닫아.
토이 프레디: 발전기를 켜.
토이 보니: 넌 아무것도 할 필요가 없어.
토이 치카: 히터를 켜.
펀타임 폭시: 쇼크 패널을 사용해.
펀타임 프레디: 오른쪽 문를 닫아.
본본: 에어컨을 켜.
퍼펫: 글로벌 뮤직 박스를 켜.
나이트마리오네: 손전등을 깜박여.
Every time you put the monitor down, and also when the night starts, there will be a plushie on your desk. If you don't get them away before you flip up the monitor, you will die. Each plushie has a different way of getting them away.
Freddy: Click his nose.
Bonnie: Put on the Freddy Fazbear Mask.
Chica: Flip the Lever next to the vent entrance.
Foxy: Close the Left Door.
Toy Freddy: Turn on the Power Generator.
Toy Bonnie: You don't have to do anything.
Toy Chica: Turn on the Heater.
Funtime Foxy: Use the Shock Panel.
Funtime Freddy: Close the Right Door.
BonBon: Turn on the Power A/C.
Puppet: Turn on the Global Music Box.
Nightmarionne: Flash your light.
FNaF HW에 등장한 인형들의 총집합.
2.11.61.1. Virtual Plush Gang 스킨[편집]

1번째 스킨은 Nard-Nard(나드 나드)라는 이름의 스킨이다.
2.11.62. Virtual Freddy Mask(가상현실 프레디 가면)X[편집]

마스크를 너무 오래 착용하면 호흡이 거칠어지면서 소음 수치가 증가해.
If you wear the mask for too long, you will start to breathe heavily, increasing the noise meter.
FNaF HW의 FNaF 2 스테이지에서 등장했던 방어수단.
2.11.63. Strange Mask(이상한 마스크)X[편집]

마스크를 착용하면 시간이 느려져.
Putting on the mask will slow down time.
이상한 마스크는 FNaF VR HW의 DLC의 옥수수 미로 레벨에 있는 비니의 마스크다.
2.11.64. Ghost Helpy(유령 헬피)[편집]

그는 너의 사무실에서 너가 선택적인 단축키를 몇 번 사용했는지를 한 시간 안에 집계 할 거야! 매 시간이 지날 때마다, 그는 너의 전기를 그 숫자만큼 뺄 거야!
He will haunt your office and tally up the amount of times you have used an optional hotkey within the current hour! At the end of each hour, he will subtract that number from your power!
FNaF VR HW의 DLC의 경고! 접근 금지! 레벨의 아이콘인 헬피의 모습이다.
2.11.65. Virtual Pumpkin Spuad(가상현실 호박 분대)O[편집]

왼쪽 문, 오른쪽 문, 카메라, 마스크를 너무 많이 쓰면 사무실에 호박이 나타나. 프레디는 왼쪽 문, 치카는 오른쪽 문, 보니는 마스크, 폭시는 카메라야. 4명이 한꺼번에 오면 넌 죽어.
When the left door, right door, monitor and mask are being used too much, a pumpkin will appear in the office. Freddy for left door, Chica for right door, Bonnie for mask, Foxy for monitor. If all 4 are there at once, you die.
FNaF VR HW의 DLC에 나오는 호박 분대다.
2.11.66. Sad Freddy(슬픈 프레디)O[편집]

그는 환풍구 시스템으로 접근하지만, 덫도 문도 그를 막지 못해. 사무실의 레버를 당기면 환풍구를 가로질러 폴리스 라인 테이프가 만들어지고, 몇 초 후에 사라져. 폴리스 라인 테이프를 이용해서 그가 너에게 점프스케어 하는 걸 막아.
He goes through the Vent System, neither the snares or door stop him. Pulling the lever in the office will create a police tape across the vent opening, which will disappear after a few seconds. Use the police tape to stop him from jumpscaring you.
FNaF HW의 인트로 컷신에서 핸드유닛이 설명할 때 배경으로 보이던, 폴리스 라인 테이프로 막아진 프레디 파즈베어의 피자 식당 내부에서 찡그린 표정을 짓던 프레디의 이미지.
2.11.67. Virtual Blacklight Freddy(가상현실 블랙라이트 프레디)X[편집]

레버를 너무 자주 사용하면 그가 사무실에 나타나 프레디 파즈베어의 피자 테마송을 부르며 소음 수치를 몇 초간 높일 수 있어.
Using the lever too often will make him appear in your office and sing the Freddy Fazbear's Pizza Theme Song, raising the Noise Meter for a few seconds.
FNaF HW의 게임 파일 속에만 존재하는 미사용된 데이터.
2.11.68. Virtual Blacklight Bonnie(가상현실 블랙라이트 보니)O[편집]

그는 왼쪽 문에 나타날 것이고 그의 눈은 점점 더 빛날 거야. 문을 닫고 레버를 내린 다음 전기 충격 패널을 사용하면 눈이 돌아가게 됩니다. 그의 눈이 너무 빛나면 그가 널 죽일 거야. 그는 잠시 후에 사라질 거야.
He will appear at the left door and his eyes will glow more and more. Closing doors, flipping the lever and using the Shock Panel resets the eyes. He will kill you if they glow too much. He will disappear after a while.
FNaF HW의 게임 파일 속에만 존재하는 미사용된 데이터.
2.11.69. Virtual Blacklight Chica(가상현실 블랙라이트 치카)O[편집]

밤이 시작될 때 다섯 개의 컵케이크가 책상 위에 나타날 거야. 한 개를 클릭해서 먹을 수 있지만 부작용이 생길 수 있어. 맨 왼쪽은 몇 초 동안 왼쪽 문를 닫지 못하게 하고, 그 다음 건 중앙 환풍구 도어에서 같은 짓을 하고, 중간은 선풍기에서 같은 짓을 하고, 다음 것은 오른쪽 문에서 같은 짓을 하며, 가장 오른쪽은 오른쪽 환풍구 문에서 같은 짓을 할 거야. 만약 네가 밤까지 그것들을 다 먹지 않았다면, 가상현실 블랙라이트 치카는 너에게 점프스케어 할 거고, 너의 밤을 끝낼 거야.
Five cupcakes will appear on your desk at the start of the night. You can click one to eat it, however it will result in side effects. The leftmost one will prevent you from closing the left door for a few seconds, the next one will do the same with the front vent door, the middle one will do the same with the fan, the next one will do the same with the right door, and the rightmost one will do the same with the right vent door. If you haven't eaten all of them by the end of the night, Virtual Blacklight Chica will jumpscare you, ending your run.
FNaF HW의 게임 파일 속에만 존재하는 미사용된 데이터.
2.11.70. Virtual Blacklight Foxy(가상현실 블랙라이트 폭시)O[편집]

Silent Ventilation: Your Noise Meter gets temporarily increased.그는 사용되지 않기 때문에 그는 너의 밤에 물리적으로 나타날 수 없어. 대신 그의 전략은 너가 사용하는 시스템을 괴롭히는 것이지. 그는 하나의 모드를 너무 오래 켜 두면 밤 동안 방해되는 존재가 될 거야.
Due to him being unused, he's unable to physically appear in your night. Instead, his strategy is to haunt your systems. He will cause additional effects to happen during the night if a single mode is left on for too long.
발전기: 전기가 닳기 시작해.
Power Generator: You will start losing power.
저소음 환풍기: 너의 소음 수치가 일시적으로 증가해.
히터: 파즈코인을 잃기 시작해.
Heater: You will start losing Faz-Coins.
에어컨: 독성 수치가 증가하기 시작해.
Power A/C: The Toxic Meter will start going up.
글로벌 뮤직박스: 게임 볼륨이 일시적으로 들리지 않아.
Global Music Box: The game volume turns down to 0% temporarily.
FNaF HW의 게임 파일 속에만 존재하는 미사용된 데이터.
2.11.71. The Forbidden Balls(금단의 공)X[62][편집]

금단의 공이 나타나 화면을 따라 튕겨나가. 서로 색이 다른 3개의 금단의 공이 있어. 올바른 순서(빨간색, 파란색, 초록색)로 공을 클릭해야 해. 제때 이 못하거나 잘못된 순서로 클릭하면 공이 얼굴 쪽으로 튕겨져 일시적으로 시야가 어두워지고 노이즈가 많이 낄 거야. 이렇게 될 때마다 게임이 강제 종료되고 모든 세이브 데이터가 삭제될 확률은 0.1%가 있지.
The Forbidden Balls will appear and will bounce along the screen. There will be three Forbidden Balls, one of each color. You must click the balls in the correct order (red, blue, green). Failing to do this on time or clicking them in the wrong order will result in the balls flinging towards your face, temporarily blacking out your vision and adding a high amount of noise. Each time this happens, there is a 0.1% chance that the game will instantly close and delete all save data.
FNaF VR HW에서 등장하지만 상품 카운터에서도 얻을 수 없는 공이다. 그래서 금단의 공이라는 이름을 붙혀준 듯.
이 애니매트로닉스를 넣었을 때의 꽤 거대한 리스크는, 이 애니매트로닉스에게 당할 때마다 게임의 세이브 데이터가 삭제된다는 큰 리스크가 있지만, 0.1%로 아주 낮은 확률이다.
2.11.72. Virtual Gumball Machine(가상현실 검볼 기계)O[편집]

마스크나 카메라를 너무 오랫동안 사용하지 않으면, 그것은 너의 사무실에 머물며 손잡이를 점점 더 빠르게 회전시킬 거야. 그것이 너무 빨리 회전하면, 넌 이미 죽은 목숨이지.
It stays in your office and will swivel its handles faster and faster, if the mask or cameras aren't used for too long. If they swivel too fast, you're dead.
FNaF HW의 상품 코너에 등장하는 검볼 기계다.
2.11.73. Curse of Dreadbear(드레드베어의 저주)O[편집]

로고는 사무실 왼쪽에서 오른쪽으로 이동해. 클릭할 때마다 한 단어가 사라지지만 좌클릭으로 시작해서 좌클릭, 우클릭을 번갈아 가며 클릭해야 해. 클릭을 잘못된 마우스를 누르거나 로고가 사무실 오른쪽 끝에 가면 죽어.
The logo moves from the left side of the office to the right. Every time you click on it one word will disappear, however you must alternate in between left clicking and right clicking, starting from the left. If you click wrong or if the logo reaches the right end of the office you will die.
FNaF VR HW의 DLC에 등장한 메인 로고다.
2.11.74. Imagebit(이매지빗)X[편집]

가끔 카메라 화면에 나타나고 카메라 화면이 가려져. 카메라를 내려놓고 수입산 버터를 클릭해서 사라지게 해.
It will sometimes appear and cover your monitor screen. Put down the monitor and click the Exotic Butters to make it disappear.
이미지빗은 FNaF VR HW의 텍스처 파일로, 몇 가지 업데이트를 위해 상품 코너의 카메라 화면에 사용됐다. 주변의 텍스트 가장자리가 일반 롤빗보다 어둡다.
2.11.75. Death Snowman(죽음의 눈사람)O[편집]

그는 사무실에 남아서 새벽 1시까지 멀쩡하면 널 죽일 거야. 온도가 120°인 상태에서 히터를 켜서 녹여야 해.
He stays in the office and will kill you if he is still intact by 1AM. You must melt him by having the temperature at 120° degrees and the Heater turned on.
죽음의 눈사람은 FNaF VR HW의 크리스마스 업데이트에 등장하는 눈사람이다.
2.11.76. Spring-Scarfy(스프링 스카피)X[편집]

그것은 천장에 매달려있고, 너가 소음을 너무 많이 만들 때마다 그것은 아래로 내려갈 거고 다시 위로 올라갈 거야. 만약 그것이 너의 마우스에 닿으면 그것은 마우스를 끌고 몇 초동안 끌고갈 것이고, 그 후에 그것은 마우스를 놓아 버릴 것이고 너의 전기의 5%를 잃을 거야.
It will be resting on the ceiling, whenever you are making too much noise it will swoop down and then up in an arc, if it hits your mouse it'll latch on to it and lock it into place for a few seconds, afterwards it will let go and 5 percent of your power will be drained.
FNaF HW의 스프라이트다.
2.11.77. Spring-Blocker & Spring Chaser(스프링 차단기와 스프링 추격자)X[편집]

스프링 차단기는 보는 위치에 따라 사무실의 왼쪽 또는 오른쪽에서 사라지고 왼쪽 문을 닫지 못하게 할 거야.(왼쪽을 보면 왼쪽 문을 닫을 수 없으며 그 반대도 마찬가지다.) 문이 막혔을 때 문을 사용하려고 하면 추격자가 생겨서 커서를 쫓아다니기 시작할 거야. 일단 추격자에게 부딪히면, 그것은 너의 전기 5%을 소모할 거야.
The Spring-Blocker will fade in at the left or right side of your office depending on where you look and prevent you from closing your left door (if you're looking left, you can't close the left door, and vice versa.) If you try to use the door when it's blocked, the Chaser will spawn and starting chasing your cursor around. Once it hits it, it will drain 5 percent of your power.
FNaF HW의 스프라이트다.
2.11.78. Steel Wool Foxy(스틸 울 폭시)O[편집]

그는 사무실 양쪽에서 문 밖을 내다보며 나타날 거야. 그가 거기에 있을 때, 네가 그의 얼굴에 빛을 비추기 전에는 문을 닫을 수 없을 거야. 그가 너무 오래 거기 있으면 널 죽일 거야.
He will appear from either side of the office, looking out from the door. When he's there, you will be unable to close the door until you flash your light in his face. He will kill you if he's kept there for too long.
FNaF HW의 티저 이미지에 등장했던 폭시. 사실은 Everything Animations라는 유저가 제작한 모델로, 팬 모델을 도용했기에 이미지는 추후 수정됐다.
2.11.78.1. Steel Wool Foxy 스킨[편집]

1번째 스킨은 Sharky(샤키)라는 이름의 스킨이다. Foxy라는 이름의 Fox에서 유래된 것처럼 Shark에서 유래됐다.
2.11.79. Steel Wool Cupcake(스틸 울 컵케이크)X[편집]

카메라가 오랫동안 내려가 있을수록 그가 너의 중앙 환풍구 문에 나타날 가능성이 커져. 그가 거기 있을 때, 넌 카메라를 몇 초 동안 볼 때까지 그걸 닫을 수 없을 거야.
The longer the cameras are down, the more chance of him appearing at your Front Vent Door. When he's there, you will be unable to close it until looking at the cameras for several seconds.
FNaF HW의 티저 이미지에 등장했던 컵케이크. 사실은 Superkerbin이라는 유저가 제작한 모델로, 팬 모델을 도용했기에 이미지는 추후 수정됐다.
2.11.80. Virtual SpringBonnie(가상현실 스프링보니)[편집]

가상현실 스프링보니는 때때로 너에게 그의 슈트를 강제로 입히려고 할 거야. < 와 > (, 그리고 .) 키를 사용해 흔들어서 그의 슈트를 벗으려고 노력해봐. 너가 슈트를 입은 동안 프레디 파즈베어 가면이나 카메라를 사용할 수 없어.
Virtual SpringBonnie will sometimes force you to wear his suit. Use the < and > (, and .) keys to shake and make his suit fall off. You cannot use the Freddy Fazbear Mask or the cameras while having the suit on.
FNaF HW에서 사용되지 않은 애니매트로닉스다. 원래 이 애니매트로닉스의 메커니즘은 글리치트랩이라는 애니매트로닉스의 것이었으나 삭제되고 아이콘은 이 캐릭터의 스킨으로 옮겨왔다.
2.11.80.1. Virtual SpringBonnie 스킨[편집]

1번째 스킨은 Glitchtrap(글리치트랩)이라는 이름의 스킨이다. 상술했듯이 원래 글리치트랩이라는 애니매트로닉스는 따로 있었으나, 스킨으로 왔다.
2.11.81. Toy Proxy(토이 프록시)X[편집]

배관 시스템으로 너에게 접근 할 거고 소리 미끼 또는 히터의 영향을 받지 않을 거야. 그것이 사무실에 들어가는 것을 막는 유일한 방법은 그것이 가는 배관를 막는 방법 뿐이야. 사무실에 들어가면 남은 밤 동안 소음을 유발 할 거야.
It will go through the Duct System, and is not affected by the Audio Lure or the Heater. The only way to prevent it from getting in the office is closing the duct it is going to. If it gets in, it will create loud noises for the rest of the night.
토이 프록시는 FNaF VR HW 파일에 있는 사용되지 않은 모델이다. 플러시트랩 섹션의 모델링으로 사용됐을 가능성이 높다.
2.11.82. Big Toy Proxy(빅 토이 프록시)X[편집]

그는 배관 시스템을 통해 이동 하고 소리 미끼에 끌릴 거야. 그는 너를 혼자서 죽일 수 없어. 그는 벽에 부딪 힐 때마다 큰 홈을 남겨 다른 캐릭터가 더 빨리 너를 향해 이동 하게 할 거야.
He will walk through the Duct System and will follow the Audio Lure. He cannot kill you by himself. Whenever he hits a wall, he will leave a large indent in it, which allows other characters to traverse towards you faster.
빅 토이 프록시는 FNaF VR HW의 파일에 있는 토이 프록시의 커진 버전이다. 그것은 밤의 공포 스테이지 캐릭터의 모델링으로 사용됐을 가능성이 크다.
2.11.83. Bonnie Cookie(보니 쿠키)X[편집]

보니 쿠키는 프레디 마스크를 쓴 후 사무실에 무작위로 나타날 수 있으며 카메라를 들 때만 사라질 거야. 그가 거기있는 동안에는 사무실이 완전히 흰색으로 바뀔 거야.
Bonnie Cookie can randomly appear in your office after putting on the mask and will only go away when you pull up the monitor. The office will turn completely white while he's there.
보니 쿠키는 FNaF VR HW 파일에 있는 사용되지 않는 텍스처다. FNaF 1 보니지만 검은 바탕에 흰색이다.
보니 쿠키에 특성은 섀도우 보니의 특성과 비슷하다.
2.11.83.1. Bonnie Cookie 스킨[편집]

1번째 스킨은 Whiterabbit(화이트래빗)이라는 이름의 스킨이다. FNaF World에 등장하는 화이트래빗에서 따온 스킨이다.
2.11.84. Unused Withereds(사용되지 않은 구형)O[편집]

새벽 1시가 되기 전에 화면 상단에 있는 3가지 난이도 중 하나를 선택하고 클릭해야 해. 그렇지 않으면 죽어.
보니는 쉬워. 선택하면 캐릭터에 대한 AI×10개의 포인트를 얻어. 그는 가끔 너의 사무실에 나타날 거야. 마스크를 착용하고 히터를 켜서 나가게 해.
치카는 중간이야. 선택하면 캐릭터에 대한 AI×15개의 포인트 를 얻어. 그녀는 너의 사무실에 자주 나타날 거야. 마스크를 착용하고 4개의 문을 모두 닫아 그녀가 떠나도록 하게 해.
폭시는 어려워. 선택하면 캐릭터에 대한 AI×20개의 포인트를 얻어. 그는 너의 사무실에 자주 나타날 거야. 마스크를 쓰고 레버를 당겨서 그가 떠나도록 하게 해.
You must choose and click one of the 3 difficulties at the top of the screen before 1AM hits, otherwise you will die.
Bonnie is easy. For choosing easy, you will get AI*10 number of points for the character. He will appear in your office every once in a while. Put on the mask and turn on the Heater to make him leave.
Chica is medium. For choosing medium, you will get AI*15 number of points for the character. She will appear in your office frequently. Put on the mask and close all 4 doors to make her leave.
Foxy is hard. For choosing hard, you will get AI*20 number of points for the character. He will appear in your office very frequently. Put on the mask and pull the lever to make him leave.
사용되지 않은 구형은 FNaF VR HW의 DLC 파일에 있는 구형 보니, 구형 치카, 구형 폭시의 사용되지 않은 버전이다.
2.11.85. Burned Freddles(불탄 프레들)X[편집]

온도가 높으면 너의 시야를 가리며 사무실에 나타나. 전기 충격 패널을 사용하여 벗겨내.
When the Temperature rises, they will begin to appear in your office covering your view. Use the Shock Panel to take them off.
불타는 프레들은 FNaF VR HW의 파일로 남아있는 사용되지 않은 캐릭터로, DLC의 스테이지인 맹글 제작 단계에 카메오로나마 등장 했다.
2.11.86. Hollow Bonnie & Chica(할로우 보니와 치카)O[편집]

너가 가장 최근에 게임 중에 죽었을 때, 둘 다 1층의 양쪽 복도에 나타날 거야. 그들의 공격을 방어하려면 양쪽 문을 닫아야 하지만 그 시간은 매우 짧을 거야.
At the exact time you most recently died at in-game, both will appear in both hallways on F1. You have only a few seconds to close both doors to defend against their attack.
FNaF HW의 사용하지 않은 잭오보니와 잭오치카의 모델링이다.
2.11.87. Rainbow Masks(무지개 가면)X[편집]

프레디 파즈베어 마스크를 착용할 때마다 무작위 색상으로 변경돼. 각 색에는 다른 속성이 있습니다.
레귤러 브라운: 아무것도 아니야.
노란색: 마스크를 너무 오래 사용하면 전기가 차단되기 시작해.
바이올렛: 몇 초 후에 벗겨질 거야.
빨간색: 마스크를 너무 오래 사용하면 산소 배출이 시작돼.
흰색: 마스크를 너무 오래 사용하면 인터넷 배출이 시작돼.
녹색: 마스크를 너무 오래 사용하면 독성 수치가 증가하기 시작해
.Every time you put on the Freddy Fazbear Mask, it will change to a random color. Each color has a different property.
Regular Brown: Nothing.
Yellow: Will start to drain power if the mask is on for too long.
Violet: Will take itself off after a few seconds.
Red: Will start to drain oxygen if the mask is on for too long.
White: Will start to drain internet if the mask is on for too long.
Green: Will start to increase the Toxic Meter if the mask is on for too long.
무지개 마스크는 FNaF VR HW의 DLC 파일에서 발견된 사용되지 않은 가상현실 프레디 마스크다. 사용하지 않는 텍스처 파일에서 가져온 거다. 이건 마지막 테스트를 하기 전에 트릭 오어 트릿 스테이지 가면의 모델링로 사용됐을 가능성이 높다.
2.12. SPECIAL DELIVERY[편집]
2.12.1. Augmented Freddy(증강현실 프레디)O[편집]

"I've planned something special, j-just for you."
"너만을 위한, 특별한 것을 준ㅂ-비했어."
"That sure was fu-un!"
"정말 재미ㅇ-있었어!"
"I-I bet you didn't expect me to show up, d-did ya now?"
"ㅅ-설마 내가 올 줄은 몰랐겠지, 안 그래?"
"Round and round we go...w-where we're going, no-obody knows!"
"돌고 돌며 우리는 나아가... ㅇ-우리가 어디로 갈지, 아무도 모르지!"
"When you wake up, j-just remember: Friends are fore-ever."
"깨어나면 ㄱ-기억해 둬: 친구는 영원ㅎ-하단 것을."
"I hope you enjoyed my visit. I've got a special delivery-y, j-just for you."
"내 방문이 즐거웠기를 바라. 너만을 위한, 특별한 배ㄷ-달을 준ㅂ-비해 뒀어."
"Now would be a good ti-ime to hold your breath."
"지금이 딱 숨을 참기 ㅈ-좋은 타이밍이야."
"It looks like someone wasn't ready for Fr-freddy to come to the party!"
"누군가가 ㅍ-프레디가 파티에 올 것을 전혀 준비하지 못한 모양인 걸!"
"Most people li-ike my hugs!"
"대부분은 내 포옹을 ㅈ-좋아하지!"
"What's that you say-y? You didn't invite me-e? Too bad."
"그게 무슨 소리ㅇ-야? ㄴ-날 초대하지 않았다고? 아쉽네."
"I hope you enjoyed my visit. I'm planning on making it e-extra special for you."
"내 방문이 즐거웠길 바라. 널 위해 ㄷ-더욱 특별한 것을 준비하고 있거든."
"Better lu-uck next time."
"다음에는 ㄷ-더 잘해 봐."
"Aw, you look down, would you like a hug?"
"이런, 기분이 안 좋아 보이는 걸, 포옹해줄까?"
"By the look on your face you really were suprised."
"네 얼굴을 보아하니 정말 깜짝 놀랐나 보구나."
"Bet you weren't expecting me to show up early were you now."
"설마 내가 일찍 나타날 줄은 몰랐겠지?"
"I bet you were shocked this time."
"이번엔 충격 좀 받았을 거야."
"You did your best and that's all that counts."
"넌 최선을 다 했으니 그걸로 된 거야."
"Now, now, all that fear there isn't helping e-either of us."
"자, 자, 두려워 하는 건 우리 모두에게 도움이 ㄷ-되지 않아."
"I've prepared an special-happy fun time j-just for you."
"너만을 위해 특별히 즐거운 시간을 ㅈ-준비했어."
대사
증강현실 프레디가 GPS 시스템으로 널 향해 걸어갈 거야. 그는 다른 GPS 애니매트로닉스보다 느리게 움직여. 그가 너와 가까워질수록 화면에 더 잡음이 흘러. 그를 사라지게 하려면 미끼나 라디오 방해기를 이용해야 해. 그가 널 잡으면 넌 죽어.
Augmented Freddy will walk towards you on the GPS System. He moves slower than any other GPS threats. The closer he is to you, the more static's on the screen. Use the Lure or Radio Jammer to make him go away. If he gets to you, you're dead.
FNaF AR SD에 나오는 프레디 파즈베어다.[63]
2.12.2. Augmented Bonnie(증강현실 보니)O[편집]

그는 거의 보이지 않는 상태로 GPS 시스템으로 너에게 가게 될 거야. 그가 너에게 가까이 있으면, 너는 그의 신음소리를 들을 거야. 그 순간, 넌 미끼를 켜야만 그를 떨어뜨릴 수 있어.
He will go through the GPS System, barely visible on it. When he's close to you, you will hear his groaning. At that moment, you must turn on the Lure to get him away.
FNaF AR SD에 나오는 보니다.
2.12.2.1. Augmanted Bonnie 스킨[편집]

1번째 스킨은 Glamfred Bonnie(글램프레드 보니)라는 이름의 스킨이다. 증강현실 보니에 글램락 프레디 색깔을 입힌 모습이다.
2.12.3. Augmented Chica(증강현실 치카)O[편집]

그녀는 미끼에 면역된 상태로 GPS 시스템으로 너에게 갈 거야. 사무실 온도가 80도 미만이어도 그녀는 더 가까이 움직이지 않을 거야. 그녀가 널 잡으면 넌 죽어. 그녀는 라디오 방해기의 영향을 받아.
She will go through the GPS System, immune to the Lure. She won't move closer if the office is under 80°. If she gets to you, you're dead. She is affected by the Radio Jammer.
FNaF AR SD에 나오는 치카다.
2.12.4. Augmented Foxy(증강현실 폭시)O[편집]

“I should warn ya! There'll be no quarter fer ya.”
"경고를 해 두지! 너에게 자비란 없다."
"Ahoy! It's time ye should be getting properly afraid."
"아호이! 이제 제대로 겁 좀 먹어 볼 시간이로군."
"Arrrrrrrrr you scared yet?!"
"야아아아알 아직도 무서운가?!"
"Good thing for me that ye were no ninja."
"네가 닌자가 아니어서 참 다행이야."
"Yer stuck to the ground like a barnacle on the ship, ain't ya?"
"마치 선박에 붙은 따개비 마냥 땅에만 찰싹 달라 붙어있군. 안 그래?"
"Ready to dance to dead man's jig?"
"죽은 자의 지그 춤을 출 준비가 되었나?"
"I'VE GOTCHA NOW!"
"잡았다!"
"Avast ye. Yer time has just about run out."
"꼼짝마. 네 시간은 끝나가고 있다고."
"What's wrong? Am I too fast for ya?"
"왜 그러지? 내가 너무 빠른가?"
"Dead men do indeed tell no tales!"
"죽은 자는 말이 없는 법이지!"
"Not long yet, before ye will be feeding the fishies!"
"조금 있으면, 넌 물고기 밥 신세가 될 테지!"
"Pretty soon, you'll be walking the plank!"
"머지않아, 넌 나무 판자 위를 걷게 될 거야!"
"Me hook is getting mighty hungry."
"내 후크가 배고프다고 난리를 치는군."
"Watch out for the hook, unless ye be wantin' to gouge yer eye!"
"후크를 조심하라고, 눈을 찔리기 싫다면 말이야!"
"HERE I COME!"
"내가 간다!"
"Arrgh! Ya scurvy landlubber! Never stood a chance!"
"아알! 한심하고 미숙한 선원이로군! 너한테는 가망이 없다고!"[A]
"Me bird's keepin' an eye on ya!"
"내 새가 널 계속 주시하고 있어!"
"Yer time's almost out!"
"네 시간은 얼마 남지 않았다!"
"The sands of time are almost gone for you."
"널 위한 시간의 모래는 거의 다 흘러 내려가고 있군."
"Shall we parley? Just kidding."
"우리 거래 좀 할까? 농담이야."
대사
무작위로, 그는 GPS 시스템을 통해 널 향해 질주할 거야. 넌 발소리를 들을 수 있을 거야. 빨리 대응해서 미끼를 사용해서 그를 다른 길로 내보내야 해. 그가 널 잡으면 넌 죽어.
At random, he will sprint at you on the GPS System, which you will be able to hear. You must react quickly and use the Lure to send him off the other way. If he gets to you, you're dead.
FNaF AR SD에 나오는 폭시다.
2.12.5. Augumented Golden Freddy(증강현실 골든 프레디)O[편집]

그는 카메라를 내릴 때 나타날 수도 있어. 만약 그가 일어서고 있다면, 그를 사라지게 하려면 손전등을 사용해. 그가 너무 오래 일어서 있으면 너를 죽일 거야. 그가 앉아 있다면 손전등을 사용하면 너는 전기 5%를 잃을 거야.
He can appear when lowering the monitor. If he is standing up, use the flashlight on him to make him disappear. After a while of him standing, he will kill you. If he's sitting, using the flashlight will take away 5% power.
FNaF AR SD에 나오는 골든 프레디다.
2.12.5.1. Augmented Golden Freddy 스킨[편집]

1번째 스킨은 Angry Fucking Rock Augmented Golden Freddy(화난 엿먹을 락 증강현실 골든 프레디)라는 이름의 스킨이다.
2.12.6. Augmented Bare Endo(증강현실 베어 엔도)O[편집]

그가 나타나서 사무실에 나타나면, 마우스를 그의 얼굴 위에 올려놔. 새벽 5시에 그는 단 한 번만 나타나서 널 똑바로 쳐다볼 거야. 가능한 한 빨리 전기 충격 패널을 사용하여 그를 떠나게 해.
When he appears and haywires in your office, hover your mouse over his face. At 5AM he will appear only once, staring straight at you. Use the Shock Panel as fast as you can to make him leave.
FNaF AR SD에 나오는 엔도01이다.
2.12.7. Augmented Toy Freddy(증강현실 토이 프레디)X[편집]

그는 울트라 커스텀 나이트의 724/20 모드를 플레이할 거야. 하지만 현실이 찢어지는 구조 때문에 잠재적으로 다중 우주에서 그의 마우스 커서가 보일 거야.
He will be playing Ultra Custom Night's 724/20 mode. However, due to the fabric of reality tearing apart, his mouse cursor from potentially multiple universe will be visible.
FNaF AR SD에 나오는 토이 프레디다. 화면만 약간 가리는 수준이 아니라, 플레이어의 마우스 커서가 무엇인지도 헷갈리게 만들어서 꽤 짜증나는 애니매트로닉스다.
2.12.8. Augmented Toy Bonnie(증강현실 토이 보니)X[편집]

그는 건물을 탈취하려고 할 거고, 넌 GPS 시스템에서 그가 접근하는 것을 볼 수 있어. 그가 계약서를 들고 사무실에 나타나면 넌 어서 히터를 킨 다음 전기 충격을 사용해 계약서에 불을 지펴야 해. 그렇지 않으면 그는 전기를 내려 전기를 0%로 만들 거야. 너가 계약서를 태우면 그는 다른 계약서를 얻기 위해 떠날 거야.
He'll try to repossess the building, you can see him approaching from the GPS system. When he appears in your office holding a contract you'll have to quickly turn on the heater and use the controlled shock to set the contract on fire. Otherwise, he'll shut off the power and it will drop to zero. After you burn the contract he'll leave to get another one.
FNaF AR SD에 등장하는 토이 보니다.
2.12.9. Augmented Toy Chica(증강현실 토이 치카)X[편집]

너는 지금 당장 파즈코인으로 몇 가지 주요 야간 기능(마스크, 배관 시스템, 환풍구 시스템 등)을 구입 해야해! 사무실 오른쪽에 있는 패널을 사용해 구입 해.
You now have to purchase some major night functions with Faz-Coins! Use the panel on the right side of the office to buy them.
FNaF AR SD에 나오는 토이 치카다.
2.12.10. Augmented BB(증강현실 BB)O[편집]

그는 너의 아바타 앞이나 옆쪽의 GPS 시스템에 나타날 거야. 살아남으려면, 만약 그가 너의 앞에 있다면, 손전등을 앞쪽 환기구로 비춰. 만약 그가 너의 옆이라면, 손전등을 각각의 문에 대봐.
He will appear on the GPS System, either in front of or to the side of your avatar. To survive, if he's in front of you, point your flashlight at the front vent. If he's to your side, point your flashlight at the respective door.
FNaF AR SD에 나오는 BB다.
2.12.11. Augmented Springtrap(증강현실 스프링트랩)O[편집]

증강현실 스프링트랩이 GPS 시스템 주위를 돌면서 널 잡으면 너에게 점프스케어 해. 그를 멀리하려면 미끼를 사용해라. 네가 그를 볼 때, 그의 눈은 하얗거나 빨갛게 빛날 수 있어. 빨간색이면 카메라를 빨리 내려야 해.
Augmented Springtrap moves around the GPS System and jumpscares you when he gets you. Use the Lure to keep him away. When you look at him, his eyes can glow either white or red. If they're red, you must quickly close your monitor.
FNaF AR SD에 나오는 스프링트랩이다.
2.12.12. Augmented Jack-O-Bonnie(증강현실 잭 오 보니)O[편집]

그는 특별해서 사무실 안에 다른 출입구를 만들어낼 거야! 근데 닫히는 문은 없거든. 그가 출입구에 나타나면, 넌 카메라를 켜고 기도하기 위해 B를 눌러야 해. 몇 초 후에, 너가 카메라를 내려놓는다면, 그와 그의 출입구는 사라질 거야, 왜냐하면 그는 치트를 썼기 때문에 지옥으로 추방되었으니까.
So special he is, he will conjure another doorway into existence inside of your office! Except there is no door to close. When he appears in the doorway, you must put on the monitor and hold B to pray. After a few seconds, the next time you put down the monitor he and his doorway will be gone, as he has been banished to super hell for cheating.
FNaF AR SD에 등장하는 잭 오 보니다.
2.12.13. Augmented Ballora(증강현실 발로라)O[편집]

미니리나는 높은 소음 수치로 오락실에 한 명씩 나타날 거야. 가까운 방에 소리 미끼를 틀면 그들은 떠날 거야. 너무 많이 오면 증강현실 발로라가 공격할 거야.
Minireenas will appear one by one in the Arcade Room at high noise levels. Playing audio in nearby rooms will make them leave. Making them leave too much or having too many of them at the same time will cause Augmented Ballora to attack.
FNaF AR SD에 나오는 발로라다.
2.12.14. Augmented Minireenas(증강현실 미니리나)O[편집]

그것들은 너의 위로 기어올 거야. 그들을 흔들어서 떨어뜨리려면 빠르게 ,< 그리고 .> 키를 눌러. 너무 많이 위로 가면, 넌 죽게 될 거야! 소음 측정기가 0이면, 그것들은 더 느리게 움직여.
They'll be crawling onto you. Rapidly press the ,< and .> keys to shake and drop them off. If too many go to the top, you die! They move slower if the noise meter is at 0.
FNaF AR SD에 등장하는 미니리나다. 메커니즘은 FNaF SL 4일밤의 미니리나의 메커니즘에서 따왔다.
2.12.15. Augmented RWQFSFASXC(증강현실 섀도우 보니)O[편집]

렘넌트가 서서히 사무실에 쌓일 거야. 마우스로 가져가면 모아서 파즈-코인이 하나 주어져. 사무실에 너무 많은 렘넌트가 한 번에 남아 있지 않도록 해. 그렇지 않으면 증강현실 섀도우 보니가 널 죽일 거야.
Remnant will slowly accumulate in your office. Hovering your mouse over it will collect it and give you one Faz-Coin. Don't let there be too many remnant in your office at once or else Augmented RWQFSFASXC will kill you.
FNaF AR SD에 나오는 섀도우 보니다.
2.12.16. Augmented Freddy Mask(증강현실 프레디 마스크)X[편집]

마스크 버튼(사무실의 빨간색 마스크 버튼 또는 키보드의 Ctrl 버튼)을 누른 상태로 유지해야 해[64]
. 그렇지 않으면 마스크가 벗겨져.
You must hold down the mask button (either the red mask button in the office or the ctrl button on your keyboard) to keep it on, otherwise the mask will be taken off.
FNaF AR SD의 방어 수단 중 하나인 프레디 마스크다.
2.12.17. Freddy Frostbear(프레디 프로스트베어)O[편집]

사무실이 너무 오랫동안 차갑게 유지되면 프레디 프로스트베어가 사무실에 나타날 거야. 그가 떠나게 하려면, 그저 온도를 다시 올리기만 하면 돼. 하지만 계속 60도로 유지하면 팬, 문 또는 발전기 같은 건물의 임의의 부분이 얼어서 사용할 수 없게 돼. 만약 그 때까지 사무실이 여전히 시원하다면, 그는 다음에 니가 카메라를 올릴 때 너에게 점프스케어 할 거야.
If the office is kept too cool for a long time, Freddy Frostbear will appear in your office. To make him go away, simply let the temperature rise again. However, if you continue to keep it at 60 degrees, he will freeze a random part of the building, like the fan, doors or the Power Generator, making them unusable. If the office is still cool by that time, he will jumpscare the player the next time they flip up the monitor.
FNaF AR SD의 그 프레디 프로스트베어다.
2.12.17.1. Freddy Frostbear 스킨[편집]


1번째 스킨은 Bad Freddy(나쁜 프레디)라는 이름의 스킨이다.
2번째 스킨은 Summer Frostbear(여름 프로스트베어)라는 이름의 스킨이다.
3번째 스킨은 Candy Cane Freddy Frostbear(사탕 지팡이 프레디 프로스트베어)라는 이름의 스킨이다.
2.12.18. Freddy Shamrock(프레디 샴록)O[편집]

그는 락스타 폭시처럼 일하지만, 완전히 그렇지는 않아. 프레디 샴록이 어떤 카메라에든 나타날 것이고, 그를 봤을 때 코를 클릭하면 그가 너에게 도움을 줄 거야. 그의 도움 옵션은 락스타 폭시와 동일하며, 1% 파워를 얻거나, 사무실에 온도를 60으로 맟춰주거나, 10개의 파즈코인을 얻거나, 잠시 동안 모든 소음을 제거해. 하지만 락스타 폭시처럼, 이것은 위험과 함께 와. 코를 클릭하면 그가 너에게 점프스케어 할 가능성이 약간 있어. 락스타 폭시처럼 그는 0에서도 활동해.
He works like Rockstar Foxy, but not completely. Freddy Shamrock will appear on any of the cameras, and when you see him, you can click his nose, after which he will grant you help. His help options are the same as Rockstar Foxy's, those being gaining 1% Power, make the office a cool 60 degrees, gain 10 Faz-Coins, or remove all noise for a while. However, like Rockstar Foxy, this comes with a risk. Clicking on his nose has a slight chance of him jumpscaring you. Just like Rockstar Foxy, he is active at 0.
FNaF AR SD의 프레디 파즈베어의 스킨 프레디 샴록이다.
2.12.19. Freddy Shamrock 스킨[편집]

1번째 스킨은 Anniversary Freddy(기념일 프레디)라는 이름의 스킨이다.
2.12.20. Chocolate Bonnie(초콜릿 보니)O[편집]

초콜릿 보니는 락스타 보니와 매우 비슷하게 일해. 그는 가끔 너의 사무실에 나타날 수 있고, 넌 1층에 있는 카메라에서 계란 바구니를 찾아서 클릭해야만 그를 보낼 수 있어. 바구니는 공급 옷장(CAM03) 또는 상품 카운터(CAM07)에 나올 수 있어. 만약 네가 제 시간에 계란을 찾지 못하면, 그는 너의 밤을 끝낼 거야. 초콜릿 보니가 데스 코인에 취약해 밤부터 이를 제거할 수 있다는 점에 유의해야 해.
Chocolate Bonnie works very similar to Rockstar Bonnie. He can sometimes appear on your office, and you must find a basket of eggs on the cameras on Floor 1 and click it to send him away. The basket can appear in either the Supply Closet (CAM 03) or the Prize Counter (CAM 07). If you don't find the eggs in time, he will end your run. It should be noted that Chocolate Bonnie is vulnerable to the Death Coin and can be removed from the night by it.
FNaF AR SD의 보니의 스킨 초콜릿 보니다.
2.12.20.1. Chocolate Bonnie 스킨[편집]

1번째 스킨은 Barack Hussein Obama II(버락 후세인 오바마 2세)라는 이름의 스킨이다. 미국의 대통령 오바마가 맞다.
2.12.21. Easter Bonnie(이스터 보니)O[편집]

이스터 보니는 락스타 보니와 초콜릿 보니 둘 다와 비슷하지만 조금 달라. 카메라를 들어올릴 때 5초 간격으로 나타날 수 있고 사무실 책상 위에 있는 달걀을 찾아 클릭해야 해. 제시간에 하지 않으면 다음 번에 니가 카메라를 올리면 그가 널 죽일 거야.
Easter Bonnie works similar to both Rockstar Bonnie and Chocolate Bonnie, but a bit different. He can appear in any 5 second interval when you lift up your monitor, and you will need to find and click an egg on the desk of your office. Not doing it in time will result in him killing you the next time you put your monitor up.
FNaF AR SD의 보니의 스킨 이스터 보니다.
2.12.21.1. Easter Bonnie 스킨[편집]

1번째 스킨은 Optimized Popgoes(최적화된 팝고즈)라는 이름의 스킨이다.
2.12.22. VR Toy Freddy(VR 토이 프레디)O[편집]

그는 니가 카메라를 내리면 언제든지 너의 사무실에 나타날 수 있어. 그가 나올 때, 넌 3 이상의 수치를 사용하면 안 돼. 그렇지 않으면 VR 토이 프레디는 다음에 카메라를 올릴 때 널 죽여.
He can appear in your office whenever you put down your monitor. When he does, you mustn't let the usage bar above 3, otherwise, VR Toy Freddy kills you the next time you put the monitor up.
FNaF AR SD의 토이 프레디의 스킨 VR 토이 프레디다.
2.12.22.1. VR Toy Freddy 스킨[편집]


1번째 스킨은 VR Troll Face(VR 트롤페이스)라는 이름의 스킨이다.
2번째 스킨은 Super Mario(슈퍼 마리오)라는 이름의 스킨이다.
3번째 스킨은 VR Guest(VR 손님)이라는 이름의 스킨이다.
2.12.23. Highscore Toy Chica(하이스코어 토이 치카)O[편집]

그녀의 미니게임이 나타나면, 아이가 행복해질 때까지 컵케이크를 던지려면 V를 연타해. 만약 니가 너무 오래 걸리면, 그녀는 너에게 점프스케어 할 거야.
When her minigame appears, spam press V to throw cupcakes at the child until they're happy. If you take too long, she will jumpscare you.
FNaF AR SD의 토이 치카의 스킨 하이스코어 토이 치카다.
2.12.23.1. Highscore Toy Chica 스킨[편집]

1번째 스킨은 OMC Highscore Toy Chica(OMC 하이스코어 토이 치카)라는 이름의 스킨이다.
2.12.24. System Error Toy Bonnie(시스템 오류 토이 보니)X[편집]

몇 초마다, 그는 무작위 시스템을 망가뜨리는 것 외에는 아무것도 하지 않아. 그런 다음 카메라를 봐서 해당 시스템을 수리해야 해.
Every few seconds, he will do nothing more than crashing a random system. You will then need to check the camera to fix said system.
FNaF AR SD의 토이 보니의 스킨 시스템 오류 토이 보니다.
2.12.24.1. System Error Toy Bonnie 스킨[편집]


1번째 스킨은 System Error Big Chungus(시스템 오류 빅 청거스)라는 이름의 스킨이다.
2번째 스킨은 CHAOS Dreadbear(혼돈 드레드베어)라는 이름의 스킨이다.
2.12.25. 8-Bit Baby(8비트 베이비)O[편집]

"I can hear you breathing, but not for long."
"네 숨소리가 들려, 오래가지는 못할 테지만."
"There's something bad, inside of me."
"내 안에, 뭔가 잘못된 게 있어."
"If you keep your eyes closed, nothing bad will happen to you."
"눈을 감고 있으면 끔찍한 일이 일어나지 않을 거야. 약속할게."
"Soon, you will be broken as I am..."
"곧, 너도 나처럼 망가지게 될 거야..."
대사
배이비의 몸이 책상에 남아 있을 거야. 언제든지 클릭하면 미니 게임을 시작할 수 있어. 키패드에 올바른 숫자를 입력하여 아이에게 컵케이크를 던져야 해. 잘못된 번호를 클릭하거나 오전 6시까지 미니 게임을 끝내지 않으면 점프스케어로 이어져. 입력해야 하는 숫자는 AI 수치보다 1개 더 많아.
A Baby figure will stay in your desk. You can click it anytime to start a minigame, in where you must type the correct numbers in the keypad to throw cupcakes at kids. Clicking the wrong number or not finishing the minigame until 6AM will result in a jumpscare. The amount of numbers you must enter is 1 more than the AI level.
FNaF AR SD의 그 8-비트 베이비이며, FNaF SL 베이비 미니게임에서도 등장했다.
2.12.25.1. 8-Bit Baby 스킨[편집]

1번째 스킨은 Gilbert Garfield(길버트 가필드)라는 이름의 스킨이다.
2.12.26. Radioactive Foxy(방사능 폭시)X[편집]

그는 GPS 시스템의 미끼를 너무 많이 사용할 경우에 GPS 시스템에 나타나 독성 수치를 올릴 거야. 사라지게 하려면 반복적으로 라디오 방해기를 켜고 꺼.
He will appear on the GPS System if the lure on it is used too much, and will add to the toxic meter. Repeatedly toggle the jammer on and off to make him go away.
FNaF AR SD의 폭시의 스킨 방사능 폭시다.
2.12.27. Toxic Springtrap(독성 스프링트랩)O[편집]

카메라를 내릴 때마다 사무실 천장에 보라색 거품이 몇 개 나타나. 너무 많은 거품이 나오면 독성 스프링트랩이 사무실에 나타나. 눈이 빨개지면 쳐다보지 마. 만약 그의 눈이 하얗다면, 그의 얼굴 위에 마우스를 올려.
Every time you close the monitor, a few purple bubbles will appear on the ceiling of the office. If too many of them spawn, Toxic Springtrap will appear in your office. If his eyes are red, don't look at him. If his eyes are white, put your mouse over his face.
FNaF AR SD의 스프링트랩의 스킨 독성 스프링트랩이다.
2.12.28. Firework Freddy(폭죽 프레디)O[편집]

폭죽이 책상에 그대로 있을 거야. 사무실이 120도로 너무 오랫동안 유지되면, 폭죽은 천천히 그 퓨즈를 점화시킬 거야. 퓨즈가 완전히 점화되면 불꽃놀이 프레디가 거의 즉시 너에게 점프스케어 해 게임이 끝나. 퓨즈를 되돌릴 방법은 없어.
A firework will stay in your desk. If the office is kept at 120 degrees for too long, the firework will slowly ignite its fuse. If the fuse ignites completely, Firework Freddy will almost instantly jumpscare you, resulting in a game over. There is no way to reset the fuse.
FNaF AR SD의 프레디 파즈베어의 스킨 폭죽 프레디다.
2.12.28.1. Firework Freddy 스킨[편집]

1번째 스킨은 American Freddy(미국인 프레디)라는 이름의 스킨이다.
2.12.29. Liberty Chica(자유의 치카)O[편집]

그녀는 너의 사무실에 있어. 만약 온도가 60도라면, 그녀의 컵케이크는 서서히 불타는 걸 멈출 거야. 만약 그게 완전히 타는 걸 멈춘다면, 그녀는 화를 낼 거고 너에게 점프스케어 할 거야. 항상 60° 이상을 유지해서 만족감을 유지해.
She stays in your office. If the temperature is on 60°, her Cupcake will slowly stop burning. If it stops burning completely, she will get angry and jumpscare you. Keep it over 60° at all times to keep her content.
FNaF AR SD의 치카의 스킨 자유의 치카다.
2.12.30. Flamethrower Bare Endo(화염방사기 베어 엔도)X[편집]

화염방사기 베어 엔도가 불꽃 효과음으로 3층 입구 카메라에 무작위로 등장해. 입구 근처에 소리 미끼를 이용해서 그를 멀리 보내. 만약 그가 너무 오랫동안 그곳에 머무르면, 그는 바닥 전체를 태워버리고 카메라가 보는 걸 막을 거야.
Flamethrower Bare Endo will randomly appear on the Entrance camera on Floor 3 with a flame sound effect. Use the audio lure near the entrance to send him away. If he lingers there for too long, he will burn down the entire floor and prevent it from being viewed.
FNaF AR SD의 베어 엔도의 스킨 화염방사기 엔도다.
2.12.31. Broiler Baby(브로일러 베이비)O[편집]

브로일러 베이비는 지하 층에 있을 거야. 지하 층 카메라로 석탄을 수집해서 불을 붙여야 해. 불이 완전히 꺼지면, 넌 그것과 함께 죽어. 석탄을 수집하면 파즈 코인 하나를 얻을 수 있어.
Broiler Baby will stay on the Basement camera. Collect coal on the Basement camera to fuel her fire. If the fire completely dies out, you die with it. Collecting a coal gives you one Faz Coin.
FNaF AR SD의 서커스 베이비의 스킨 브로일러 베이비다.
2.12.32. Scorching Chica(불타는 치카)X[편집]

밤새도록 연기가 사무실에 가득 찰 거야. 이걸 제거하려면 저소음 환기나 선풍기를 사용해. 사무실 안에 연기가 많을수록 시야가 좁아지고, 사무실 안에 연기가 가득 차면 산소가 빠져나가기 시작해.
Smoke will fill up the office throughout the night. To get rid of it, use the Silent Ventilation or the fan. The more smoke that is in the office, the harder it is to see, and when the office is full of smoke, you will start to lose oxygen.
FNaF AR SD의 치카의 스킨 불타는 치카다.
2.12.33. Flaming Springtrap(타오르는 스프링트랩)X[편집]

그는 니가 히터를 사용할 때마다 Lumber Co. 층 카메라에서 사라지게 될 거야. 만약 그가 완전히 망가지면, 그는 카메라를 태워버리고 니가 보는 걸 막을 거야. 그가 다시 사라질 수 있는 유일한 방법은 에어컨을 몇 초 동안 사용하는 거야.
He will fade in on the Lumber Co. camera whenever you use the Heater. If he fades in all the way, he will burn down the camera and prevent you from looking at it. The only way for him to fade out again is to use the Power A/C for a few seconds.
FNaF AR SD의 스프링트랩의 스킨 불타는 스프링트랩이다.
2.12.34. Ringmaster Foxy(링마스터 폭시)O[편집]

그는 너의 사무실에 나타나서 10 파즈코인을 요구할 거야. 그가 널 죽이기 전에 넌 그에게 돈을 줘야 해. 그가 그곳에 있는 동안, 넌 임무 시스템에서 다크 서커스 표를 찾을 수 있어. 이 티켓은 모은 후에 그에게 10개의 파즈코인을 줘.
He will appear in your office and demand 10 Faz-Coins. You must pay him before he kills you. While he's there, you can find Dark Circus tickets on the Task System, which after collecting give you 10 Faz-Coins.
FNaF AR SD의 폭시의 스킨 링마스터 폭시다.
2.12.34.1. Ringmaster Foxy 스킨[편집]

1번째 스킨은 OMC 링마스터 폭시라는 이름의 스킨이다.
2.12.35. Magiciam Mangle(마술사 맹글)O[편집]

하룻밤에 한 번씩 톱은 천천히 아래로 내려가며 세 개의 칼은 환풍구 바로 위에 있는 환풍구 시스템에 나타날 거야. 칼 중 하나에 환풍구 덫을 씌우면 막을 수 있어. 톱이 화면 바닥에 닿기 전에 세 개의 칼을 모두 막아 점프스케어를 피해.
Once per night, her saw will slowly move downwards and her three knives will appear in the Vent System, right on top of each vent snares. Placing a vent snare on one of the knives will block it. Block all three knives before the saw gets to the bottom of the screen to avoid her jumpscare.
FNaF AR SD의 맹글의 스킨 마술사 맹글이다.
2.12.36. Clown Springtrap(광대 스프링트랩)X[편집]

카메라에 나타나면 카메라를 내리거나 카메라를 전환해. 너무 오래 보면 망치로 카메라를 치게 되고, 밤새도록 카메라에 자국이 남아. 그는 온도가 100도 이상일 때만 나타날 수 있어.
When he appears on the monitor, close it or switch the camera. If you watch him for too long, he will hit the monitor with his hammer, which will leave marks on it for the rest of the night. He can only appear if the temperature is above 100°.
FNaF AR SD의 스프링트랩의 스킨 광대 스프링트랩이다.
2.12.37. Catrina Toy Chica(카트리나 토이 치카)X[편집]

전기 충격(사무실 또는 4층)을 사용할 때마다 게임 프레임이 몇 초 동안 떨어져.
Every time you use the controlled shock (either Office or Floor 4), your game's framerate will drop for a couple of seconds.
FNaF AR SD의 토이 치카의 스킨 카트리나 토이 치카다.
2.12.38. Woodland Toy Freddy(우드랜드 토이 프레디)O[편집]

그는 Lumber Co. 층 카메라에 찍힌 나무들 중 하나를 교체할 거고, 무작위로 나무들 사이를 전환할 거야. 살아남고 싶으면 그에게 도끼를 휘두르는 것을 피해.
He will replace one of the trees on the Lumber Co. camera and will switch between the trees at random times. Avoid using the axe on him if you want to survive.
FNaF AR SD의 토이 프레디의 스킨 우드랜드 토이 프레디다.
2.12.39. Boulder Toy Bonnie(바위 토이 보니)O[편집]
그는 밤의 막바지에 나타나고, 6시가 되자마자 널 죽일거야. 그전에 임무들을 확실히 끝내놓도록 하고, 시간을 느리게 하거나 거꾸로 돌리는 것을 삼가도록 해!
He will appear at the end of the night, and kill you just after 6AM. Make sure to have your tasks done before then, and avoid having time slowed down or reversed!
FNaF AR SD의 토이 보니의 스킨 볼더 토이 보니다.
2.12.40. Swamp BB(늪지 BB)O[편집]

그는 GPS 시스템으로 널 향해 다가갈 거고 그가 가까이 있을 때 너의 독성 수치를 올릴 거야. 미끼와 라디오 방해기를 동시에 사용해서 그를 돌아가게 해. 그가 너에게 닿으면 널 죽일 거야.
He will move towards you on the GPS System and will raise your Toxic Meter when he's near. Use both the Lure and Radio Jammer at the same time to make him go back. He'll kill you if he reaches you.
FNaF AR SD의 벌룬 보이의 스킨 늪지 BB다.
2.12.41. Black Ice Frostbear(검은 얼음 프로스트베어)O[편집]

화면에 얼음이 선명해지면서 점차 얼게 될 거야. 얼게 된다면 화면이 움직이는 속도가 느려질 거야. Q를 눌러 얼음을 없애는 귀마개를 착용할 수 있지만, 소리가 잘 안들리게 돼. 완전히 얼어버리면 죽을 거야.
You'll gradually freeze, with ice fading on the screen. Freezing slows the speed of your head movement. Press Q to toggle wearing earmuffs which reverses the freezing, but muffles your hearing. If you freeze over completely you'll die.
FNaF AR SD의 프레디 프로스트베어의 스킨 블랙 아이스 프로스트베어다.
2.12.41.1. Black Ice Frostbear 스킨[편집]

1번째 스킨은 Abominable Toy Freddy(가증스러운 토이 프레디)라는 이름의 스킨이다.
2.12.42. Frost Plushtrap(서리 플러시트랩)O[편집]

FNaF SD에 등장하는 플러시트랩의 스킨이다.그는 메인 복도[65]
에 나타날 거야. 드랍으로는 얻을 수 없으니 파즈코인으로 구매해야 해. 하지만, 그의 가격은 몇 초마다 올라갈 거야. 밤이 끝나기 전까지 팔리지 않으면 널 죽일 거야.
He appears in the Main Hall. You cannot obtain him through drops, so you must buy him using your Faz-Coins. However, his price goes up every few seconds. If he isn't bought by the end of the night, he will kill you.
2.12.43. Heartsick Baby(심장병 베이비)X[편집]

그녀는 때때로 너의 사무실에 나타날 거야. 너는 그녀를 사라지게 하기 위해 전기 충격을 사용할 수 있는 짧은 시간이 주어질 거야. 그렇지 않으면, 그녀는 활로 너의 두 눈 중 하나에 활을 쏘고 일시적으로 너의 시력 절반을 가져갈 거야.
She'll sometimes appear in your office. You have a short period of time to use the controlled shock to get her to disappear, otherwise, she'll shoot you in one of your two eyes with her bow and take out half of your vision temporarily.
FNaF AR SD의 베이비의 스킨 심장병 베이비다.
2.12.44. Black Heart Bonnie(검은 심장 보니)O[편집]

그는 3층에서, 그의 심장은 4층에서 움직일 거야. 만약 둘 다 같은 번호의 카메라에 있을 때 심장이 뛸 거야.. 소리 미끼를 사용해서 검은 심장 보니를 다른 카메라로 유인하거나, 그렇지 않으면 보니는 그의 심장에 자신을 합치고 널 죽일 거야..
He will move through Floor 3, while his HEART moves through Floor 4. A heartbeat will play if they both get on a camera with the same number. Use the Audio Lure to lure Black Heart Bonnie to a different camera, otherwise he will fuse his HEART and kill you.
FNaF AR SD의 보니의 스킨 검은 심장 보니다.
2.12.45. Curse(저주)X[편집]

그의 눈은 때때로 문에 나타날 거야. 하지만 걱정 마, 그는 사무실에 들어가고 싶어하지 않아. 그의 얼굴에 문을 닫는 것은 꽤 무례할 거야. 그래서 만약 문을 닫는다면 그는 소음 수치를 높이며 욕(Curse)를 할 거야.
His eyes will sometimes appear in a doorway. Don't worry though, he doesn't want to enter the office. Closing the door on his face would be quite rude. So if that happens, he will start cursing, with loud bleeps raising the noise meter.
FNaF AR SD의 스프링트랩의 스킨 저주다. 메커니즘은 Curse라는 단어가 해외에서는 욕이라고 해석되기도 하는 언어유희에서 따왔다.
2.12.45.1. Curse 스킨[편집]

1번째 스킨은 Uhhhh... I have no idea who this is, but he's apparently a skin for Curse.(어... 어... 이게 누군지는 모르겠지만, 보니까 저주의 스킨인 것 같아.)라는 이름의 스킨이다.
2.12.46. Melted Chocolate Bonnie(녹아내린 초콜릿 보니)O[편집]

때때로 그는 4층에 있는 아무 카메라에 나타난 다음 전기 충격을 받은 후 잠시 사라질 거야. 그를 완전히 녹히려면 밤새 그에게 AI 수치만큼 여러 번 전기 충격을 주어야 하고, 그러면 그는 너를 공격할 수 없게 돼. 너가 이걸 하지 못하면 넌 느리고 고통스럽게 죽겠지.
Every now and then he will appear on a random camera on Floor 4 and will disappear for a bit after being shocked. You must shock him AI number of times throughout the night in order to make him completely melt, resulting in him being unable to attack you. You will die a slow, painful death if you fail to do this.
FNaF AR SD 보니의 스킨 녹아내린 초콜릿 보니다.
2.12.47. Big Bad Foxy(커다랗고 나쁜 폭시)O[편집]

[ AI 수치가 20일 때 ] 

그는 1층에서 돌아다니고 있어. 너무 오래 쳐다보면 공황 수치가 증가할 거야.
He's walking around F1. Looking at him for too long will cause the Panic meter to increase.
FNaF AR SD에 등장하는 폭시의 스킨 커다랗고 나쁜 폭시다.
2.12.48. Dark Water Bare Endo(어두운 물 베어 엔도)O[편집]

퍼즐 조각이 작업 시스템에 나타날 거야. 오전 5시까지 퍼즐 조각을 맞출 시간이 있어.(=+ 버튼을 사용하여 조각을 고정할 수 있다.) 5시까지 퍼즐 조각을 맞추지 않으면 넌 죽을 거야.
Puzzle Pieces will appear on The Task System. You have time until 5AM to put the pieces together (use the =+ button to hold a piece). otherwise you will die.
FNaF AR SD의 베어 엔도의 스킨 어두운 물 베어 엔도다.
2.12.49. Sunken Toy Bonnie(가라앉은 토이 보니)X[편집]

그는 4층 CAM 05에 앉아, 랜덤의 순간에 동전을 생성하기 시작 해. 이것은 너의 사무실의 온도를 올릴 뿐만 아니라 많은 전력을 사용 해. 그를 멈추려면 그에게 전기 충격을 줘.
He sits on the Oxygen Storage, at random moments in time he will begin generating coins, this will give you some coins to heat up your office as well as using a lot of power, control shock him to make him stop.
FNaF AR SD의 토이 보니의 스킨 가라앉은 토이 보니다.
2.12.49.1. Sunken Toy Bonnie 스킨[편집]

1번째 스킨의 이름은 Optimized Popgoes(최적화된 팝고즈)라는 이름의 스킨이다.
2.12.50. Aeronaut Toy Freddy(조종사 토이 프레디)O[편집]

주식 교환 창구는 두 시간마다 뜰 것이고, 너는 코인을 얻을 수 있는 이윤이 더 많을 때 적절한 시기에 주식을 팔아야 이익을 얻을 수 있어. 코인을 얻기 위해 더 큰 이윤이 있을때 그것을 파는 거야. 부정적일 때 동전을 파는 것은 동전을 잃게 만들 거야. 만약 시장이 닫을 때까지 기다리면 그는 너를 죽일 거야.
A stock exchange window will pop up at every other hour, you must liquidate your stocks at the correct time to earn a profit selling it when there's a larger margin of profit to gain coins. Selling it when there's a larger margin of profit to gain coins. Selling a when negative causes you to lose coins. Waiting until the market closes at the end of the hour will cause him to kill you.
FNaF AR SD의 토이 프레디의 스킨 항공의 토이 프레디다.
2.12.51. Unidentified(미확인)O[편집]

그/그녀는 GPS 시스템으로 널 향해 걸어갈 거야. 미끼를 사용하여 그/그녀를 돌아가게 하거나 라디오 방해기를 사용하여 그를 제자리에 고정시켜. 그/그녀가 너에게 닿으면 넌 죽어.
He will walk towards you on the GPS System. Use the Lure to make him go back or the Radio Jammer to make him freeze in place. If he gets in, you're dead.
FNaF AR SD의 애니매트로닉스가 확인이 안 됐을 때 나오는 물음표다.
2.12.52. Giftbox(기프트박스)X[편집]

선물 상자가 리필되어 상품권을 청구할 수 있다는 팝업 창이 화면 상단에 무작위로 나타나. GPS 시스템으로 전송하려면 이 아이콘을 클릭한 다음 선물 상자를 클릭해서 상품을 구입해. 팝업을 클릭하지 않으면 밤새도록 GPS 시스템을 볼 수 없을 뿐만 아니라, 미끼 및 라디오 방해기 장치를 사용할 수 없게 돼.
A pop-up will randomly appear at the top of the screen, saying your giftbox has refilled and you can claim your prize. Click it to be sent to the GPS System, then click on the Giftbox to claim your prize. If you don't click the pop-up, you won't be able to look at the GPS System for the rest of the night, as well as disabling the Lure and Radio Jammer.
선물 상자는 FNaF AR SD에 나타나는 선물 상자다.
2.12.53. Avatar Cupcake(아바타 컵케이크)X[편집]

모든 모드가 켜질 때마다(All OFF 제외) GPS 위치 추적 장치가 오작동해서 GPS 시스템에서 위치가 잘못 배치돼. 너에게 공격할 수 있는 모든 것이 대신에 잘못된 위치로 이동할 거야.
Whenever any mode is on (other than All OFF), your GPS location-tracking device will be malfunctioning, misplacing your position on the GPS System. Anything that would attack when it gets to you has to get to the misplaced position instead.
아바타 컵케이크는 FNaF AR SD에서 플레이어의 위치로 보여지는 컵케이크다.
2.12.54. The Fazbear Balloon(파즈베어 풍선)X[편집]

그것은 밤새 디플레이션 소음을 내면서 번개와 같은 속도로 너의 사무실 주변을 날 거야. (풍선은 지속적인 디플레이션 상태에 있다.)
It'll fly around your office at lightning speed while making a deflation noise for the entire night. (the balloon is in a constant state of deflation).
FNaF AR SD에서 등장하는 프레디의 풍선 버전.
2.12.55. Promo Freddy(프로모션 프레디)O[편집]

그는 사무실의 양쪽 문에 나타날 거야. 그의 점프스케어를 피하려면 문을 닫아.
He will appear in either doorway in the office. Close the door on him to avoid his jumpscare.
프로모션 프레디는 FNaF AR SD의 사전 렌더링된 사진뿐만 아니라 트레일러와 사전 릴리스 티저에도 나온다.
2.12.56. Promo Chica(프로모션 치카)O[편집]

그녀는 니가 보고 있는 반대편에 있는 사무실에 나타날 거야. 그녀를 너무 오래 쳐다보면, 넌 점프스케어 당할 거야.
She will appear in the office on the other side of where you're looking. If you look at her for too long, you will get jumpscared.
프로모션 치카는 FNaF AR SD의 사전 렌더링된 사진뿐만 아니라 트레일러와 사전 릴리스 티저에도 나온다.
2.12.57. Promo Foxy(프로모션 폭시)O[편집]

그는 때때로 소리칠 거야. 중앙 환풍구 문을 열어야 해. 그렇지 않으면 그가 직접 문을 부수고 뛰어갈 거야.
He will sometimes shout. You must have the Front Vent Door open, otherwise he will break it open himself and jumpscare you.
프로모션 폭시는 FNaF AR SD의 사전 렌더링된 사진뿐만 아니라 트레일러와 사전 릴리스 티저에도 나온다.
2.12.58. Promo Springtrap(프로모션 스프링트랩)O[편집]

3층을 보고 있을 때 가끔 나타날 수도 있어. 그가 사라질 때까지 그를 응시해. 카메라를 전환하거나 카메라가 그대로 있는 동안 카메라를 내리면 점프스케어로 이어져.
He may sometimes appear when you're watching Floor 3. Stare at him until he disappears. If you change camera view or lower the monitor while he is still there, you will be jumpscared.
프로모션 스프링트랩은 FNaF AR SD의 사전 렌더링된 사진뿐만 아니라 트레일러와 사전 릴리스 티저에도 나온다.
2.12.59. Promo Baby(프로모션 베이비)O[편집]

그녀는 너가 4층을 보고 있을 때 카메라에 나올 수도 있어. 그녀가 사라질 때까지 그녀를 바라봐. 그녀가 있는 동안 카메라를 내리거나 다른 곳으로 바꾸면 널 죽일 거야.
She may appear on the cameras when you're watching Floor 4. Stare at her until she disappears. If you change camera view or lower the monitor while she is still there, you will be jumpscared.
프로모션 베이비는 FNaF AR SD의 사전 렌더링된 사진뿐만 아니라 트레일러와 사전 릴리스 티저에도 나온다.
2.13. FREDDY IN SPACE 2[편집]
2.13.1. Lolzhax(롤즈핵스)X[편집]

그는 너의 사무실의 오른쪽에 머무를 거야. 그의 몸통에 있는 빨간 버튼을 클릭하면 그가 켜질 거야. 그가 행복한 표정을 짓고 있다면, 그는 당신을 돕기 위해 무작정 무언가를 하고 있다는 뜻이야. 만약 그가 화난 표정을 짓고 있다면, 그는 너에게 해를 끼치기 위해 무작정 무언가를 한다는 뜻이야.
He will stay on the right side of your office. If you click the red button on his torso, he will turn on. If he has a happy expression, he has done something random to help you. If he has an angry expression, he has done something random to harm you.
롤즈핵스는 FiS 2의 마지막 보스이자 주요 적이다.
2.13.2. Franken-Foxy(프랑켄-폭시)O[편집]

그는 너의 사무실에 있어. 넌 밤새도록 스팸메일을 통해 그의 머리와 몸통, 팔다리를 클릭해서 그것들을 떨어져 쓰러지게 하고 그를 쓰러뜨려. 만약 그가 아직 살아있고 오전 6시까지 서있다면, 그는 너를 죽일거야.
He stays in your office. You have the entire night to spam click his head, torso and limbs to make them fall apart and make him collapse. If he is still alive and standing by 6AM, he will kill you.
FiS 2의 Lunar Mines의 최종 보스다.
2.13.3. Poopet Master(푸펫 마스터)O[편집]

푸펫 마스터는 너의 앞에, 너의 책상 바로 앞에 머물러. 니가 카메라를 보고 있는 동안 그는 천천히 입을 다물기 시작할 거야. 클릭해서 붙잡으면 다시 천천히 턱을 벌려. 턱이 완전히 닫히면 널 죽일 거야. 헬피가 활성화되면 푸펫 마스터가 더 빠르게 움직여.
Poopet Master stays in front of you, right in front of your desk. He will slowly start closing his jaw while you're looking at the cameras. Clicking and holding him will cause him to slowly open his jaw again. If his jaw fully closes, he will kill you. Poopet Master will act faster if Helpy is active.
Lunar Mines의 히든 보스다.
2.13.4. Robo-Chica WIP(로보-치카 WIP)O[편집]

왼쪽 문에서 그녀의 붉게 빛나는 눈을 본다면, 전기 충격을 가해.
If you see her glowing red eyes in your left doorway, adminster a controlled shock.
Galactic Factory의 중간 보스다.
2.13.5. Already-Ate Chica(엄청 배부른 치카)O[편집]

뼈, 신발, 사과 코어가 화면 상단에서 떨어질 거야. 만약 마우스 커서가 너무 많은 파편에 부딪히면, 그녀는 너에게 점프스케어 할 거야.
Bones, shoes and apple cores will fall from the top of the screen. If your mouse cursor hits too much of the debris, she will jumpscare you.
Galactic Factory의 중간 보스다.
2.13.6. Totem Panic(토템 패닉)O[편집]

점프스케어
토템 패닉의 조각들은 계속해서 화면을 통해 오른쪽에서 왼쪽으로 날아 가. 커서가 이 중 하나를 누르면 토템 패닉 수치가 책상에 쌓여. 4번 맞으면 피규어가 완성되고 토템 패닉이 너에게 점프스케어 할 거야.
Pieces of Totem Panic will constantly fly through the screen, from right to left. If your cursor hits one of them, a Totem Panic figurine will build up on your desk. If you get hit 4 times, the figurine will be complete, and Totem Panic will jumpscare you.
Cosmic Freeway의 중간 보스다.트로피 룸에서도 한 미니게임에 주인공으로 나온다.
그리고 여담으로 본 게임에 나오는 캐릭터 중 스킨이 가장 많다! 제작자 말에 의하면 자신이 가장 좋아하는 캐릭터라고 한다.
2.13.6.1. Totem Panic 스킨[편집]


1번째 스킨은 Dark Totem Panic 666(검은 토템 패닉 666)[66]이라는 이름의 스킨이다. 무섭진 않고 귀엽기만 하다.
2번째 스킨은 Game Accurate Totem Panic(게임 어트렉션 토템 패닉)이라는 이름의 스킨이다.
3번째 스킨은 Awakened Totem Panic 이라는 이름의 스킨이다. 다른 이름으로 나이트메어 토템 패닉이라고도 불린다.
4번째 스킨은 Totem Bonnet(토템 보넷)이라는 이름의 스킨이다. FNaF SL 에 나오는 보넷이라는 캐릭터를 모티브한 스킨.
5번째 스킨은 Toilet Panic(화장실/변기 패닉)이라는 이름의 스킨이다. 귀여우면서도 웃기다.
6번째 스킨은 2D Totem Panic(2D 토템 패닉)이라는 이름의 스킨이다. 원작에 나오는 그림체를 그대로 가지고 왔다.
7번째 스킨은 Neon Totem Panic(네온 토템 패닉)이라는 이름의 스킨이다. 네온처럼 어둡게 빛난다.
8번째 스킨은 White Panic(하얀 패닉)이라는 이름의 스킨이다. 눈동자가 검해서 그런지 무서운 느낌이 있다.
9번째 스킨은 Minecraft Panic(마인크래프트 패닉)이라는 이름의 스킨이다. 마인크래프트 버전 토템 패닉.
10번째 스킨은 Prototem Panic(프로토템 패닉)이라는 이름의 스킨이다. 앞서 서술한 하얀 패닉 스킨과 비슷하다.
11번째 스킨은 Games Totem Panic(게임 토템 패닉)이라는 이름의 스킨이다. 황토색 또는 금색으로 빛나는거 같은 스킨이다.
12번째 스킨은 Totem Pancake(토템 팬케이크)라는 이름의 스킨이다. 제작자는 이것을 보고 맛있겠다 라고 말했다고 한다...
13번째 스킨은 Totem Mug(머그잔 토템 패닉)이라는 이름의 스킨이다. 머그잔으로 변한 토템 패닉이다.
14번째 스킨은 Totem Asgore(토템 아스고어)라는 이름의 스킨이다. 언더테일의 나오는 그 아스고어가 모티브.
15번째 스킨은 Totem Fear(토템 페얼)이라는 이름의 스킨이다.
16번째 스킨은 Totem Mini(토템 미니)라는 이름의 스킨이다. 토템 패닉이 기존보다 작아졌다.
17번째 스킨은 Negate Rainbow Totem Panic(네게이트 레인보우 토템 패닉)이라는 이름의 스킨이다. 눈이 아프다. 대신 색이 예쁘다.
18번째 스킨은 Totem Chungus(토템 처거스)라는 이름의 스킨이다. 밈이다.
19번째 스킨은 Adventure Totem Panic(어드벤처 토템 패닉)이라는 이름의 스킨이다. 토템 패닉이 많이 순화 되었다.
20번째 스킨은 Mario Panic(마리오 패닉)이라는 이름의 스킨이다.
참고로 토템 패닉의 스킨은 전부 무료다.
2.13.7. Fully Loaded Rabbit(완전 무장 토끼)O[편집]

그는 1층 파츠/서비스(CAM 08) 카메라에 그대로 남아 있어. 만약 니가 그의 눈이 검게 변한 것을 본다면, 그건 그가 곧 너의 사무실로 달려갈 것이라는 것을 의미해. 그가 널 죽이는 걸 막으려면 재빨리 전기 충격을 가해.
He stays on the Floor 1 Parts/Service (CAM 08) camera. If you see his vizor has turned black, it means he is about to run straight to your office. Quickly administer a controlled shock to prevent him from killing you.
Cosmic Freeway의 최종 보스다.
2.13.8. Animdude: The Revenge(애님듀드: 복수)O[편집]

애님듀드 복수는 환풍구 시스템을 통해 너에게 가. 환풍구 덫과 환풍구 문으로 우회시킬 수 있어. 너의 유일한 방어 수단은 환기구 바로 옆에 있는 레버를 이용해서 그를 돌아가게 하는 거야.
Animdude The Revenge will go through the Vent System. He can bypass the Vent Snare and the vent door. Your only defense is to use the Lever right next to the vent to make him go back.
Cosmic Freeway의 히든 보스다.
2.13.9. Puppenator(퍼페네이터)O[편집]

그는 조명 시스템에서 사방을 빙글빙글 돌면서 머물러. 니가 그에게 너무 오랫동안 빛을 비추면,[67]
그는 널 죽일 거야.
He stays on the Light System, spinning around all over the place. If you shine your light on him for too long, he will kill you.
Stellar Pit의 중간 보스다.
2.13.10. Sockpuppet(양말인형)O[편집]

메커니즘은 보넷과 매우 비슷해. 그것은 때때로 사무실의 왼쪽에서 오른쪽으로 날아갈 거야. 그게 오른쪽에 닿으면, 넌 죽어. 클릭하기만 하면 멈출 수 있어.
It's mechanic is very similar to Bonnet's. It will sometimes fly from the left to the right side of the office. If it reaches the right side, you die. Simply click it to make it stop.
Stellar Pit의 중간 보스다.
2.13.11. Mariominous(마리오미너스)O[편집]

그것이 카메라에 나타나면 다른 시스템으로 변경하거나 카메라를 닫아. 그렇지 않으면 네가 죽을 수 있어.
When they appear on the monitor, you only have a few seconds to change to a different system or close the monitor, otherwise they will kill you.
Stellar Pit의 최종 보스다.
2.13.12. Mechiplier(메키플라이어)X[편집]

"Hello, everybody. My name is Markiplier, and welcome back to Five Nights at Freddy’s."
"안녕하세요, 여러분. 제 이름은 마키플라이어고,[68]
프레디에서 5일밤에 돌아온 걸 환영합니다.""Oh, you know what? NOBODY LIKES YOU!"
"오, 그거 알아? 아무도 널 좋아하지 않아!"
"GO AWAY!"
"꺼져!"
"Boopa doopa doopa doop!"
"부파 두파 두파 둡!"
"YEAH!"
"그래!"
"Slightly...sassy."
"약간...건방진데."
"This is impossible!"
"이건 불가능해요!"
"You wanna win? TOO BAD!"
"이기고 싶어? 안 됐네!"
"PURPLE GUYYYY!?"
"퍼플 가이이이!?"
"Was that the Bite of 87!?"
"저게 87년도 입질 사건이었어요!?"[69]
그의 웹캠은 화면 오른쪽 상단에 남아 시계와 타이머를 차단해. 그는 또한 가끔 그 게임에 대해 논평할 거야.[70]
His webcam will stay at the top right of the screen, blocking the clock and the timer. He will also occasionally comment on the game.
Stellar Pit의 히든 보스다.
2.13.13. FinAl FOrmz!1(최종 폼즈!1)X[편집]

그는 가끔 GPS 시스템으로 널 향해 운전할 거야. 그의 HP를 없애려면 연타 클릭 해. 그가 너에게 닿으면, 그는 너의 사무실에 나타나서 많은 소음을 내기 시작할 거고, 소음 수치를 영구적으로 증가시킬 거야. 라디오 방해기가 켜져 있으면 그를 멈출 수 있어.
He will sometimes drive towards you on the GPS System. You must spam-click him to take away his HP. If he reaches you, he will appear in your office and start making a lot of noise, adding to the noise meter permanently. He can be stopped if the Radio Jammer is on.
FNaF World 에 마지막 스테이지의 중간 보스다.
2.13.14. Cyclops Ailen(사이클롭스 외계인)X[편집]

프레디 파즈베어 마스크를 착용할 때마다, 그는 그 마스크의 눈구멍을 막을 거야. 이렇게 되면 마스크를 착용하는 동안 산소가 천천히 내려가게 돼.
Everytime you put on the Freddy Fazbear Mask, he'll block one of the eyeholes of it. This will make the Oxygen slowly go down while you're wearing the mask.
Lunar Mines의 잡몹이다.
2.13.15. Hammerhead Puppet(해머헤드 퍼펫)O[편집]

사무실에 안개가 꼈을 때, 넌 3층 카메라 중 하나에서 그를 찾아야 하고 그에게 소리 미끼를 사용해야 해. 사무실에 과실이 생기면 넌 죽을 거야.
When mist appears in the office, you must find him in one of the Floor 3 cameras and use an Audio Lure on him. If the office gets over-misted, you will die.
Stellar Pit의 잡몹이다.
2.13.16. Shadow Mask(그림자 마스크)X[편집]

카메라 위에 몇 초마다, 그것 중 한 명이 화면 맨 위에서 알을 낳고, 선물상자를 아래로 발사해. 마우스가 그 중 하나에 닿으면 열린 문이 닫히고 닫힌 문이 열리고 선풍기가 꺼지거나 켜지고 시스템, 카메라 및 모드가 전환돼.
Every few seconds you're on the cameras, one of them will spawn at the top of the screen, firing giftboxes downwards. If your mouse hits one of them, it will close opened doors, open closed doors, toggle the fan and switch the system, camera and mode.
Stellar Pit의 잡몹이다.
2.13.17. Pirate Lolbit(해적 롤빗)O[편집]

니가 환풍구 시스템을 통해 움직이는 무적 보호막을 수집하지 않는 한 그녀는 오전 5시에 공격할 거야. 아이콘을 클릭해서 다시 시작 부분으로 밀어넣을 수 있어. 환풍구의 어떤 캐릭터에 닿으면 다 쓰고 사라져.
She will attack at 5AM unless you collected the invincibility shield that travels through the Vent System. You can click it to push it back to the beginning. If it touches any character in the vents, it will be used up and disappear.
해적 롤빗은 FiS 2의 롤빗 가게 주인이다.
2.14. FURY'S RAGE[편집]
2.14.1. Fury Freddy(분노의 프레디)X[편집]

그의 AI 레벨이 높을수록 Fury's Rage 층에 있는 애님듀드는 더 약해질 거야.
The higher his AI level. the less strength Animdude on the Fury's Rage floor will have!
분노의 프레디는 시큐리티 브리치 Fury's Rage에 등장하는 글램록 프레디다.
2.14.2. Fury Monty(분노의 몬티)X[편집]

그의 AI 레벨이 높을수록 Fury's Rage 층에서 너가 더 적은 힘을 가질 거야.
The higher his AI level. The less power you will have on the Fury's Rage floor!
분노의 몬티는 시큐리티 브리치 Fury's Rage에 등장하는 몽고메리 게이터다.
2.14.3. Fury Roxxanne(분노의 록산느)X[편집]

그녀의 AI 레벨이 높을수록 Fury's Rage 층에서 행운이 줄어들 거야.
The higher her AI level, the less luck you will have on the Fury's Rage Floor!
시큐리티 브리치 Fury's Rage에 등장하는 록산느 울프다.
2.14.4. Fury Chica(분노의 치카)X[편집]

그녀의 AI 레벨이 높을수록 Fury's Rage 층에서 필살기의 공격력이 줄어들 거야.
If at any time all four doors are closed, they will spawn on the Fury's Rage floor! Defeat them before they defeat you!
시큐리티 브리치 Fury's Rage에 등장하는 글램록 치카다.
2.14.5. VR Sisters(VR 자매들)O[편집]

언제든지 네 개의 문이 모두 닫히면, 그들은 Fury's Rage 층에 나타날 거야. 그들이 너를 죽이기 전에 그들을 처치해!
If at any time all four doors are closed, they will spawn on the Fury's Rage floor! Defeat them before they defeat you!
시큐리티 브리치 Fury's Rage에 등장하는 적이다.
2.14.6. Soulbrawler(소울브롤러)O[편집]

그는 새벽 2시가 되면 Fury's Rage 층에 나타날 거야. 그의 시작은 방패야. 방패를 부수려면, 그에게 필살기를 사용해야만 공격을 할 수 있어. 그가 너를 죽이기 전에 그를 처치 해!
He will spawn on the Fury's Rage floor when 2AM starts. He starts off shielded. To break the shield, you must use a special attack on him will be using regular attacks. Defeat him before he defeats you!
Fury's Rage에 등장하는 적 중 하나이며 FNaF World에 등장했던 그 소울도저가 맞다.
2.14.7. Mega Brow(메가 브로우)O[편집]

새벽 3시부터 밤이 끝날 때까지 메가 브로우는 Fury's Rage 층에 통통 튀는 공을 나타나게 할 거야. 넌 그들에게 그를 빼앗기지 않기 위해 방어를 사용해야 해!
From 3am until the end of the night, Mega Brow will spawn bouncing balls on the Fury's Rage floor. You must use the block move to avoid getting him by them!
시큐리티 브리치 Fury's Rage에 등장하는 적 중 하나이며 FNaF World에 등장했던 그 브로우보이가 맞다.
2.14.8. Fury Vanny(분노의 바니)O[편집]

그녀는 새벽 4시가 되면 Fury's Rage 층에 나타날 거야. 그녀는 너에게 칼을 던질 거야. 그녀가 널 죽이기 전에 그녀를 처치 해!
She will spawn on the Fury's Rage floor when 4am starts. She will be throwing knifes at you. Defeat her before she defeats you!
시큐리티 브리치 Fury's Rage에 등장하는 바니다.
2.14.9. Dreamgeist(드림게이스트)X[편집]

그것은 항상 Fury's Rage 층에 있을 거야. 널 공격하지는 않아. 때때로 지식 질문이 나타나 화면의 한 가장자리를 막을 거야. 드림게이스트를 공격하면 모든 질문이 사라지지만, 너무 때리면 죽을 거야.
It's on the Fury's Rage floor at all times. It'll not attack you. Sometimes, a lore question will appear and block a corner of the screen. Damaging Dreamgeist will remove all questions, but after too many hits, it will die.
시큐리티 브리치 Fury's Rage에 등장하는 적이다.
2.14.10. Poison Foxy(독의 폭시)O[편집]

방사능으로 가득 찬 상자들이 Fury's Rage 층에 나타날 거야. 그것들을 너무 많이 때리면 그것들이 깨져서 독성 수치를 상승시킬 거야.
Crates filled with radiation will spawn on the Fury's Rage floor. Punching or kicking them too many times will cause them to break open and raise your toxic meter.
시큐리티 브리치 Fury's Rage에 등장하는 적이며 특이한 폭시다.
2.14.11. Thuglife Chipper(깡패생활 치퍼)O[편집]

Lumber Co. 층에 있는 나무를 베어 버리면 Fury's Rage 층에서 깡패생활 치퍼 분대들이 나타날 거야. 그들이 널 죽이기 전에 그들을 처치 해!
Chopping down a tree on the Lumber Co. camera will cause a group of Thuglife Chippers to spawn on the Fury's Rage floor. Defeat them before they defeat you!
시큐리티 브리치 Fury's Rage에 등장하는 적이다.
2.14.12. Thug Chica(깡패 치카)O[편집]

Eating any Chicken on the Fury's Rage floor will immediately spawn a horde of Thug Chica's! Defeat them before they defeat you!Fury's Rage 층에서 치킨을 먹으면 바로 깡패 치카 분대들이 나타날 거야! 그들이 널 죽이기 전에 그들을 처치 해!
시큐리티 브리치 Fury's Rage에 등장하는 적이며 특이한 치카다.
2.14.13. Punk Mangle(펑크 맹글)O[편집]

그녀는 Fury's Rage 층에 나타날 거야.. 그는 필살기에 면역이기 때문에 일반 공격을 통해 그녀를 물리쳐야 해. AI 수준이 높을수록, 그는 더 자주 나타나고 점점 더 체력이 많아질 거야.
She spawns on the Fury's Rage floor. He is immune to special attacks, so she has to be defeated using regular attacks. The higher the AI level, The more often he will spawn and the more HP she will have.
시큐리티 브리치 Fury's Rage에 나오는 적이다.
2.14.14. Trap(트랩)O[편집]

3층에서 소리 미끼를 사용하면 Fury's Rage 층에 트랩이 나타날 거야. 그가 너를 죽이기 전에 그를 처치 해.
Using the audio lure on Floor 3 will cause Trap to spawn on the Fury's Rage floor. Defeat him before he defeats you.
시큐리티 브리치 Fury's Rage에 등장하는 적이다. FNaF SD에 등장하는 광대 스프링트랩이 맞다.
2.14.15. Fire Girl(화염 소녀)O[편집]

4층에 전기 충격을 가하면 화염 소녀가 Fury's Rage 층에 나타날 거야. 그녀가 널 죽이기 전에 그녀를 처치 해!
Using the shock on Floor 4 will cause Fire Girl to spawn on the Fury's Rage floor. Defeat her before she defeats you!
2.14.16. Thug Marionette(깡패 꼭두각시)O[편집]

그들은 Fury's Rage 층에 나타날 거야. 그들은 일반 공격에 면역이기 때문에 필살기를 사용해서 물리쳐야 해. AI 레벨이 높을수록 수가 더 많아지고 체력도 더 많아질 거야.
They'll spawn on the Fury's Rage floor. They are immune to regular attacks, so they have to be defeated using special attacks. The higher the AI level, the more often they spawn and the more HP they will have.
시큐리티 브리치 Fury's Rage에 등장하는 적이다.
2.14.17. Ice Freddy(얼음 프레디)O[편집]

그들은 Fury's Rage 층에 나타날 거야. 그들이 널 죽이기 전에 그들을 처치 해! AI 레벨이 높을수록 수가 더 많아지고 체력도 더 많아질 거야.
They will spawn on the Fury's Rage floor. Defeat them before they defeat you! The higher the AI level, the more often they spawn and the more HP they will have.
시큐리티 브리치 Fury's Rage에 등장하는 적이다.
2.15. SECURITY BREACH[편집]
2.15.1. Long Monty(롱 몬티)X[편집]

그는 머물러서, 지켜보고 있어.
He stays, watching.
시큐리티 브리치 트레일러에서 나온 몽고메리 게이터의 포스터다.
2.15.2. Long Monty(롱 몬티 2)X[편집]

그는 머물러서, 지켜보고 있어.
He stays, watching.
시큐리티 브리치 트레일러에서 나온 몽고메리 게이터의 포스터다. 사실 롱 몬티와 크게 차이가 없다. 아니, 그냥 머무르는 위치 빼고 똑같다.
2.15.3. Blacklight Long Monty(블랙라이트 롱 몬티)X[편집]

그는 머물러서, 지켜보고 있어.
He stays, watching.
시큐리티 브리치 트레일러에서 나온 몽고메리 게이터의 빛나는 포스터다.
2.15.4. Blacklight Long Monty(블랙라이트 롱 몬티 2)X[편집]

그는 머물러서, 지켜보고 있어.
He stays, watching.
시큐리티 브리치 트레일러에서 나온 몽고메리 게이터의 또 다른 빛나는 포스터다. 사실 블랙라이트 롱 몬티와 다를 게 하나도 없다.
2.15.5. Grean Long Monty(녹색 롱 몬티)X[편집]

그는 머물러서, 지켜보고 있어.
He stays, watching.
몽고메리 게이터의 녹색 카펫이며, Dawko의 영상에서 나온 9번째 사진에서 등장한다.
2.15.6. Grean Long Monty(녹색 롱 몬티)X[편집]

그는 머물러서, 지켜보고 있어.
He stays, watching.
몽고메리 게이터의 녹색 카펫이며, Dawko의 영상에서 나온 9번째 사진에서 등장한다. 녹색 롱 몬티와 딱히 다른 건 없다.
2.15.7. Neon Long Monty(네온 롱 몬티)X[편집]

그는 머물러서, 지켜보고 있어.
He stays, watching.
몽고메리 게이터의 네온 사인이며, Dawko의 영상에서 나온 10번째 사진에서 등장한다.
2.15.8. Balloon Long Monty(풍선 롱 몬티)X[편집]

그는 머물러서, 지켜보고 있어.
He stays, watching.
몽고메리 게이터의 풍선 버전이며, 시큐리티 브리치의 아이템이다.
2.16. Teasers & Trailers[편집]
2.16.1. Teaser Freddy(티저 프레디)O[편집]

1단계
2단계
3단계
4단계
점프스케어
"I've planned something special, j-just for you."
"너만을 위한, 특별한 것을 준ㅂ-비했어."
"That sure was fu-un!"
"정말 재미ㅇ-있었어!"
"I-I bet you didn't expect me to show up, d-did ya now?"
"ㅅ-설마 내가 올 줄은 몰랐겠지, 안 그래?"
"Round and round we go...w-where we're going, no-obody knows!"
"돌고 돌며 우리는 나아가... ㅇ-우리가 어디로 갈지, 아무도 모르지!"
"When you wake up, j-just remember: Friends are fore-ever."
"깨어나면 ㄱ-기억해 둬: 친구는 영원ㅎ-하단 것을."
"I hope you enjoyed my visit. I've got a special delivery-y, j-just for you."
"내 방문이 즐거웠기를 바라. 너만을 위한, 특별한 배ㄷ-달을 준ㅂ-비해 뒀어."
"Now would be a good ti-ime to hold your breath."
"지금이 딱 숨을 참기 ㅈ-좋은 타이밍이야."
"It looks like someone wasn't ready for Fr-freddy to come to the party!"
"누군가가 ㅍ-프레디가 파티에 올 것을 전혀 준비하지 못한 모양인 걸!"
"Most people li-ike my hugs!"
"대부분은 내 포옹을 ㅈ-좋아하지!"
"What's that you say-y? You didn't invite me-e? Too bad."
"그게 무슨 소리ㅇ-야? ㄴ-날 초대하지 않았다고? 나쁘구만."
"I hope you enjoyed my visit. I'm planning on making it e-extra special for you."
"내 방문이 즐거웠길 바라. 널 위해 ㄷ-더욱 특별한 것을 준비하고 있거든."
"Better lu-uck next time."
"다음에는 ㄷ-더 잘해 봐."
"Aw, you look down, would you like a hug?"
"이런, 기분이 안 좋아 보이는 걸, 포옹해줄까?"
"By the look on your face you really were suprised."
"네 얼굴을 보아하니 정말 깜짝 놀랐나 보구나."
"Bet you weren't expecting me to show up early were you now."
"설마 내가 일찍 나타날 줄은 몰랐겠지?"
"I bet you were shocked this time."
"이번엔 충격 좀 받았을 거야."
"You did your best and that's all that counts."
"넌 최선을 다 했으니 그걸로 된 거야."
"Now, now, all that fear there isn't helping e-either of us."
"자, 자, 두려워 하는 건 우리 모두에게 도움이 ㄷ-되지 않아."
"I've prepared an special-happy fun time j-just for you."
"너만을 위해 특별히 즐거운 시간을 ㅈ-준비했어."
대사
그는 왼쪽 홀 (CAM 01)을 지나 사무실로 들어 가려고 할 거야. 그는 얼티밋 커스텀 나이트(Ultimate Custom Night)처럼 4단계로 이동 하며 4단계에서 너의 사무실로 들어 가려고 시도 할 거야. 그가 들어가면 너는 죽게 될 거야. 그를 막으려면 그가 떠날 때 까지 왼쪽 문을 닫아야 해.
He moves through the Left Hall (CAM 01) and attempts to get into your office. Like his Ultimate Custom Night counterpart, he moves in 4 stages en-route, and will attempt to enter your office on stage 4. If he enters, you're met with a jumpscare. To fend him off, you're required to shut the left door until you hear a thud indicating he's gone.
2014년 당시 FNaF 1의 첫 티저에 등장했던 프레디이다. 원작 UCN에서는 점프스케어 후에 프레디 특유의 오르골 소리가 들렸지만 FNaF AR의 대사가 생겼다. 성우는 아직 밝혀지지 못했다. 또 온도가 높아도 원작 UCN처럼 그렇게 빨리 오지는 않아서 꽤 너프된 캐릭터 중 하나가 됐다.
여담으로 1.0.0 버전부터 1.5.4 버전까지 프레디 파즈베어라고 불렸지만 1.5.5에 프레디 파즈베어가 새로 추가되며 이름이 티저 프레디로 변경되었다.
또 티저 프레디와 프레지 파즈베어의 차이점이 없는 것 같지만 서로 조명 효과가 다르게 나타난다.
2.16.1.1. Teaser Freddy 스킨[편집]


1번째 스킨은 리틀 트롤드 원에서 나온 RIP라는 이름의 스킨이다. 무료이며 졸라맨 형태를 띄고 있다.
2번째 스킨은 Amber Freddy(앰버 프레디)라는 이름의 스킨이다. 원작 UCN에서 10000점 이상 점수가 되면 주는 금상과 똑같이 생겼다. 상점에서 1000 파즈 코인으로 구매할 수 있다.
여담으로 제작자가 장난으로 만든 캐릭터라고 한다.
2.16.2. Trailer Bonnie(트레일러 보니)X[편집]

사무실 안
오류 화면
그는 가끔 카메라를 내린 후에 너의 사무실에 나타날 거야. 전기 충격을 주면 그는 사라지게 될 거야. 그가 사무실에 있을 때 프레디 파즈베어 마스크를 쓰면 몇 초 동안 쓸 수 없게 될거야.
He will sometimes appear in your office after lowering the monitor. Using the controlled shock will make him go away. Putting on the Freddy Fazbear Mask when he's in the office will lock it from being wearable for a few seconds.
FNaF 1의 트레일러에서만 등장했으며 인형탈을 벗고 내골격 머리를 드러내던 보니이다. 본래는 트레일러 엔도가 이 메커니즘을 사용했었지만, 게임이 업데이트 되면서 동일한 메커니즘을 유지한 트레일러 보니로 변경됐다.
2.16.3. Greenlight Freddy(그린라이트 프레디)O[편집]

흰색 눈
파란색 눈
노란색 눈
빨간색 눈
프레디 머리
보니 머리
치카 머리
폭시 머리
너의 사무실에 그의 내골격이 나타나면, 그의 눈동자 색깔을 확인하고 맞는 버튼을 눌러. 흰색이면 7을 눌러. 파란색이면, 8을 눌러. 노란색이면, 9번을 눌러. 빨간색이면, 0을 눌러. 너무 오래 두거나 잘못된 버튼을 누르면 너에게 점프스케어 할 거야. 7을 누르면 그린라이트 프레디가 프레디 파즈베어 머리를 쓰게 될 거야. 8을 누르면 그린라이트 프레디가 보니 머리를 쓰게 될 거야. 9를 누르면 그린라이트 프레디가 치카 머리를 쓰게 될 거야. 0을 누르면 그린라이트 프레디가 폭시 머리를 쓰게 될 거야.
When his suitless endo appears in your office, check his eye color and press the corresponding button. If they're white, press 7. Blue, press 8. Yellow, press 9. Red, press 0. Waiting too long or pressing the wrong button will lead to a jumpscare. Pressing 7 will cause Greenlight Freddy to wear a Freddy Fazbear head. Pressing 8 will cause Greenlight Freddy to wear a Bonnie head. Pressing 9 will cause Greenlight Freddy to wear a Chica head. Pressing 0 will cause Greenlight Freddy to wear a Foxy head.
FNaF 1의 스팀 그린 라이트 페이지에서 사용됐던 내골격을 드러낸 프레디의 이미지이다. 본래는 베타 엔도가 이 메커니즘을 사용했었지만, 위 트레일러 보니처럼 게임이 업데이트 되면서 동일한 메커니즘을 유지한 그린라이트 프레디로 변경됐다.
또 그린라이트 프레디의 눈 색깔에 대한 번호를 메모하거나 외우는 것이 좋다.
2.16.4. Teaser Mangle(티저 맹글)X[편집]

어느 층이던 CAM 02를 보면 그녀의 갈고리가 나타나서 카메라를 가로질러 천천히 움직이면서 긁게 될 거야. 너무 많이 긁히면 화면이 완전히 깨져.
Looking at CAM 02 on any floor will cause her hook to appear and slowly move across the monitor, scratching it. After too many scratches, the screen will break completely.
FNaF 2의 티저에 등장했던 맹글. 티저 이미지에 등장했던 것처럼 후크를 가지고 있으며, 메커니즘도 후크를 활용했다.
하지만 티저에서는 후크가 있었지만 후의 메커니즘이 바뀌어서 후크가 사라져버렸다.아마도 폭시와 컨셉이 같아서 바꾼것이 였던거 같다.
2.16.5. Three(3)O[편집]

그것은 폭시 홀(CAM 3)에 머물고 있어. 9초마다 AM 텍스트가 빨간색으로 바뀔 거야. 텍스트가 빨간색일 때 캠 시스템을 보고 있으면 3의 또 다른 조각이 사라질 거야. 그것의 조각이 폭시 홀에서 모두 사라지면 넌 결국 죽을 거야. 저소음 환풍기를 사용해서 그것의 조각을 천천히 다시 나타나게 해야 돼.
It stays on the Foxy Hall (CAM 03). Every 9 seconds, the AM text will change to red. If you're watching the Cam System when the text is red, another piece of Three will disappear. If all of them disappear, you die. Use the Silent Ventilation to make it slowly reappear.
스콧 게임즈에 올라왔었던 FNaF 3의 티저 이미지에 등장했었던 3이다.
2.16.5.1. Three 스킨[편집]

1번째 스킨은 500,000(50만)이라는 이름의 스킨이다. Ultra Custom Night 총 다운로드 수 50만 기념으로 나온 스킨이다.
2.16.6. Teaser Fredbear(티저 프레드베어)O[편집]

눈(혐오 주의)
점프스케어
그의 눈은 2층을 볼 때 가끔 나올 거야. 그의 눈이 있을 때 조명을 사용하면 널 죽일 거야. 그를 돌려보내려면 카메라를 전환해.
His eyes will sometimes appear while looking at Floor 2. When he's there, shining your light will result in a jumpscare. Change the camera to make him leave.
FNaF 4의 티저에서 나왔던 나이트메어 프레드베어다. 티저의 나이트메어 프레드베어가 회색인 걸 이용한 듯하다.[71]
2.16.7. Thank You Yellow Bear(Thank You 옐로우 베어)O[편집]

사무실에 나타났을 때
점프스케어
카메라를 내린 후 가끔 사무실에 나타 날 거야. 그가 사라지도록 그를 응시 해. 그가 사무실에 있는 동안 카메라를 다시 올리면 그는 너를 죽일 거야.
He will sometimes appear in your office after lowering your monitor. Stare at him to make him disappear. He will kill you if you put on the monitor while he is still in the office.
FNaF 4 출시 이후, 스콧의 사이트에 올라왔던 애니매트로닉스 단체 사진 속 골든 프레디의 모습.
2.16.8. Thnak You Endo(Thank You 엔도)O[편집]

눈썹
점프스케어
그는 밤이 시작되기 전에 이미 죽었어. 그의 눈썹은 하늘로 치솟으려 할 거야. 선풍기는 그것을 막을 테고. 눈썹이 정상에 올라가면 Thank You 엔도는 너를 죽일 거야. 그리고 너무 아래로 내려가도 너를 죽일 거고.
He passed away before the night began. His eyebrows will try to go up to Heaven. The Fan will make them fall down. If they reach the top then Thank You Endo will kill you. If they go too far down then they'll clip through Thank You Endo which also kills you.
FNaF 4 출시 이후, 스콧의 사이트에 올라왔던 애니매트로닉스 단체 사진 속 엔도스켈레톤의 모습.
2.16.9. Hangle(행글)O[편집]

천장에 매달려있을 때
천장에서 떨어질 때
점프스케어
프레디 파즈베어 마스크를 쓸 때마다 그녀는 천장에 매달려있을 거야. 밧줄을 자르고 그녀가 떨어지면 그녀를 클릭해야 해. 그녀가 여전히 사무실에 있을 때 카메라를 들면 넌 죽어버릴 거야.
Every time you put the Freddy Fazbear Mask on, she will appear hanging from the ceiling. You must click her to cut the rope and let her fall. If she's still there when you open up the monitor, you will die.
FNaF World 티저 이미지에 나왔던 캐릭터로, 어드벤처 맹글이 목에 줄을 매달고 있는 섬뜩한 모습을 하고 있다.
2.16.10. Presents(선물)O[편집]

사무실에 나타났을 때
점프스케어
하룻밤에 한 번씩, 그들 중 몇 명이 사무실에 나타날 거고 선물은 상품 카운터에서 받을 수 있게 될 거야. 매 5초마다 가격이 1에서 50까지 난수로 바뀌어. 너는 선물이 등장하고 45초 이내에 구매해야 해.
Once per night, several of them will appear in the office and a present becomes available at the Prize Counter. Every 5 seconds, the price of it changes to a random number from 1 to 50. You must buy it within 45 seconds of the presents appearing.
FNaF World 사이트에서 2015년 당시 크리스마스 이미지에 배경으로 등장했던 물건들이다.
애니매트로닉스도 아니고 캐릭터도 아닌 사물이 주인공을 죽인다...
2.16.11. Beta Freddy(베타 프레디)O[편집]

밤이 시작될 때, 그들 중 네 명은 원래 모습의 사진과 함께 조명 시스템에 나타날 거야. FNaF 1 메뉴의 프레디가 나오면 첫 번째 메뉴를 클릭해. 준비실의 엔도01이 나오면 두 번째 메뉴를 클릭해. 베타 프레디의 원본 이미지가 나오면 세 번째 이미지를 클릭해. 얼티밋 커스텀 나이트 티저의 프레드베어가 표시되면 네 번째를 클릭해. 오전 1시 이전에 잘못 클릭하거나 클릭하지 않으면 넌 죽을 거야.
At the start of the night, four of them will appear on the Light System, alongside a picture of one of their original appearances. If it shows Freddy from the FNaF 1 menu, click the first one. If it shows Endo01 in the Backstage, click the second one. If it shows the original image of Beta Freddy, click the third one. If it shows Fredbear from the Ultimate Custom Night teaser, click the fourth one. Clicking the wrong one or not doing it before 1AM will result in death.
2016년 당시 FNaF 시리즈의 2주년을 맞아 기념으로 스콧이 공개한 프레디의 개발 과정 중 렌더링 이미지이다.
2.16.12. Beta Bonnie(베타 보니)X[편집]

그는 가끔 너의 사무실에 검은색과 빨간색 두 개의 나비 넥타이와 함께 나타날 거야. 너는 검은 나비 넥타이를 그의 몸에 있는 올바른 위치에 끌어다 놓아야 할 거야. 올바르게 하지 않으면 10초 동안 마스크 안에 갇혀 시야가 제한되고 카메라를 사용할 수 없게 될 거야.
He will sometimes appear in your office along with two bowties, one black and one red. You must drag and drop the black bowtie in the correct place on his body. If you fail to do that correctly, you will be trapped inside his mask for 10 seconds, limiting your view and preventing you from using the monitor.
2016년 당시 FNaF 시리즈의 2주년을 맞아 기념으로 스콧이 공개한 보니의 개발 과정 중 렌더링 이미지이다. 메커니즘은 렌더링 이미지 속 초기 보니의 나비 넥타이가 검은색이였던 것을 오마주한 것으로 보인다.
2.16.13. Viewport Bonnie(뷰포트 보니)O[편집]

그는 3층에 있는 엘리베이터 쪽으로 갈 거야. 그는 카메라에는 보이지 않고 전기가 소비되는 속도로 뷰포트 보니가 어디에 있는지 알 수 있는 유일한 방법이야. 소리 미끼(3층)를 사용하서 그가 너를 죽이는 걸 막아.
He will make his way towards the elevator on Floor 3. He is invisible to the cameras and the only way to tell where he is by seeing if the static is heavier than usual. Use the Audio Lure (Floor 3) to prevent him from killing you.
2016년 당시 FNaF 시리즈의 2주년을 맞아 기념으로 스콧이 공개한 보니의 개발 과정 중 렌더링 이미지이다. 말 그대로 사무실에 침입한 보니의 렌더링을 뷰포트로 본 모습.
2.16.14. Viewport Chica(뷰포트 치카)O[편집]

그녀는 4층에 있는 엘리베이터 쪽으로 갈 거야. 그녀는 카메라에는 보이지 않고 전기가 소비되는 속도로 뷰포트 치카가 어디에 있는지 알 수 있는 유일한 방법이야. 널 죽이지 않고 돌아가게 그녀에게 전기 충격을 줘.
She will make her way towards the elevator on Floor 4. She is invisible to the cameras and the only way to tell where she is by seeing if the static is heavier than usual. Shock her to make her go back and not kill you.
2016년 당시 FNaF 시리즈의 2주년을 맞아 기념으로 스콧이 공개한 치카의 개발 과정 중 렌더링 이미지이다. 말 그대로 사무실에 침입한 치카의 렌더링을 뷰포트로 본 모습.
2.16.15. Viewport Cupcake(뷰포트 컵케이크)O[편집]

그는 사무실에 있어. 카메라가 꺼진 상태에서 마우스를 클릭할 때마다 윙크가 나타나. 그가 윙크를 할 때마다, 그는 네가 기절하는 데 필요한 독성의 양을 줄여. 그 수치는 결국 다시 오를 거야.
He stays in the office. Whenever you mouse-click while the monitor is down, he will wink. Everytime he winks, he lowers the amount of toxicity needed for you to pass out. The amount will eventually go back up again.
2016년 당시 FNaF 시리즈의 2주년을 맞아 기념으로 스콧이 공개한 컵케이크의 개발 과정 중 렌더링 이미지이다. 말 그대로 치카가 들고 있는 컵케이크의 렌더링을 뷰포트로 본 모습.
2.16.16. Beta Foxy(베타 폭시)O[편집]

그는 무작위로 너의 사무실로 달려가 너를 도울 거야. 데스코인을 주는 거와 같이 그가 도울 수 있는 세 가지 방법이 있지만, 독성 측정기를 올리는 거와 같은 너의 밤을 조금 더 어렵게 만드는 세 가지 방법이 있어.
He will run into your office at random and offer to help you. He has three ways for him to assist, like giving you a Death-Coin, but also three ways for him to make your night just a bit more difficult, like raising your Toxic Meter.
2016년 당시 FNaF 시리즈의 2주년을 맞아 기념으로 스콧이 공개한 폭시의 개발 과정 중 렌더링 이미지이다. 메커니즘은 스콧이 만우절 당시 장난으로 올렸던 글에서 따왔다.[72]
2.16.17. Scrap Baby Endo(스크랩 베이비 엔도)X[편집]

그것은 오른쪽 문을 열 때마다 왼쪽 문에 나타나. 왼쪽 문을 닫아. 그렇지 않으면 문이 닫히고 환기구, 소리, 그리고 카메라 오류가 발생해.
It will appear in the left doorway every time you open the Right Door. Close the Left Door, otherwise it will get in and cause a ventilation, audio and video error.
2017년 당시 FNaF 시리즈의 3주년을 맞아 기념으로 스콧이 공개한 스크랩 베이비의 엔도스켈레톤 렌더링 이미지. 이때는 FFPS의 출시 이전이여서 이스터에그로 숨겨 놓았었다.
2.16.18. Teaser Plush(티저 인형)X[편집]

때때로 카메라를 놓을 때 사무실 천장에 움직이는 문자열이 매달려 나타나며, 손전등을 사용할 때만 보여. 문자열 위를 맴돌면 해당 문자열을 잘라내고 5초 동안 글로벌 뮤직 박스를 사용 할 수 없게 돼.
Sometimes when you put down the monitor, a moving string will appear hanging off the ceiling of your office, only visible when using the flashlight. Hovering over a string will make you cut it and make you lose access to the Global Music Box for 5 seconds.
FFPS의 티저 이미지로 등장했던 프레디의 인형. 울트라 커스텀 나이트에 쓰인 버전은 3번째로 공개된 티저 이미지 속 프레디 인형이다.
2.16.19. Concept Bob(콘셉트 밥)O[편집]

그는 밤새도록 너의 사무실에 앉아 있을 거야. 카메라를 닫을 때마다 지우개가 나타나고, 지우개 쪽으로 끌어 움직인 상태를 돌려낼 수 있어. 만약 그가 그림을 다 그리면, 넌 죽어버릴 걸.
He will draw himself in your office throughout the night. Everytime you close the monitor, an eraser will appear, which you can drag towards him to reset his progress. If he finishes drawing, you will die.
FFPS의 출시 이전, 스콧의 아들 중 한 명이 그린 버킷 밥의 그림으로, 레딧의 한 디스코드 유저에게 이미지가 보내졌었다.
2.16.19.1. Concept Bob 스킨[편집]

1번째 스킨은 Wither(위더) 라는 이름의 스킨이다. 마인크래프트에서 나온다.
2.16.20. Theodore Peterson(시어도어 피터슨)O[편집]

소음 수치가 너무 높으면, 그는 환풍구 시스템 주위에 곰 덫을 설치하기 시작할 거야. 만약 어떤 캐릭터든 환풍구 시스템의 곰 덫을 건드리면, 피터슨 씨가 널 죽일 거야.
If the Noise Meter is too high, he will begin placing bear traps around the Vent System. If a character touches the bear trap on the vent system, Mr. Peterson will kill you.
옆동네 호러게임 Hello Neighbor에 등장하는 그 피터슨이다. FNaF 캐릭터가 아님에도 등장하는 이유는 UCN의 트레일러 속에 유튜버 Razzbowski의 영상이 포함되어있는데, 영상 속 배경으로 피터슨의 인형이 나왔기 때문(...)
2.16.20.1. Theodore Peterson 스킨[편집]

1번째 스킨은 William Afton(윌리엄 애프턴) 이라는 이름의 스킨이다. 다른 말로 퍼플가이 라고도 불린다.
2.16.21. Steel Wool Spring Bonnie(스틸 울 스프링 보니)O[편집]

그는 가끔 웃고 앞쪽 또는 오른쪽 환풍구 문에서 자기를 보여줄 거야. 스프링 보니는 윌리엄 애프턴의 시그니처 환상 디스크를 사용하므로 반대쪽 환풍구 문을 닫아 그를 막아. 그가 너무 오랫동안 환풍구에 있으면 그는 너를 죽일 거야.
He will sometimes laugh and show himself in either the front or right vent doorway, SpringBonnie uses William Afton's signature illusion disks, so close the opposite vent door to fend him off. If he's kept in the vent for too long, he will kill you.
스틸 울 스프링 보니는 FNaF VR HW의 티저에 나왔다. 실제로 케인 카터에 의해 만들어진 취소된 이름 팝고즈 리플린트와 팝고즈 파이널의 도용당한 모델이었다.
2.16.22. Freddybear(프레디베어)O[편집]

손전등을 사무실의 왼쪽이나 오른쪽으로 너무 가까이 움직이면 그가 문에 나타날 거야. 점프스케어를 피하려면 재빨리 문을 닫아.
If you move your flashlight too close to either the left or right side of the office, he will appear in the doorway. Quickly close the door to avoid his jumpscare.
FNaF HW의 트레일러에 등장했던 프레드베어. 외형은 프레드베어이지만 색상은 나이트메어 프레디인데, 게임의 베타 버전에서 사용되었던 초기 모델로 추정된다.
2.16.23. Fazbear Ent. Spokesperson(파즈베어 엔터테인먼트 대변인)X[편집]

"무료 파즈코인" 버튼이 화면 주위를 이동해. 만약 니가 그걸 클릭한다면, 넌 건너뛸 수 없는 긴 광고를 보아야 할 거고, 그건 모든 화면을 덮기 때문에 죽음을 초래할 확률이 높아.
A "Free Faz-Coins" button will move around the screen. If you click it, you will have to watch a lengthy, unskippable ad, which will most likely result in death since it covers the entire screen.
파즈베어 엔터테인먼트 대변인은 유명 유튜버 Markiplier로, FNaF AR SD 예고편에 출연하면서 유튜버로 더 잘 알려졌다.
2.16.24. Microwave(전자레인지)X[편집]

그것은 4층 임의의 카메라에 나타날 거야. 신호음이 울리기 시작하면 해당 신호를 찾아 클릭해서 꺼. 신호음이 울리면 소음 수치가 올라 가. 전자레인지가 제때 꺼지지 않으면 폭발해서 온도가 120°로 맞춰져.
It will appear at a random camera on Floor 4. When it starts beeping, find it and click it to turn it off. The beeping raises the Noise Meter. If the microwave isn't turned off in time, it will explode and set the temperature to 120°.
FNaF SD 예고편에서 등장한 물체다.
2.16.25. Reddit User(레딧 사용자)X[편집]

그것의 이론 게시물이 화면에 떠. 제거하려면 '신고' 버튼을 클릭해야 해.
Their theory posts will pop up on your screen. You must click the 'report' button to get rid of it.
레딧 사용자는 FiS 2의 첫 번째 티저에서 나왔다. 티저에 58번이라고 적혀있다. 이미지를 밝게 하면 커뮤니티의 채팅 중 하나가 레딧 사용자의 것이다. 그의 말에 따르면, "꿈 이론에 대한 보살핌을 그만뒀어..."라고...
2.16.26. Clickteam Nightmarionne(클릭팀 나이트마리오네)O[편집]

시간이 바뀔 때마다 임무 시스템에 두 개의 사진이 표시돼. 하나는 FNaF 1의 4가지 캐릭터 중 하나인 FNaF의 공식 모델이 될 거고, 다른 하나는 팬메이드 모델이 될 거야. 클릭팀 나이트마리오네가 널 죽이기 전에 먼저 공식 사진을 클릭해야 해.
Every time the hour switches, two images will be displayed in the Task System. One will be an official FNaF model of one of the classic four characters from FNaF 1, and the other will be a fanmade model. You must click the official one before Clickteam Nightmarionne gets you.
클릭팀 나이트마리오네는 UCN 모바일 버전의 오래된 트레일러에 나온 나이트마리온 모델이다. 팬이 만든 도용당한 모델이다.
2.17. SCOTTGAMES[편집]
2.17.1. Scott(스콧)X[편집]

때때로, 그는 너의 사무실에 나타나서 몇 초 동안 시끄러운 음악을 연주할 수 있어. 음악 자체는 소음 수치를 증가시키지 않을 거야. 하지만, 음악이 재생되는 동안 소음 수치가 너무 높으면, 넌 어떤 것도 듣지 못하게 하면서, 밤새도록 귀가 들리지 않게 될 거야.
Sometimes, he may appear in your office and play loud music for a few seconds. The music itself will not increase the noise meter. However, if the Noise Meter is too high while the music playing, you will become deaf for the rest of the night, preventing you from hearing anything.
스콧이 2003년에 만들었던 게임, Doomsday Picnic RPG에 나오는 주인공이다.
이 캐릭터의 이름은 제작자의 이름인 Scott Cawthon 에서 따온 것이다.
2.17.2. Evil Scientist(악마 과학자)O[편집]

그는 그와 함께 부서진 공을 휘두르며 화면 주위를 움직일 거야. 그를 클릭하면 (AI 레벨에따라) 여러 개의 파즈 코인을 잃게 될 거야. 파즈코인이 0개 이하일 때 클릭하면 넌 죽을 거야.
He will move around the screen, swinging a wrecking ball around with him. If he hits your cursor, you will lose several Faz-Coins (depending on the AI level.) If he hits you when you have 0 or less Faz-Coins, you will die.
스콧이 만든 RPG 게임에 나오는 캐릭터 중 하나다.
2.17.3. Bio-Beta(바이오-베타)X[편집]

독성 수치는 문을 더 많이 닫을수록 서서히 채워져. 다 차면 죽어.
The Toxic Meter will slowly fill up the more doors you have closed. If it fills up all the way, you die.
스콧이 2013년에 만들었던 게임, The Desolate Hope에 나오는 캐릭터다.
2.17.4. Malenz(말렌츠)X[편집]

너가 전기 충격 패널을 사용할 때마다, 그는 그 후에 그것을 몇 번 더 사용할 거고, 전기를 낭비하고 많은 소음을 낼 거야.
Whenever you use the Shock Panel, he will use it a few more times afterwards, wasting power and making a lot of noise.
스콧이 2013년에 만들었던 게임, The Desolate Hope에 나오는 캐릭터다.
2.17.5. Viren(바이렌)O[편집]

그의 머리가 화면 상단에 떠있을 거야. 몇초 후, 머리가 다른 모서리로 날아갈 거야. 만약 너의 커서가 그에게 닿으면 온도가 120도로 오를 거야. 만약 온도가 120도인 상태가 유지되면, 넌 죽을 거야.
His head'll float on either top corner of the screen. After a few seconds, it'll fly in circle, then it'll loop to the opposite corner. If your cursor touches him, the temperature will rise to 120 degrees. If the temperature was 120 degrees, you die.
The Desolate Hope에 나오는 캐릭터다.
2.17.6. D-Co 9 X[편집]

D-Co 9는 카메라에 설치된 안티바이러스야. 때때로 모드(발전기, 히터 등)를 감지해. 그걸 바이러스로 사용하는 걸 무력화시킬 거야. D-Co 9를 클릭해서 모드를 다시 사용할 수 있게 해.
D-Co 9 is an anti-virus installed on your monitor. Occasionally, it will detect the mode (Power Gen, Heater, Etc.) you're using as a virus and it'll disable It. Click on D-Co 9 to confirm that you want to enable It to be able to use this mode again.
The Desolate Hope에 나오는 안티바이러스 시스템이다.
2.17.7. Tyke(타이크)X[편집]

그는 Lumber Co. 층에 남아서 대부분의 카메라를 장악해. 그는 빈손으로 돌아다닐 수도 있고 물뿌리개를 가지고 다닐 수도 있어. 그가 빈손으로 있을 때, 넌 여전히 나무를 자를 수 있을 거야. 하지만 그가 나무 바로 옆에 있어야만 해. 그가 물뿌리개를 들고 있을 때, 그는 가까이에 있는 어떤 나무도 평소보다 빨리 자라게 할 거야.
He stays at the Lumber Co. camera and takes control over most of it. He can either walk around empty-handed, or with a watering can. When he's empty-handed, you will still be able to cut down trees but only if he's right next to said trees. When he's holding a watering can, he will make any tree that's near him grow faster than usual.
타이크는 치퍼의 아들이며 스콧이 2013년에 만들었던 게임, Chipper & Sons Lumber Co.의 주인공이다.
2.17.8. Father Tree(아버지 나무)O[편집]

나타났을 때
점프스케어
나무 한 그루가 너무 오래 자라게 내버려두면 Lumber Co. 층 카메라에 나타나 나무를 대신하게 되고, 니가 도끼를 제때 사용하지 않으면 몇 초 후에 너에게 점프스케어 할 거야.
He will appear on the Lumber Co. camera if a tree is left to grow for too long, replacing the tree, and will jumpscare you a few seconds after if you don't use the axe on him in time.
2013년에 만들었던 게임, Chipper & Sons Lumber Co.의 캐릭터다.
2.17.9. Cool Chipper(쿨 치퍼)O[편집]

밤에 한 번, 그는 화면 오른쪽 아래에 나타나 슬롯 게임을 시작할 거야. N을 눌러 상단 슬롯을 정지하고 M을 눌러 하단 슬롯을 정지해. 일치하는 항목이 있으면 계속해. 만약 그렇지 않거나 너무 오래 걸리면, 넌 죽을 수 있는 점프스케어를 받게 될 거야.
Once per night, he will appear on the bottom right of the screen and start a slots game. Press N to stop the top slot and press M to stop the bottom slot. If they match, you continue. If they don't, or you take too long, you will get lethally jumpscare you.
V.I.P. Woodland Casino. 아이콘에 나오는 치퍼다.
2.17.10. Doofas(두파스)O[편집]
 [73]
[73]오전 1시가 되면, 그가 나타나서 마우스 커서가 제어해. 화면 어딘가에 있는 루비를 찾아 그 위에 두파스를 올려놓고 미니게임을 클리어해야 해. 날아다니는 적들도 있을 거고, 두파스가 그들에게 맞으면 그는 HP를 잃을 거야. 만약 그가 죽으면, 그는 너에게 점프스케어 할 거고 너도 죽게 될 거야. 루비를 찾는데 너무 오래 걸리면 죽음도 초래될 거야. 만약 두파스가 루비를 모으는 것이 허락된다면, 그는 소리를 낼 거야.
When 1AM hits, he will appear and be controlled by your mouse cursor. Find a ruby somewhere on the screen and hover Doofas over it to complete his minigame. Flying enemies will also spawn, if Doofas gets hit by them he will lose HP. If he dies, he will jumpscare you and you die too. Taking too long to find the ruby will also result in death. If Doofas is allowed to collect the ruby, he will make a sound.
스콧이 1989년에 만들었던 게임, Doofas the Dinosaur에 나오는 주인공이다.트로피 룸에서도 한 미니게임의 주인공으로 나온다.
여담으로 이 캐릭터는 아무리 스콧 코슨을 좋아하는 사람인데도 모르는 사람이 대부분이다.
또 이 캐릭터에 자세한 정보가 궁금하다면 이곳을 참조.
2.18. One Night at Flumpty's[편집]
2.18.1. Flumpty Bumpty(플럼티 범프티)O[편집]

그는 1층 주변을 걸을 거야. 너무 오래 쳐다보면 노출도 수치가 증가하기 시작해.
He will walk around the first floor. If you look at him for too long, the Exposure Meter will start to increase.
ONaF의 그 플럼티 범프티다.
2.18.2. Grunkfuss(그런크푸스)O[편집]

새벽 1시, 3시, 5시 동안, 니가 카메라를 내릴 때마다, 그는 너의 사무실의 구멍에서 나와서 각각 단계 별로 접근 할 거야. 그가 완전히 나오면 널 죽일 거야. 새벽 2시와 4시에 그는 다시 천천히 구멍 속으로 들어갈 거야.
During 1AM, 3AM and 5AM, every time you put down the monitor, he will take another step in exiting the hole in your office. He will kill you if he gets out completely. At 2AM and 4AM, he will slowly go back into the hole again.
ONaF의 그 그런크푸스다.
2.18.3. Cartoon Golden Flumpty(만화 골든 플럼티)X[편집]

그는 하늘에서 바람을 쐬듯이 날아다니며 사무실을 돌아다닐 것이다. 만약 그가 너의 커서를 씹으면, 그건 그의 입 안에 몇 초 동안 박히게 될 거야.
He will fly around the office, chomping down on air. If he chomps down on your cursor, it will get stuck within his mouth for a few seconds.
ONaF를 클리어하고 나면 나오는 그림버전 골든 플럼티다.
2.18.4. Empty Bempty(비어있는 범프티)X[편집]

보조 모드를 너무 오랫동안 켜두면 밤 중에 추가 부작용이 발생해.
발전기: 넌 전기를 잃기 시작할 거야.
저소음 환기: 소음 수치가 일시적으로 증가해.
히터: 파즈코인을 잃기 시작할 거야.
에어컨: 독성 수치가 상승하기 시작해.
글로벌 뮤직 박스: 게임 볼륨이 일시적으로 0으로 감소해.
He will cause additional effects to happen during the night if a single mode is left on for too long.
Power Generator: You will start losing power.
Silent Ventilation: Your Noise Meter gets temporarily increased.
Heater: You will start losing Faz-Coins.
Power A/C: The Toxic Meter will start going up.
Global Music Box: The game volume turns down to 0% temporarily.
비어있는 범프티는 ONaF의 업데이트된 버전에서 하드 보일드 모드를 누른 후 표시되는 별을 클릭한 후에만 나타나는 이스터 에그다.
2.18.5. The Owl(올빼미)O[편집]

배관 시스템의 중앙에 머무르며 400/AI초마다 배관 출입구 쪽으로 날아가. 사무실의 네온 벽을 사용해서 차단해.
It will stay in the center of the Duct System and will fly towards either duct exit every [400 / AI] seconds. Use the Neon Wall in the office to block it.
ONaF 2의 그 올빼미다.
2.19. POPGOES[편집]
2.19.1. Arcade Popgoes(아케이드 팝고즈)O[편집]

그는 새벽 3시에 너와 싸울 거야. 넌 공격하거나 방어할 수 있어. 팝고즈가 공격하려고 하면 약간 빨갛게 보일 거야. 그가 죽으면 너가 이기는 거야. 새벽 5시까지는 게임을 끝내야 해. 그렇지 않으면 지는 거야.
He will battle you at 3AM, You can choose to either attack or to block. Popgoes himself will appear slightly red if he's about to attack. If he dies, you win! You have until 5AM to finish the fight, otherwise you lose.
팝고즈 아케이드에 등장하는 팝고즈다.
2.19.2. Dead King Freddy(데드 킹 프레디)O[편집]

그는 사무실에 남아서 눈이 빨갛게 물든노란색 또는 자주색으로 빛나. 노란색이면 쇼크 패널을 사용해서 공격해. 그의 눈이 자주색일 때 충격을 사용하면 5%의 전기가 없어져. 공격을 너무 자주 놓치면 죽음으로 이어져.
He stays in the office, his eyes flash in a pattern of red-red-red-[yellow or purple]. If they're yellow, use the Shock Panel to attack. Using the shock when his eyes are purple will remove 5% power. Missing attacks too often will result in death.
팝고즈 아케이드 2020년 에디션에 나오는 보스다.
2.19.3. Blackrabbit(블랙래빗)O[편집]

사지가 문에 나타나면 문을 닫아 사라지게 해. 그녀의 머리가 책상에 나타나서 프레디 파즈베어 마스크를 쓰고 사라져. 몸통이 책상에 나타나면, 전기 충격 패널을 사용하여 사라지게 해. 만약 6개 부품이 모두 사무실에 있다면, 넌 점프스케어 당할 거야.
Her limbs will appear in doorways, close the doors to make them disappear. Her head will appear on your desk, put on the Freddy Fazbear Mask to make it disappear. Her torso will appear on your desk, use the Shock Panel to make it disappear. If all 6 parts are in the office, you will be jumpscared.
블랙래빗은 토이 보니를 본떠 만든 6개의 부분으로 이루어진 환각같은(?) 캐릭터다. 그는 섀도우 보니와 매우 닮았다.
2.19.4. Popgoes(팝고즈)O[편집]

그는 3층을 지나갈 거야. 엘리베이터로 향하고 있어. 그곳에 도착하면 널 죽일 거야. 그는 인터넷 수치가 낮으면 더 느리게 움직여. 저소음 환풍기를 활성화하거나 카메라 보는 것도 팝고즈가 한 발짝 더 뒤로 가게 할 수 있어.
He will walk through Floor 3. Making his way to the elevator. If he gets there, he will kill you. He moves slower if the internet meter is lower. Watching a camera with the Sil. Vent on will cause it to shut down, making Popgoes go one step back.
팝고즈에 나오는 팝고즈다.
2.19.5. Trading Cards(거래 카드들)X[편집]

그들은 화면에 초현실적인 3D와 번개 효과를 추가할 거야.
They will add hyperrealistic 3D and lightning effects on the screen.
팝고즈 에버그린에 나오는 거래 카드들이다.
2.20. Five Nights at Candy's[편집]
2.20.1. Candy(캔디)O[편집]

출구(CAM 01) 카메라로 점점 더 가까이 다가갈 거야. 그가 카메라에 아주 가까이 있을 때, 그의 한쪽 눈만 빛날 거야. 왼쪽 눈이면 왼쪽 문을 닫아. 오른쪽 눈이면 오른쪽 문을 닫아. 그를 막지 못하면 점프스케어를 초래할 거야.
He will come closer and closer on the Exit (CAM 01) camera. When he's very close to the camera, only one of his eyes will glow. If it's his left eye, close the Left Door. If it's his right eye, close the Right Door. Failing to block him out will result in a jumpscare.
FNaC R의 그 캔디다.
2.20.2. Cindy(신디)O[편집]

그녀는 엘리베이터 복도(CAM 02) 카메라로 점점 더 가까이 다가갈 거야. 그녀가 카메라 가까이에 있을 때, 그녀의 한쪽 눈만 빛날 거야. 왼쪽 눈일 경우 중앙 환풍구 문을 닫아. 오른쪽 눈이면 오른쪽 환풍구 문을 닫아. 그녀를 막지 못하면 점프스케어를 초래할 거야.
She will come closer and closer on the Elevator Hall (CAM 02) camera. When she's very close to the camera, only one of her eyes will glow. If it's her left eye, close the Front Vent Door. If it's her right eye, close the Right Vent Door. Failing to block her out will result in a jumpscare.
FNaC R의 그 신디다.
2.20.3. Chester(체스터)O[편집]

만약 니가 주기적으로 그를 확인하지 않는다면 그는 천천히 원숭이 방 카메라의 커튼에서 나올 거야. 그가 나오면 넌 죽을 거야.
He will slowly come out of the curtains on the Monkey Room camera if you don't regularly check on him. If he gets out, you will die.
FNaC R의 그 체스터다.
2.20.4. The Penguin(펭귄)X[편집]

그는 밤새 아무렇게나 문을 열고 닫을 거야. 그를 막을 방법이 없어.
He will open and close your doors at random throughout the night. There is no way to stop him.
FNaC R의 그 펭귄이다.
2.20.5. Old Candy(오래된 캔디)O[편집]

2층 부품/서비스(CAM 04) 카메라에 그대로 남아 있어. 그가 떠났을 때, 그건 그가 오른쪽 환풍구 (CAM 05) 카메라에 있다는 걸 의미해. 오른쪽 환풍구를 닫은 상태에서 손전등을 켜고 그를 지켜봐야만 그가 떠나 점프스케어를 피할 수 있어.
He will stay on the Floor 2 Parts/Service (CAM 04) camera. When he's gone, it means he is on the Right Air Vent (CAM 05) camera. You must watch him with the flashlight on while having the Right Vent Door closed to make him leave and avoid his jumpscare.
FNaC R의 그 오래된 캔디다.
2.20.6. Hamburger(햄버거)X[편집]

카메라가 오랫동안 내려가 있을 수록 그가 사무실에 나타날 가능성이 커져. 그가 거기 있을 때, 그는 세 가지 시스템을 모두 오류가 나게 할 거야.
The longer the cameras are down, the more chance of him appearing in the office. When he's there, he will error out all three systems.
FNaC R의 사무실 책상 위에 있는 햄버거 장식이다.
2.20.7. Shadow Candy(그림자 캔디)X[편집]

그는 글리치 층에서 선명해질 거야. 그를 보는 건 그를 점점 멀어지게 할 거야. 만약 그가 완전히 선명해지면, 그는 너에게 점프스케어 할 거고 시간을 한 시간 뒤로 돌릴 거야.
He will fade in on the Glitch Floor. Watching him will make him fade away. If he fades in fully, he will jumpscare you and turn back time by an hour.
FNaC R의 그 그림자 캔디다.
2.20.8. Tragedy Puppet(비극 퍼펫)O[편집]

글로벌 뮤직 박스를 쓰는 동안 카메라를 보면, 그는 천천히 카메라 화면으로 이동할 거고, 그가 너무 가까이 가면 결국 너에게 점프스케어 하게 될 거야.
When you watch the cameras while using the Global Music Box, he will slowly move into the camera view and will eventually jumpscare you if he gets too close.
FNaC R의 비니다.
2.20.9. Green Candy(그린 캔디)X[편집]

넌 항상 그의 뒤에 있을 거야. 단지 얼굴 구멍을 통해 볼 수 있을 뿐이지. 커서가 구멍 밖으로 나갈 수 없어. 화살표 키를 눌러 구멍이 있는 위치를 전환할 수 있어.
You will always be behind him, only being able to see through the face hole. Your cursor cannot go outside of the hole. You can toggle where the hole is by pressing the arrow keys.
FNaC R의 파티장 카메라에 있던 장식이다.
2.20.10. Blank Endo(블랭크 엔도)X[편집]

그는 항상 한 층의 시야를 가릴 거야. 잠시 동안 모드를 모두 끄기로 설정하면 현재 층을 볼 수 있어.
He will block the view of one of the floors at all times. Setting the mode to All OFF for a while will make him change the floor he is at.
FNaC R의 부품/서비스에 있던 블랭크의 엔도다.
2.20.11. Classic Blank(클래식 블랭크)O[편집]

그는 그림 복도 (CAM 07) 카메라에 남아서 천천히 깨어날 거야. 그가 사라진 걸 보면, 그의 점프스케어를 피하려면 중앙 환풍구 문을 닫아.
He will stay on the Drawing Hall (CAM 07) camera, and will slowly wake up. If you see that he's gone, close the Front Vent Door to avoid his jumpscare.
FNaC 1의 그 블랭크다.
2.20.12. Classic Old Candy(클래식 오래된 캔디)O[편집]

산소 저장소(CAM 05)에 있을 거고 가끔 작동해서 복도 안으로 들어갈 거야. 그가 거깄을 때, 그가 안으로 들어갈 수 있도록 문을 열어두고 그가 사무실에 있을 때 전기 충격 패널을 사용해. 문을 닫으면 5%의 전기가 소모돼.
He'll be at the Oxygen Storage (CAM 05) and will sometimes activate to go into one of the hallways. When he's there, leave the door open so he can get inside, then use the Shock Panel when he's in the office. Closing the door will drain 5% power.
FNaC 1의 그 오래된 캔디다.
2.20.13. Classic Rat(클래식 렛)O[편집]

그는 1층의 양쪽 복도에 나타날 거야. 진짜 클래식 렛은 그 중에 한 명뿐이야. 가짜는 살짝 깜박거릴 거야. 진짜는 문을 닫고 가짜는 문을 열어둬야 살아남을 수 있어.
He'll seemingly walk through both of the hallways on F1 at once, but only one will be the real Classic RAT. The fake one will slightly flicker. Close the door one the real one, and leave the door open on the fake one to survive.
FNaC 1의 CCTV에 나오는 낡지 않은 렛이다.
2.20.14. Withered Candy(구형 캔디)O[편집]

그는 배관 시스템에 있고, 항상 소리 미끼 쪽으로 움직일 거야. 소리 미끼에 도달하면 비활성화 될 거야. 그리고 몇 초 후에 다시 활성화 될 거야. 그가 너무 많이 비활성화 되면 너에게 점프스케어할 거야.
He's on the Duct System, always moving towards the audio lure, disabling it once he reaches it, only enabling it again after a few seconds. He will jumpscare you if he disables it too many times.
FNaC 2에 나오는 그 구형 캔디다.
2.20.15. Monster Rat(괴물 렛)O[편집]

그는 묵묵히 어느 문에나 나타날 거야. 그를 떠나게 하기 위해 손전등을 비춰. 그가 들어오면 도망갈 때까지 그의 눈에 손전등을 비춰. 그가 사무실에 너무 오래 있으면 널 죽일 거야.
He will silently appear at either doorway. Flash your light on him to make him leave. If he gets in, flash your light at his eyes until he runs off. If he stays in the office for too long, he will kill you.
FNaC 3의 그 괴물 렛이다.
2.20.16. Monster Cat(괴물 캣)O[편집]

그는 조명 시스템 양쪽에서 밖을 내다보기 시작할 거야. 그를 숨기도록 조명을 비춰. 그렇게 하지 않으면 결국 그가 널 죽일 거야.
He will start to peek out from either side on the Light System. Flash him to make him hide. If you don't do so he'll eventually kill you.
FNaC 3의 괴물 렛을 보조해주는 그 괴물 캣이다.
2.20.17. Child Mary(아이 메리)X[편집]

그녀는 조명 시스템 안에서 오른쪽에서 왼쪽으로 바닥을 따라 걸을 거야. 테이프 플레이어는 왼쪽에서 시작해. 그녀가 테이프 플레이어에 닿으면, 그녀는 그걸 반대쪽으로 옮길 거야. 하지만, 만약 니가 그녀에게 조명을 비춰준다면, 그녀는 겁을 먹고 반대편으로 도망칠 거야. 만약 그녀가 테이프 플레이어에 너무 오랫동안 닿을 수 없다면, 그녀가 다시 닿을 수 있을 때까지 테이프 플레이어는 재생을 멈출 거야. 일단 재생이 멈추면, 밤의 타이머는 완전히 멈춰.
She will be in the Light System, walking along the floor from the right to the left. The tape player starts on the left side. When she reaches the tape player, she'll move it to the opposite side. However, if you ever shine your light on her, she'll get scared and run back to the opposite side. If she is not allowed to reach the tape player for too long, the tape player will stop playing until she is allowed to reach it again. Once it stops playing, the night's timer stops completely.
FNaC 3의 주인공인 어린 시절의 메리다.
2.20.18. Shadow Rat(그림자 렛)O[편집]

환기구, 카메라 또는 소리 미끼 오류가 있을 때마다 그는 천천히 너의 사무실에서 선명해질 거야. 그가 완전히 선명해지면 너에게 점프스케어 할 거야. 그의 진척도는 되돌릴 수 없어.
Anytime there's a ventilation, video or audio error, he will slowly fade into your office. He will jumpscare you if he fades in fully. His progress cannot be reversed.
FNaC 3의 챌린지의 주 적인 그 그림자 렛이다.
2.20.19. Classic Shadow Candy(클래식 그림자 캔디)O[편집]

캠 시스템을 보면서 나타날 수 있으며, 이 경우 환풍구 시스템을 살펴봐야 하고, 그 반대도 마찬가지야. 다른 시스템을 보면 점프스케어로 이어질 수 있어.
He may appear while looking at the Cam System, in which case you must look at the Vent System, and vice versa. Looking at any other system will result in a jumpscare.
FNaC 1의 이스터 에그로 나오는 그 그림자 캔디다.
2.20.20. Unused Shadow Candy(사용되지 않은 그림자 캔디)O[편집]

임무 시스템을 보는 동안 나타날 수 있으며, 이 경우 GPS 시스템을 살펴봐야 하고, 그 반대의 경우도 마찬가지야. 다른 시스템을 보면 점프스케어로 이어질 수 있어.
He may appear while looking at the Task System, in which case you must look at the GPS System, and vice versa. Looking at any other system will result in a jumpscare.
FNaC 3 기타에서 나온 점프스케어로 사용되지 않은 그림자 캔디다.
2.20.21. Eyeless Shadow Candy(아이리스 그림자 캔디)O[편집]

배관 시스템을 보는 동안 나타날 수 있으며, 이 경우 조명 시스템을 살펴봐야 하고, 그 반대의 경우도 마찬가지야. 다른 시스템을 보면 점프스케어로 이어질0 수 있어.
He may appear while looking at the Duct System, in which case you must look at the Light System, and vice versa. Looking at any other system will result in a jumpscare.
FNaC 3 기타에서 나온 Thank You! 이미지에서 나온 그림자 캔디다. 이름에서도 알 수 있듯이, 눈알이 없다.
2.21. CHARLIE TRILOGY[편집]
2.21.1. Theodore(시어도어)X[편집]

사무실에서 앉아있을 때
사무실에서 손을 흔들 때
그는 사무실에 머무르고 있어. 카메라를 내리면 그가 손을 흔들 때가 있을 거야. 그를 멈추려면 그의 코를 빠르게 눌러. 그가 너무 오래 손을 흔들면 환기 오류가 생길 거야.
He stays in the office. When you flip down the camera, he may activate and begin waving. Click his nose quickly to deactivate him. If he waves for too long, he will error out the vents.
FNaF 소설 3부작에 등장했던 주인공 찰리의 어릴적 장난감이다. 펀코에 피규어 상품으로도 판매되고 있다.
2.21.2. Twisted Freddy(트위스티드 프레디)O[편집]

그는 천천히 지하 층 카메라 천장에서 기어 나올 거야. 그가 바닥에 서 있다면, 그를 지켜보면서 동시에 히터를 사용해서 천장으로 기어들어가게 해. 그가 너의 사무실에 들어가면 넌 이미 죽은 목숨이야.
He will slowly crawl out of the ceiling on the Basement camera. If he's standing on the floor, watch him and use the Heater at the same time to make him crawl back into the ceiling. If he gets into your office, you're dead.
FNaF 소설 3부작의 두번째 작품인 TTO(The Twisted Ones)에 등장했던 트위스티드 프레디다.
2.21.3. Twisted Bonnie(트위스티드 보니)O[편집]

그가 지하 층 카메라에 나타나면 미끄러운 바닥 표지판을 카메라에 있는 뒤틀린 보니의 반대편(왼쪽이면 오른쪽, 오른쪽이면 왼쪽)으로 옮겨. 그는 그걸 정확한 곳으로 옮긴 후 즉시 떠날 거야.
When he appears on the Basement camera, move the Wet Floor Sign to the opposite of where Twisted Bonnie is on the camera (right if he's on the left, left if he's on the right). He will instantly leave after moving it to the correct place.
FNaF 소설 3부작의 두번째 작품인 TTO(The Twisted Ones)에 등장했던 트위스티드 보니다.
2.21.4. Twisted Chica(트위스티드 치카)O[편집]

지하 층에 있는 카메라에 그녀가 나타나면, 그녀가 어느 쪽에 있는지 보고 빨리 문을 닫는 동시에 히터를 켜. 글로벌 뮤직 박스는 그녀가 나타나는 것을 막지만, 많은 소음이 그녀를 더 많이 보이게 해.
When she appears in the Basement camera, quickly close the door according to which side she's at and turn on the Heater at the same time. The Global Music Box prevents her from appearing, but a lot of noise makes her appear more.
FNaF 소설 3부작의 두번째 작품인 TTO(The Twisted Ones)에 언급만 됐었던 트위스티드 치카다. 사실 소설 내에서 직접 등장하지는 않지만, 일러스트가 존재하고, 공식 상품으로도 나온 적이 있어 출현한듯.
2.21.5. Twisted Foxy(트위스티드 폭시)O[편집]

지하 층 카메라에 그가 나타나면, 넌 그가 떠날 때까지 왼쪽 문을 닫아야 해. 그렇지 않으면 그가 널 죽여버릴 거야. 소음 수치가 높을 때 더 자주 나타나.
When he rises in the Basement camera, you must close the Left Door until he leaves, otherwise he will jumpscare you. He appears more often when the Noise Meter is high.
FNaF 소설 3부작의 두번째 작품인 TTO(The Twisted Ones)에 등장했던 트위스티드 폭시다.
2.21.6. Twisted Wolf(트위스티드 울프)O[편집]

그는 인터넷 수치가 50% 미만일 때마다 지하 층에 나타날 거야. 그는 수치가 50% 이상일 때 수입산 버터를 누를 때까지 그곳에 머무를 거야. 만약 그가 그곳에 너무 오래 머물면, 그는 너를 죽일 거야.
He will appear in the Basement whenever the Internet meter is below 50%. He will stay there until the Exotic Butters is pressed while the meter is above 50%. If he stays there for too long, he will kill you.
FNaF 소설 3부작의 두번째 작품인 TTO(The Twisted Ones)에 등장했던 트위스티드 울프다.
2.21.7. The Fazbear Monkeys(파즈베어 원숭이들)O[편집]

그는 개별적으로 2층, 3층 또는 4층의 CAM 03에 나타날 거야. 각 층의 메커니즘(조명, 소리 미끼, 전기 충격)를 사용하여 원숭이를 분리해. 만약 세 원숭이가 동시에 나타나면, 넌 죽지.
They will individually appear on the Cam03 of either Floor 2, Floor 3, or Floor 4. Use the respective floor's tool (Flashlight, audio lure, shock) to make them leave. If all three of them appear at the same time, you die.
FNaF 소설 3부작의 두번째 작품인 TTO(The Twisted Ones)에 등장했던 캐릭터들. 트위스티드 프레디가 주인공 찰리를 끌고 갔던 피자가게에서 아케이드 머신 위에 놓여 있는 모습이 나온다.
2.21.8. Mono Freddy(모노 프레디)O[편집]

왼쪽이나 오른쪽 문을 열면 문 뒤에서 그의 붉게 빛나는 눈이 보일 거야. 점프스케어를 피하려면 재빨리 다시 문을 닫아.
After opening either the left or right door, you may see his glowing red eyes behind the doorway. Quickly close the door again to avoid a jumpscare.
FNaF 소설 3부작의 세번째 작품인 TFC(The Fourth Closet)에 등장했던 펀타임 프레디의 짙은 회색 버전이다.
2.21.9. Funtime Mangle(펀타임 맹글)X[편집]

네가 그의 갈고리 같은 잡음 소리를 들으면, 그건 그녀가 4층의 어느 벽장에 나타났다는 것을 의미해. 빨리 찾아내서 전기 충격을 줘. 만약 그가 제때에 전기 충격을 받지 않는다면, 그녀는 너의 사무실에 들어가서 밤새도록 소음 수치를 올릴 거야.
When you hear their garbled static sound, it means they have appeared on either closet on Floor 4. Quickly find them and shock them. If they aren't shocked in time, they will get into your office and raise the noise meter for the rest of the night.
FNaF 소설 3부작의 세번째 작품인 TFC(The Fourth Closet)에 등장했던 맹글이다.
2.22. FAZBEAR FRIGHTS[편집]
2.22.1. Pit Spring Bonnie(핏 스프링 보니)O[편집]

소품 저장소 카메라의 공구덩이에서 천천히 나올 거고, 넌 그에게 전기 충격을 사용할 때 그는 돌아갈 거야. 그가 나오면 너에게 점프스케어 할 거야.
He will slowly come out of the ballpit on the Prop Storage camera and will go back when you use the controlled shock on him. If he gets out, he will jumpscare you.
Fazbear Frights 1권[74]에 나오는 스프링 보니다.
2.22.2. Eleanor(엘리노어)O[편집]

특정 문을 너무 자주 닫으면 다음과 같은 결과에 직면하게 돼.
왼쪽 문: 그녀는 너의 왼팔을 고철로 대체할 거야.
오른쪽 문: 그녀는 너의 오른팔을 고철로 대체할 거야.
중앙 환풍구 문: 그녀는 너의 왼쪽 다리를 고철로 대체할 거야.
오른쪽 환풍구 문: 그녀는 너의 오른쪽 다리를 고철로 대체할 거야.
두 팔이 모두 금속일 경우 도어 버튼이 작동될 확률은 50%에 불과해. 만약 두 다리가 모두 금속이라면 사무실에서의 둘러보는 속도는 줄어들 거야. 만약 너의 팔과 다리가 모두 금속이라면, 그녀는 널 죽일 거야.
When closing a specific door too frequently, you will face consequences.
Left Door: She will replace your left arm with scrap metal.
Right Door: She will replace your right arm with scrap metal.
Front Vent Door: She will replace your left leg with scrap metal.
Right Vent Door: She will replace your right leg with scrap metal.
If both your arms are metal, the door buttons will only have a 50% chance of working. If both your legs are metal, your turning speed in the office will decrease. If both your arms and both your legs are metal, she will kill you.
Fazbear Frights 1권[75]에 나오는 엘레노어다.
2.22.3. Counting Freddy(카운팅 프레디)O[편집]

그는 카메라에 나타날 거야. 그가 웃은 후에 카메라를 빨리 내리고 전기 충격 패널을 사용해야 해. 죽지 않으려면 프레디 파즈베어 마스크를 써. 마스크를 써야 할 때 전기 충격을 주거나 반대로 할 경우[76]
넌 죽어.
He'll appear on the cameras. You must quickly lower the monitor and use the Shock Panel, after which he will laugh. Put on your Freddy Fazbear Mask to not get killed. If you shock when you're supposed to put on the mask and vice versa, you will die.
Fazbear Frights 1권[77]에 나오는 펀타임 프레디다.
2.22.4. The Stitchwraith(스터치레이스)O[편집]

그는 2층을 걸어다닐 거야. 그가 움직이는 소리가 들리면 어디선가 그를 찾아. 만약 그를 찾을 수 없다면, 그건 그가 엘리베이터에 들어갔다는 것을 의미해. 그가 나가게 하려면 왼쪽과 오른쪽 문을 모두 닫아.
He will walk around Floor 2. If you hear him move, make sure you can find him somewhere. If you can't find him, it means he has entered the elevator. Close both the left and right doors to make him leave.
Fazbear Frights 시리즈에서 언급만 되는 엔도다.
2.22.5. Fetch(페치)X[편집]

그는 밤새도록 계속해서 너에게 문자를 보낼 거고, 그의 문자는 화면 왼쪽 상단에 나타날 거야. 그는 밤새 인터넷 일부를 빼앗거나, 다른 카메라로 바꾸거나, 온도를 올리거나, 파즈코인을 빼앗는 등 무작위로 널 괴롭힐 거야.
He will constantly text you throughout the night, and his texts will be shown at the top left of the screen. He will mess you in random ways throughout the night, like taking away some of your internet, switching to a different camera, raising the temperature, or taking away some Faz-Coins.
Fazbear Frights 2권[78]에 나오는 페치다.
2.22.6. Lonely Freddy(외로운 프레디)X[편집]

몇 초마다 화면 상단에 키 버튼과 카운트다운 목록이 표시돼. 카운트다운이 0이 되면, 외로운 프레디는 너의 몸을 통제하기 시작할 거고 그 순서대로 키를 누를 거야. 그를 멈추기 위해 카운트다운이 0이 되지 않은 상태에서 1-5 키를 누르면 상단에 있는 목록에서 키 버튼이 삭제돼.
Every few seconds, a list of key presses and a countdown will be shown at the top of the screen. When the countdown reaches 0, Lonely Freddy will begin to control your body and those key presses will be pressed in that order. To stop him, pressing the 1-5 keys while the countdown hasn't reached 0 yet will delete the key presses from the list at the top.
Fazbear Frights 2권[79]에 나오는 외로운 프레디다.
2.22.7. Yarg Foxy(심판 폭시)X[편집]

그는 밤중에 아무 때나 사무실에 나타나서 갈고리로 닫힌 문을 계속 열 거야. ,키와 .키를 연타해 팔이 떨어져 문을 열 수 없을 때까지 그를 흔들어 줘.
At random points during the night, he will appear in your office and will constantly open closed doors with his hook. Spam the , and . keys to shake him around until his arm falls off and makes him unable to open doors.
Fazbear Frights 2권[80]에 나오는 폭시의 인형이다.
2.22.8. Plushtrap Chaser(플러시트랩 체이서)O[편집]

배관 시스템을 통해 이동하고 배관 문에 면역이 돼. 소리 미끼가 그와 가까워질수록 그는 더 빨라질 거야.
He moves through the Duct System, immune to the duct seals. The closer the Audio Lure is to him, the faster he will become.
Fazbear Frights 2권[81]에 나오는 플러시트랩 체이서다.
2.22.9. Withered Minireenas(구형 미니리나들)X[편집]

프레디 파즈베어 마스크를 착용할 때마다 나타나. 이 버튼을 클릭하면 떨어질 수 있어. 마스크를 벗었을 때 그 중 하나라도 머무르면 독성 수치의가 높아져 기절해 죽기 쉬워.
They will appear whenever you put on the Freddy Fazbear Mask. Click on them to make them fall. If any of them stay when you take off the mask, your Toxic Meter's minimum value will increase, making it easier to die by passing out.
Fazbear Frights 3권[82]에 나오는 미니리나다.
2.22.10. Holographic Ballora(홀로그램 발로라)O[편집]

프레디 파즈베어 마스크를 쓰면 가끔 그녀가 사무실에 나타날 거야. 그녀를 사라지게 하려면 글로벌 뮤직 박스를 이용해야 해. 그녀가 아직 사무실에 있을 때 마스크를 벗으면 그녀에게 점프스케어 당해.
She will sometimes appear in the office when you put on your Freddy Fazbear Mask. You must use the Global Music Box to make her vanish. Taking off the mask when she's still in the office will result in her jumpscare.
Fazbear Frights 4권[83]에 나오는 발로라다.
2.22.11. Coming Home Chica(집으로 온 치카)O[편집]

임무 시스템에는 1층의 특정 카메라 보기, 2층의 특정 카메라 조명 사용, 3층의 특정 카메라에서 소리 미끼 재생, 4층의 특정 카메라에서 전기 충격 사용, 특정 문 닫기 등 일이 포함된 여러 도면이 나와. 살아남으려면 새벽 2시 전에 모두 완성해.
Several drawings with instructions will appear on the Task System, including watching a specific camera on Floor 1, using the flashlight on a specific camera on Floor 2, playing an audio lure on a specific camera on Floor 3, using the controlled shock on a specific camera on Floor 4, and closing a specific door. Complete all of them before 2AM to survive.
Fazbear Frights 4권[84]에 나오는 치카다.
2.22.12. Springtrap Jr(스프링트랩 주니어)O[편집]

그는 니가 카메라를 내린 후에 너의 책상에 나타날 수 있어. 그가 거깄을 때, 넌 손전등을 계속 비춰야 해. 그가 눈을 가릴 수 있게 말이야. 그렇지 않으면 그가 널 죽일 거야. 그는 니가 다시 카메라를 뒤집은 후에야 사라질 거야.
He can appear on your desk after you put down your monitor. When he's there, you must keep shining your flashlight on him so he covers his eyes, otherwise he will kill you. He will only disappear after you flip the monitor back up again.
Fazbear Frights 5권[85]에 나오는 스프링트랩이다.
2.23. MISC. BOOKS[편집]
2.23.1. Math-Man(매스 맨)X[편집]

그는 오전 2시에 왼쪽 하단 모서리에 갑자기 나타나 전기, 소음, 인터넷, 그리고 독성 수치를 차단해. 화면 맨 위에 있는 텍스트 상자를 사용해서 수학 문제 몇 개 해결하면 그를 떠나게 할 수 있어.
At 2AM he will pop up in the bottom left corner, blocking the power, noise, internet and Toxic Meter. Solve several math problems using the textbox at the top of the screen to make him leave.
공식 가이드북인 Five Nights at Freddy's: The Freddy Files에 삽화로 그려진 캐릭터.
2.23.2. Recipe Golden Cupcake(레시피 골든 컵케이크)X[편집]

카메라가 오랫동안 꺼져있을 수록, 그가 너의 사무실에 나타날 확률은 점점 높아질 거야. 그가 그곳에 있을 때, 넌 카메라를 몇 초 동안 볼 때까지 1~6 모드 기능을 사용하지 못할 거야.
The longer the cameras are down, the more of a chance of him appearing in your office. When he's there, you will be unable to use the 1-6 mode functions until looking at the cameras for several seconds.
공식 가이드북에 나온다.
2.23.3. TFF Spring Bonnie(TFF 스프링 보니)O[편집]

마스크를 착용할 때 스프링 잠금 장치 두 개를 클릭한 상태를 유지해서 마스크 양쪽에 있는 스프링 잠금 장치 두 개를 위로 올려 놔야 해. 마스크를 쓰고 있는 동안 내내 긴장을 풀면 스프링이 잠겨서 죽게 될 거야.
When wearing the mask, you must keep the two springlocks on either side of the mask wound up by clicking and holding them. If they unwind all the way while you're wearing the mask, you will get springlocked and killed.
공식 가이드북인 Five Nights at Freddy's: The Freddy Files에 삽화로 그려진 스프링 보니의 인형탈. 메커니즘은 스프링 보니가 스프링락 슈트임을 오마주한 것으로 보인다.
2.23.4. Funtime Lefty(펀타임 레프티)O[편집]

펀타임 레프티는 배관 시스템을 통과하여 사무실에 도착하면 널 죽일 거야. 글로벌 뮤직 박스를 사용하여 그를 리셋 시켜.
Funtime Lefty will go through the Duct System and will jumpscare you when he reaches your office. Use the Global Music Box to reset him.
펀타임 레프티는 TFF 확장판의 UCN 맵 섹션에서 사용한 많은 팬 메이드 편집 중 하나다. 특히, 레프티가 지도에서 어디에 있었는지를 나타내기 위해 사용됐다. 프레디가 레프티처럼 보이기 위해 만든 펀타임의 편집본이다.
2.23.5. Withered Trash and the Gang(구형 쓰레기와 갱단)X[편집]

???
TFF 확장판에서 잘못 사용된 구형 쓰레기와 갱단의 팬 편집본이다. 그것들은 쓰레기와 갱단의 망가지고 구형인 것처럼 보이도록 만들어졌다.
공략에 ???만 들어 가있다. 이걸 설명하면 다음과 같다.
넘버 1 크레이트 : 사무실 왼쪽 아래에 나타난다. 뭐라 말한 후에 바로 죽이지 않는 점프스케어를 한다.
버킷 밥 : 넘버 원 크레이트와 같이 점프스케어 한다.
미스터 캔-두 : 아무 카메라에 나와서 시야를 가린다.
미스터 허그 , 팬 스탠 : 미스터 캔-두와 똑같다.
2.24. Funko[편집]
2.24.1. Blacklight Foxy 1 & 3(블랙라이트 폭시 1 & 3)O[편집]

그들은 무작위 3층 카메라에 머물면서 체스 경기를 둘 거야. 카메라를 들 때마다 적어도 한 번은 그들의 진행 상황을 보고 그들이 즐겁게 놀게 해야 해. 만약 그들이 너무 지루해지면, 넌 죽을 거야.
They will stay on random Floor 3 cameras and play competitive chess. Look at their progress at least once every camera flip to keep them excited to play. If they get too bored, you will die.
펀코의 상품인 인형들이다.
2.24.2. Blacklight Foxy 2(블랙라이트 폭시 2)O[편집]

그는 폭시 복도 (CAM03) 카메라에 머물면서 네가 그를 볼 때마다 점점 더 화가 나. 결국 그가 너무 화를 많이 내면 너에게 점프스케어 하게 될 거야.
He stays on the Foxy Hall (CAM 03) camera and gets angrier whenever you look at him and will eventually jumpscare you if he is too angry.
펀코의 상품인 인형이다.
2.24.3. Blacklight Foxy 4(블랙라이트 폭시 4)O[편집]

그는 폭시 복도 (CAM03) 카메라에 남아서 너무 많은 소음이 들리면 더 활발해져. 그를 진정시키는 유일한 방법은 그를 카메라로 보는 거야. 그가 너무 화를 내면 널 죽일 거야.
He stays on the Foxy Hall (CAM 03) camera and gets more agitated if too much noise is being made. The only way to calm him down is to watch him on the cameras. If he gets too angry, he will kill you.
펀코의 상품인 피규어이다.
2.24.4. Blacklight Toy Bonnie 2(블랙라이트 토이 보니 2)O[편집]

2층을 보면서 무작위로 나타나고 카메라를 바꾸기 전에 손전등을 비추고 코를 클릭해야 하며 그렇지 않으면 그가 널 점프스케어 할 거야. 또한 카메라를 닫거나 시스템을 바꾸면 그가 널 공격하게 돼.
He will randomly appear while looking at Floor 2, before changing the camera you must shine your flashlight on him and click his nose, otherwise he will jumpscare you. Closing the monitor or switching the system will also make him attack you.
펀코의 상품인 야광 가방고리 인형이다.
2.24.5. Blacklight Puppet 1(블랙라이트 퍼펫 1)X[편집]

카메라를 바꿀 때, 그가 다른 포즈로 번쩍이면서 나타날 가능성이 있어. 카메라를 빨리 바꾸지 않으면 그가 출연한 카메라는 밤새도록 그의 얼굴에 가려질 거야.
When changing cameras, there is a chance he might appear, flashing in different poses. If you don't change the camera quickly, the camera he appeared in will be blocked by his face for the rest of the night.
펀코의 상품인 야광 가방고리 인형이다.
2.24.6. Blacklight Endo02(블랙라이트 엔도02)O[편집]

그는 환풍구 시스템을 지나갈 거야. 환풍구 덫에 닿으면 일시적으로 현재 덫 위치를 변경할 수 없게 돼. 그의 점프스케어를 피하기 위해 그의 얼굴의 문을 닫아.
He will go through the Vent System. If he touches an active Vent Snare, he will temporarily stop you from changing the current snare position. Close the door on his face to avoid his jumpscare.
펀코의 상품인 피규어이다.
2.24.7. Blacklight Rockstar Freddy(블랙라이트 락스타 프레디)X[편집]

때때로 카메라를 내릴 때, 그가 나타나서 다시 카메라에 접근할 수 있도록 5개의 파즈 코인을 요구할 거야. 락스타 프레디와 달리 히터는 그에게 효과가 없어. 그는 하룻밤에 겨우 세 번 나타날 수 있어.
Sometimes when lowering the monitor, he will appear and demand 5 Faz-Coins to get access to the monitor again. Unlike Rockstar Freddy, the Heater doesn't work on him. He can only appear thrice per night.
펀코의 제품인 시리얼 상자 속에 부록되어 있는 미니 피규어이다.
2.24.8. Glow Freddy(글로우 프레디)O[편집]

그는 3층에 머물고 있을 거야. 그를 보고 있으면 그가 더 빛나는데, 너무 많이 빛나면 넌 죽을 거야. 카메라 중 하나에 소리 미끼를 사용하면 그가 그 카메라로 순간이동 할 거야. 넌 그가 빛나는 걸 되돌릴 수 없어.
He will stay on Floor 3. Watching him will make him glow more and more, if he glows too much, you die. Using the audio lure in one of the cameras will make him teleport to said camera. You cannot reset his glow progress.
펀코의 상품인 미니 피규어이다.
2.24.9. Glow Toy Freddy(글로우 토이 프레디)O[편집]

글로우 토이 프레디는 프레디 파즈베어 마스크를 벗고나서 대때로 나타날 거야. Y를 누르면 배터리 저장 모드가 활성화 되는데 전기 낭비 없이 손전등을 사용할 수 있어. 하지만 확률적으로 널 죽일 수 있어.
Glow Toy Freddy will sometimes appear after taking off the Freddy Fazbear Mask. Press Y when hovering over him to turn on the battery-save mode, which will work as using the Flashlight without the waste of power. There's a chance he'll jumpscare you however.
펀코의 상품인 미니 피규어이다.
2.24.10. Glow Balloon Boy(글로우 벌룬 보이)O[편집]

너는 2층에서 풍선을 찾아서 클릭해야 돼. 너는 어두울 때(카메라 조명을 사용하지 않음)만 풍선을 볼 수 있어. 풍선은 화면을 가로질러 이동하고, 모든 캠을 돌아다녀. 오전 1시가 될 때 풍선이 아직도 2층에 있다면, 넌 죽을 거야.
You must find and click a balloon on Floor 2, you can only see it when it's dark (not using the flashlight). It will float around the entire floor, moving across cameras. If it's still there when the clock hits 1AM, you're dead.
펀코의 상품인 미니 피규어이다.
2.24.11. Glow Nightmare Freddy(글로우 나이트메어 프레디)O[편집]

어둡고 작은 나이트메어 프레디가 너의 사무실에 나타나서 점점 더 거대해지고, 더 밝아지며, 더 무서워지고, 더 가까워지면 널 죽일 거야. 넌 이것을 멈추려면 그를 20번 클릭해야 해.
Glow Nightmare Freddy appears to be a simple recolor of Nightmare Freddy, being that his entire body has been colored to a neon glowing green, similar to the other glow characters. He also lacks the rough and dirty textures on his body. And finally, Glow Nightmare Freddy has black eyes, brown shining irises, and white pupils.
펀코의 미니 피규어 상품이다.
2.24.12. Glow Mr. Hippo(글로우 히포 씨)X[편집]

그는 네가 손전등을 켜고 있을 때마다 너의 사무실에서 충전을 할거야. 손전등 사용을 멈추면, 그는 너에게 점프스케어를 하고 너의 전기를 빼앗을 거야. 그가 얼마나 충전했느냐에 따라, 그가 더 많은 전기를 빼앗아 충전하게 해줘.
He will charge in your office whenever you have the flashlight on. When you stop using the flashlight, he will jumpscare you and take away a bit of your power, depending on how charged he is, taking more power the more he charges.
글로우 히포 씨는 미스터리 미니로 등장하는 미스터 히포의 글로우 버전이다.
2.24.13. Endoskeleton Freddy(엔도스켈레톤 프레디)O[편집]

환풍구 시스템 아이콘
점프스케어
환풍구 덫을 놓으면 그가 활성화 되지 않은 덫에 곧바로 나타날 수 있어. 네가 그에게 덫을 걸면 그는 너를 죽일 거야. 무소음 환기를 켜면 그는 떠날 거야.
After you put down a Vent Snare, there is a chance he will appear directly on an unactivated snare. If you put a snare over him, he will kill you. Turning on the Silent Ventilation will make him leave.
이름 그대로 프레디의 내골격으로, 원본은 펀코에서 판매중인 미니 피규어 시리즈의 상품이다.
2.24.14. Games Springtrap(게임 스프링트랩)X[편집]

하룻밤에 한 번씩 그는 너의 사무실에 나타나 당신에게 그의 고가 상품 중 하나를 사게 할 거야. 제품을 클릭해서 구입해. 그렇게 하지 않으면, 그는 천천히 당신의 파즈코인을 빼앗을 거야.[86]
Once per night he will appear in your office and make you buy one of his overpriced merchandise. Click the product to buy it. If you don't, he will slowly take away/drain your Faz-Coins for the rest of the night.
게임 스프링트랩 Funko POP!의 피규어다.
2.24.15. Cuppen(컵펜)X[편집]

임무 시스템에 나타났을 때
상품 카운터(캠 07)에서 무언가를 구매할 때마다 그는 임무 시스템에 나타날 거야. 구입한 가격에 4를 곱한 숫자를 입력하고 Yes를 선택해야 해. 잘못된 번호를 입력하거나 입력하지 않으면 밤새도록 상품 카운터를 사용할 수 없을 거야.
Whenever you buy something from the Prize Counter (CAM 07), he'll appear on the Task System. Select the number that is the price of what you bought times 4 and press YES. Writing the wrong number or not doing it will block you from using the Prize Counter for the rest of the night.
나이트메어 컵케이크가 달려있는 펜으로, 펀코의 상품이다. 이 녀석에게 당하면 나이트메어 보니와 나이트메어 맹글,서커스 베이비를 막을 수 없게 된다.
2.24.16. Action Figure Lolbit(액션 피규어 롤빗)X[편집]

카메라를 바꿀 때, 녀석의 팝업이 나타날 때가 있는데, 네가 카메라를 바꾸는 것을 방해할 거야. L-O-L을 입력하면 녀석이 사라지고 카메라를 다시 바꿀 수 있어.
When switching cameras, there is a chance for their pop up to appear, preventing you from changing cameras. Type L-O-L to make them disappear and be able to switch cameras again.
실제로 판매중인 펀코의 롤빗 액션 피규어다.
2.24.17. TV Lolbit(TV 롤빗)X[편집]

카메라를 바꾸면 그녀가 나타날지도 몰라. 그녀가 나가게 하려면 카메라를 내려놔. 그렇지 않으면 왼쪽 문과 오른쪽 문 컨트롤이 몇 초간 L과 O에 덮어써질 거야.
When you change cameras, she may appear. Put down the monitor to make her leave, otherwise your Left Door and Right Door controls will be overwritten to L and O for a few seconds.
실제로 판매중인 펀코의 상품으로, 펀코 팝!과 미니 피규어 시리즈 상품에서 가져왔다.
2.24.18. Funko Dark Springtrap(펀코 다크 스프링트랩)O[편집]

그는 불 위에 있는 게 멋지다고 생각하기 때문에 불 위에 있는 것을 좋아해. 그가 너의 사무실에 들어가서 널 공격하려 할 때, 마우스 스크롤 휠을 사용해서 소화기를 사용해. 그는 그의 불길이 꺼지는 걸 원치 않기 때문에 재빨리 떠날 거야.
He prefers to stay on fire because he thinks it's cool. When he tries to attack you by entering and waiting in your office, use the scroll wheel to use the fire extinguisher. He will quickly leave, as he does not want his flames to be extinguished.
펀코의 상품이다.
2.25. quidd[편집]
2.25.1. Lil'Devil Freddy(릴 악마 프레디)O[편집]

그는 1층 왼쪽 복도로 너에게 접근 할 거야. 그가 가까이 있을 때, 무서운 음악이 연주되기 시작할 것이고, 이렇게 되면 알려지지 않은 힘이 너의 카메라에 성스러운 물병을 테이프로 붙일 거야. 릴 악마 프레디를 떠나게 하려면 CAM 01 버튼에 성스러운 물을 클릭해서 드래그 해야 해.
He'll come down the left hall on F1. When he's close scary music will begin playing, luckily when this happens an unknown force will tape a bottle of holy water to your monitor. To banish Lil'Devil Freddy you must click and drag the holy water onto the Cam01 button.
퀴드의 이모티콘이다.
2.25.2. Lil'Devil Bonnie(릴 악마 보니)X[편집]

그는 가끔 오른쪽 문에 나타나서 빨간 연기를 내뿜기 시작할 거야. 만약 너의 마우스 커서가 연기 위를 맴돌고 있다면, 그것이 너의 전기를 아주 빨리 닳게하기 시작할 거야! 오른쪽 문을 닫으면 연기가 커지는 것을 막지만 릴 악마 보니를 내쫓지는 못해. 릴 악마 보니를 떠나게 하려면, 넌 카메라에 편리하게 놓여진 성스러운 물 테이프를 사용해서 그것을 CAM 02 버튼 위에 놓아야 해.
He'll occasionally appear in the right doorway and start breathing red smoke. If your mouse cursor is hovering over the smoke, it'll start draining your power really quickly! Closing the right door stops the growing of the smoke but doesn't get Lil'Devil Bonnie out. To get Lil'Devil Bonnie to go away you must use the conveniently placed holy water tape onto your monitor and put it over the Cam02 button.
퀴드의 이모티콘이다.
2.25.3. Lil'Devil Chica(릴 악마 치카)X[편집]

그녀는 파티룸 A에 나타날 거야. 그녀가 나타나면, 빨간색의 큰 6이 너의 시야를 가리기 시작할 거야. 카메라에 테이프로 붙여 놓은 성스러운 물을 가져다가 CAM 07 위에 올려서 그녀를 떠나게 해.
She'll appear in Party Room A. When she does, big red sixes will start covering your vision. Take the conveniently placed holy water taped onto your monitor and put it over the Cam07 to banish her.
퀴드의 이모티콘이다.
2.25.4. Lil'Devil Foxy(릴 악마 폭시)X[편집]

그는 해적 코브 카메라에 나타날 거야. 왼쪽 상단 모서리에 머리가 번쩍일 거야. 카메라 테이프로 붙여진 편리한 성스러운 물을 CAM 05 버튼 위에 올려놔. 만약 그가 너무 오래 머무르면, 너의 모든 문은 빠르게 열고 닫히기 시작할 거야. 사무실 전기 충격을 한 번 사용해서 일시적으로 지연시킬 수 있고, 이후 완전히 나아질 때까지 다시 시작될 거야.
He'll appear on the Pirate Cove camera, indicated by his head flashing in the top left corner. Take the convenient holy water taped onto your monitor and put it over the Cam05 button. If he stays for too long, all of your doors will begin rapidly opening and shutting. You can use the office shock once to temporally delay this, after which it will begin again until he is taken care of fully.
퀴드의 이모티콘이다.
2.25.5. Lil'Devil Foxy Glow(릴 악마 폭시 글로우)X[편집]

그는 너의 손전등을 가지고 있고, 계속 해서 손전등을 폭발시키려고 시도 할 거야. 넌 그가 그럴수록 손전등의 빛이 점점 더 빨개지고 있다는 걸 알게 될 거야! E를 누르고 있으면 배터리를 교체하고 손전등의 상태를 재설정 할 거야.
He possesses your flashlight, attempting to permanently explode the flashlight, you'll know he's nearing when the light of your flashlight is progressively becoming more and more red! Hold E to swap the batteries and reset his progress.
퀴드의 이모티콘이다.
2.25.6. Lil'Devil Toy Freddy(릴 악마 토이 프레디)X[편집]

이 토이 프레디는 사실 게임의 프로야. 그는 조명 시스템에 있는 그의 컴퓨터에 있을 거야. 때때로 그는 큰 파일을 다운 받아서 당신의 인터넷 수치를 고갈시키고 카메라의 시스템이 로딩되는 데 더 오랜 시간이 걸리도록 만들어 그의 다운을 멈춰야 하고, 조명 시스템의 컴퓨터 위에 마우스를 올려놓고 그것을 클릭해서 전원을 끄면 돼. 그렇게 하면 그가 널 쳐다보고 그의 기분은 매우 슬퍼질 거야 :(.
This version of Toy Freddy is actually a champion at gaming, he'll be on his computer in the light system. Occasionally he will download a large file, which will deplete your internet meter and make the systems on the monitor take longer times to load, to get him to stop, mouse over the computer in the light system and click on it to power it off. Doing so will cause him to look at you and look very sad :(.
퀴드의 이모티콘이다.
2.25.7. Lil'Devil Mangle(릴 악마 맹글)X[편집]

환풍구 덫과 문에 면역인 상태로 환풍구 시스템을 통해 이동 할 거야. 문이 닫혔을 때 문이 열릴 때까지 기다릴 거야. 문이 열리는 순간 그녀는 환풍구 밖으로 머리를 내밀어 문을 닫을 수 없게 만들고, 그녀의 머리 위에 빨간 6이 줄지어 나타날 거야. 넌 6을 없애려면 7 키를 연타해서 사라지게 해야 해(한 번 누르기 = 한 번 제거하지만 계속 나타나.). 6이 모두 사라지면 그녀는 다시 돌아갈 거야.
She moves through the vent system, immune to the vent snare and door. If the door is closed when she reaches it she will wait until it's opened. The moment the door is opened she'll stick her head out of the vent, making it so you can't close the door anymore, and an array of red 6's will appear above her head, you must spam the 7 key to get rid of the 6's (one press = one removal, but they keep appearing), once all of the 6's are gone she will reset.
퀴드의 이모티콘이다.
2.25.8. Lil'Devil Puppet(릴 악마 퍼펫)X[편집]

Fury's Rage 층에 작은 뮤직 박스의 태엽이 점점 풀릴 거야. 발로 차면 다시 감길 거야. 만약 그것이 완전히 감긴다면, 카메라와 마스크 버튼은 뮤직 박스가 다시 완전히 감길 때까지 화면을 움직이며 회전하기 시작할 거야.
A small music box will be on the Fury's Rage floor, slowly winding down. Kicking it will wind it back up. If it winds down all the way, the monitor and mask buttons will start moving and rotating around the screen until the music box is wound to full again.
퀴드의 이모티콘이다.
2.25.9. Lil'Devil Springtrap(릴 악마 스프링트랩)O[편집]

세 시스템 중 하나가 고장나면 재부팅할 텍스트가 녹색이 아닌 빨간색이 되는 경우가 종종 있을 거야. 빨간색 텍스트를 좌클릭 하면 릴 악마 스프링트랩이 널 죽일 거야. 텍스트를 마우스 우클릭로 클릭해서 빨간색을 제거 해.
Occasionally when one of your three systems goes out, the text to reboot it will be red instead of green. If you left-click the red text Lil' Devil Springtrap will kill you. Right click the text to remove the redness.
퀴드의 이모티콘이다.
2.25.10. Nightlight Bonnie(나이트라이트 보니)O[편집]

조명 시스템에서의 모습
점프스케어
그는 조명 시스템에서 머물고 있고 어둠 속에서 빛나고 있을 거야. 네가 너무 오랫동안 그의 얼굴에 조명을 오래 비추고 있으면, 그는 널 죽여버릴 거야. 시스템을 바꾸고 조명 시스템으로 다시 오면 때때로 있는 위치를 바꿀 거야.
He stays on the Light System and will glow in the dark, meaning you can see him without having your flashlight on him. If you shine your flashlight over his face for too long, he will jumpscare you. He will sometimes switch positions if you switch systems and switch back to the Light System.
퀴드 앱의 3D 이모티콘이다.
2.25.11. Tur-Chica(터치카)O[편집]

오전 5시에 오른쪽에 포크와 함께 음식이 떨어질 거야. 음식이 포크에 수직선으로 도달하면 포크를 던져서 음식을 잡기 위해서 다른 곳을 눌러야 해. 음식이 너무 많이 바닥에 떨어지면 넌 죽을 거야.
At 5AM, food will drop down from the top of the screen, along with a fork on the right. If the food reaches the vertical position of the fork, press SPACE to throw the fork and catch the food. If too much food falls to the floor, you will die.
퀴드 앱의 이모티콘이다. 이름의 유래는 Turkey(칠면조)+치카.
2.25.12. Quidd Puppet(퀴드 퍼펫)X[편집]

네가 전기를 조금씩 잃을 때마다 화면에 점점 선명해지고, 전기를 모두 잃어버리면 그것은 완전히 선명해져 있을 거야.
Everytime you lose a bit of power, The Puppet Cringe will form more and more on your screen, and eventually block the entire view once enough power is lost.
퀴드 앱의 이모티콘이다.
2.25.13. Soild Gold Endoskeleton(솔리드 골드 엔도스켈레톤)X[편집]

그는 때때로 왼족 환풍구(CAM 06) 카메라에 나타날 거야. 글로벌 뮤직 박스를 켜서 그를 멀리 해. 환풍구에서 그를 막지 못하면, 그는 사무실에 들어올 거고 밤새 글로벌 뮤직 박스를 사용하지 못하게 할 거야.
He will sometimes appear in the Left Air Vent (CAM 06) camera. Turn on the Global Music Box to make him go away, If he gets out of the vent, he will enter your office and prevent you from using the Global Music Box the rest of the night.
퀴드 앱의 이모티콘이다.
2.25.14. Cake Animatronics(케이크 애니매트로닉스)O[편집]

그들 중 하나가 몇 초마다 커서 위에 나타날 거야. 곰이 나타나면 커서를 흔들어서 그를 떨어뜨려. 토끼가 나타나면 좌클릭을 연타 해. 병아리가 나타나면 우클릭을 연타 해.
One of them will appear above your cursor every couple of seconds. If it's the bear, shake your cursor to make him fall off. If it's the rabbit, spam-click the left mouse button. If it's the chicken, spam-click the right mouse button.
케이크 베어를 기반으로 한 애니매트로닉스들이다. 이후 퀴드 앱의 이모티콘이 되었다.
2.25.15. Quidd Nightmarionne(퀴드 나이트마리오네)O[편집]

녀석은 밤새도록 오르골 소리를 울려퍼지게 할 거야. 음악이 멈추면 글로벌 뮤직 박스를 켜서 다시 음악을 재생하게 해.녀석의 오르골 소리가 장시간동안 멈춰있으면, 녀석은 널 죽일 거야.
It will play its music box throughout the entire night. If you notice that it has stopped, turn on the Global Music Box to make the song resume. If its song hasn't been playing for a bit, you will be jumpscared.
퀴드 앱의 이모티콘이다.
2.25.16. Nightmare Springtrap(나이트메어 스프링트랩)O[편집]

오른쪽 환풍구 문을 열면, 그의 손이 오른쪽 환풍구에서 튀어나와 있을 거야. 그 때 오른쪽 환풍구 문을 닫으면 넌 죽어. 히터와 에어컨을 번갈아 작동시켜서 그의 손을 없애.
After opening the Right Vent Door, there is a chance his hand will appear reaching out from the right vent. If you close the door after that, you will die. Quickly alternate between the Heater and the Power A/C multiple times to get the hand away.
퀴드 앱의 이모티콘이다.
2.25.17. Quidd Funtime Freddy Duo(퀴드 펀타임 프레디 듀오[87])O[편집]

때때로, 양쪽에서 그가 투우사의 노래가 두 가지로 들릴 거야. 그를 막으려면 올바른 문을 닫아. 너의 전기가 50%가 되면, 그는 디지털 글로우 모습으로 변할 거고 그를 막으려면 반대쪽 문을 닫아야 할 거야.
Sometimes, you'll hear a few notes of his Toreador March playing from either side. Close the correct door to block him. After 50% power, he turns into his Digital Glow form and you must close the opposite door to block him.
퀴드 앱의 이모티콘이다. 사진을 보면 알겠지만, 원래 프레디 파즈베어에 펀타임 프레디와 비슷하게 채색한 것이다.
2.25.18. Digital Glow Yenndo(디지털 글로우 옌도)O[편집]

그는 토템 복도에 있을 거고, 발전기가 켜지면 점점 더 빛을 발할 거야. 그는 마침내 충분히 빛나면서 토템 복도를 떠날 거야. 일단 이런 일이 일어나면, 넌 그가 널 죽이기 전에 그를 돌려보내기 위해 사무실 전기 충격 버튼을 사용해야만 해!
He will be in the Totem Hall, glowing more and more when the Power Gen is on. He will eventually leave the Totem Hall upon glowing enough. Once this happens, you must use the office shock button to reset him before he kills you!
퀴드 앱에 나오는 이모티콘이다.
2.25.19. Mystery shadow Freddy(미스터리 섀도우 프레디)X[편집]

그는 무작위로 화면에 나타날 거야. 넌 그를 없애려면 선풍기를 빠르게 끄고 켜야 돼. 10초 후, 그가 공격하기 전까지 화면에 불투명하게 머물고 있을 거야.
He will appear on your screen randomly. You must turn the fan on and off quickly to make him fade out. After 10 seconds, he will stay at the opacity he was left at for the time until he decides to attack again.
퀴드 앱의 이모티콘이다.
2.25.20. Shadow Toy Freddy(섀도우 토이 프레디)X[편집]

그는 무작위로 너의 카메라를 한 시간 동안 까맣게 칠할 거야. 이걸 막거나 멈출 방법이 없어.
He will activate at random and make your cameras pitch black for an entire hour. There is no way to prevent or stop this.
Quidd 3D Pop! 피규어다. 토이 프레디의 섀도우 버전이다.
2.25.21. Crazed Shadow BB(광란의 섀도우 BB)O[편집]

조명을 너무 오래 켜면 2층에 나타나. 그가 널 죽이기 전에 재빨리 카메라를 닫아.
He will appear on Floor 2 if you have your Flashlight turned on for too long. Quickly close the monitor before he jumpscares you.
퀴드 앱에서 나온 FNaF MyMoji 캐릭터다. 원본인 BB와 다르게 하얗게 빛나는 눈과 뾰족한 이빨을 가지고 있다.
2.25.22. Neon Foil Chica(네온 포일 치카)O[편집]

그녀는 가끔 카메라를 내려놓은 후에 너의 사무실에 나타날 거야. 빨리 주방(CAM 04) 카메라로 가서 음악을 바꾸면 그녀가 떠나게 될 거야. 만약 네가 제때에 그렇게 하지 않는다면, 그녀는 널 죽일 거야.
She will sometimes appear in your office after putting down the monitor. Quickly go to the Kitchen (CAM 04) camera and change the music to make her leave. If you don't do that in time, she will jumpscare you.
퀴드 앱의 이모티콘이다.
2.25.23. Neon Foil Nightmare Bonnie(네온 포일 나이트메어 보니)X[편집]

때때로 그는 오른쪽 문을 걸어 잠그고 그 문이 작동하지 못하게 할 거야. 문간의 어둠 속에서 그를 볼 수 있어. 그를 떠나게 하려면, 그에게 손전등을 껐다 켰다를 반복해.
Occasionally he will jam the Right Door and stop it from working. You can see him in the darkness of the doorway. To get him to go away, spam-click the flashlight on him.
퀴드 앱의 이모티콘이다.
2.25.24. Halloween Bonnie(할로윈 보니)O[편집]

파즈 코인의 수가 31개가 되면 스폰돼서 남은 밤 동안 활동 할 거야. 일단 스폰이 되면, 그는 아무 카메라에나 무작위로 등장할 거고, 너는 그의 점프스케어를 막기 위해 그를 피해야 할 거야.
If your Faz-Coins count ever reaches 31, he will spawn and remain active for the rest of the night. Once spawned, he will randomly appear on any camera, forcing you to look away to prevent his lethal attack.
퀴드 앱의 이모티콘으로, 잭 오 보니와 비슷한 할로윈 버전의 보니다. 다만 잭 오 보니와는 달리, 나이트메어 버전이 아닌 FNaF 1에 등장하는 보니를 베이스로 했다.
2.25.25. Halloween Foxy(할로윈 폭시)O[편집]

그는 조용한 화재진압 분위기와 함께 4층에 있는 복도 카메라에 무작위로 등장할 거야. 만약 그가 왼쪽 복도에 있다면, 온도를 80도 이하로 유지해. 만약 그가 오른쪽 복도에 있다면, 온도를 80도 이상 유지해. 이 규칙을 따르지 않으면 넌 죽음에 이를 거야.
He will randomly appear on either hall camera on Floor 4 along with quiet fire cracking ambience. If he's in the Left Hall, keep the temperature below 80 degrees. If he's in the Right Hall, keep the temperature above 80 degrees. Failing to comply will result in death.
퀴드 앱의 이모티콘으로, 할로윈 버전의 폭시다. 역시나 나이트메어 버전이 아닌 FNaF 1에 등장하는 폭시를 베이스로 했다.
2.25.26. Frozen Over Baby(냉동 베이비)O[편집]

하룻밤에 딱 한 번, 너의 온도는 60도 이하로 내려가기 시작할 거야. 지하 층 카메라를 확인해서 그녀가 사무실에 나타나게 한 다음, 손전등과 히터를 같이 사용하서 그녀를 녹여내. 온도가 0도 이하로 내려가면 넌 죽어 버릴 거야.
Once per night, your temperature will start to go below 60 degrees. Check the Basement camera to make her appear in your office, then use a combination of the flashlight and heater to make her melt. If the temperature goes below 0 degrees, you will die.
퀴드 앱의 이모티콘이다.
2.25.27. Frozen Over Ballora(냉동 발로라)O[편집]

그녀는 건물 반대편에서 노래를 부르면서 천천히 너에게 다가갈 거야. 그녀가 널 잡으면 널 죽일 거야. 온도를 높게 유지하면 그녀가 녹아서 처음 상태로 돌아갈 거야.
She will slowly move towards you while singing from the other side of the building. She will kill you if she gets to you. Keeping the temperature high will cause her to melt and reset to the start.
퀴드 앱의 이모티콘이다.
2.25.28. Frozen Over Yenndo(냉동 옌도)O[편집]

그는 온도가 70이 넘으면 카메라를 내려놓은 후에 너의 사무실에 무작위로 나타날 거야. 그를 떠나게 하기 위해 카메라를 다시 올려. 그가 그곳에 있으면, 그는 빠르게 사무실의 온도를 낮출 거야. 60도가 되면 넌 죽을 거야.
He will randomly appear in your office after pulling down the monitor when the temperature is above 70. Put the monitor back up to make him leave. When he's there, he will rapidly cool down the office. If it reaches 60, you will die.
퀴드 앱의 이모티콘이다.
2.25.29. Security Footage Freddy(보안 영상 프레디)O[편집]

그는 오락실에 있을 거고 네가 캠 시스템에 있지 않을 때마다 더 화를 낼 거야. 그의 눈이 점점 빨개질 거야. 네 개의 문을 모두 열었다 닫았다 하는 것을 반복하면 그는 마음을 가라앉힐 거야.
He will be in the Arcade Room and will get angrier and angrier whenever you are not on the Cam System, represented by his eyes turning red. Repeatedly opening and closing all four doors will cause him to calm down.
퀴드 앱의 이모티콘이다.
2.25.30. Security Footage Springtrap(보안 영상 스프링트랩)X[편집]

화면에 그의 얼굴이 나타나고 몇 초 동안 누르고 있는 키를 기록하기 시작 할 거야. 몇 초 후에 그는 그 시퀀스를 반빠른 개념으로 누른 한 다음 사라질 거야.
2.26. ILLUMIX[편집]
2.26.1. Purple Man Animatronic(퍼플 맨 애니매트로닉스)O[편집]

그는 데스 코인을 사용하는 즉시 사무실로 순간이동 할 거야. 넌 그가 떠날 때까지 10초 동안 마스크를 착용해야 해.
He will be summoned into the office immediately upon using the Death Coin. You must keep the mask on for 10 seconds until he leaves.
퍼플 맨 애니매트로닉(Purple Man Animatronic)은 일루믹스가 제작한 Auggies 2020 - Five Night's At Freddy's AR: Special Delivery - By Illumix 영상에 나오는 팬에 의해 만들어진 속임수다.. 그는 약 11초 후에 나타나는 속임수 영상 썸네일에서 볼 수 있다.
2.26.2. Nightmare JJ(나이트메어 JJ)O[편집]

그녀는 당신의 사무실에 머물 거고 때때로 일어설 거야. 그녀의 점프스케어를 피하려면 일어설 때 손전등을 그녀에게 비추지 않도록 해.
She will stay in your office and will sometimes stand up. Make sure to not shine your flashlight on her when she is standing up to avoid her jumpscare.
나이트메어 JJ는 Augies 2020 - Five Night's At Freddy's AR: Special Delivery - By Illumix의 일루믹스 영상에 나오는 팬에 의해 만들어진 속임수다. 약 11초 후에 나타나는 속임수 영상 썸네일에서 볼 수 있다.
나이트메어 JJ에 메커니즘은 나이트메어 BB에 메커니즘과 반대이다.
2.26.3. The Funny Moment(재미있는 순간)X[편집]

45초 대신, 게임 내 모든 시간은 52초가 걸릴 거야.
Instead of 45 seconds, every in-game hour will take 52 seconds.
재미있는 순간은 Augies 2020 - Five Night's At Freddy's AR: Special Delivery - By Illumix의 일루믹스 영상에 나오는 팬에 의해 만들어진 속임수다. 약 11초 후에 나타나는 속임수 영상 썸네일에서 볼 수 있다.
2.26.4. 최적화된 팝고즈(Optimized Popgoes)X[편집]

그는 4층의 왼쪽 또는 오른쪽 복도 카메라에서 코믹하게 거대한 금지 망치를 휘두르며 다가와. 4층 복도 카메라에 도착하면 맞는 문을 닫아. 그렇지 않으면 나머지 시간 동안 모드 중 하나를 '금지'할 거야.
He approaches from either the Left or Right Closet camera on F4, wielding a comically large Ban Hammer. Close the corresponding door when he gets to a F4 Hallway camera, otherwise he will 'ban' one of the modes for the rest of the night.
Dawko가 일루믹스의 사장의 인터뷰에서 등장한 팝고즈다.
2.26.5. ㅤX[편집]

그는 자신의 AI에 따라 점수를 뺄 거야. 그는 AI가 높을수록 더 많이 제거해.
He will subtract points, depending on his AI. The higher the AI, the more he removes.
ㅤ는 일루믹스의 FNAF AR 2020년 5월 Quick Draw Challenge Compilization 영상에 나온 인기 밈 버프 헬피의 조잡한 그림이다.
2.26.6. The Imposter(임포스터)X[편집]

그는 환풍구 시스템을 돌아다닐 거야. 만약 그가 환풍구 덫에 닿으면, 그는 환기구, 카메라, 소리 미끼 중 하나를 파괴할 거야. 그는 일단 문 앞에 도착하면 다시 돌아갈 거야. 카메라 또는 소리 미끼 오류 중에는 독성 수치가 증가하기 시작해.
He will roam the Vent System. If he hits a vent snare, he will sabotage either the ventilation, video or audio. He will reset to the beginning once he gets to the door. During video or audio errors, your toxic meter will start to increase.
임포스터는 어몽 어스의 주인공이다. Dawko와 Kirin의 Special Delivery 인터뷰에 언급됐다.[88]
2.26.7. Negate Rainbow Freddy(네게이트 레인보우 프레디)X[편집]

그는 너의 사무실에 무작위로 나타날 거야. 그를 클릭하면 사라져. 그렇지 않으면, 그는 너에게 점프스케어 하고 한 시간을 되돌려 보낼 거야.
He will randomly appear in your office. Click him to make him disappear. If you don't, he will jumpscare you and send you back an hour.
네게이트 레인보우 프레디는 FNaF AR SD의 광고에 나오는 프레디 파즈베어의 네게이트 레인보우 버전이다.
2.26.8. Negate Rainbow Bonnie(네게이트 레인보우 보니)X[편집]

그는 너에게 점프스케어 할 거고 오전 3시 동안 임의의 지점에서 시간을 1시간 전으로 돌릴 거야. 시끄러운 음악이 흘러나오기 시작하면 그가 너에게 점프스케어 한다는 걸 알게 될 거야. 저소음 환기를 켜서 그를 막아.
He will jumpscare you and turn back time to one hour before at a random point during 3AM. You will know when he's about to jumpscare when loud ambience music starts playing. Turn on the Silent Ventilation to stop him.
네게이트 레인보우 보니는 FNaF AR SD의 광고에 나오는 보니의 네게이트 레인보우 버전이다.
2.26.9. Negate Rainbow Chica(네게이트 레인보우 치카)X[편집]

분위기가 랜덤으로 재생 될 거야. 주방(CAM04) 카메라의 음악을 변경해야 해. 그렇지 않으면 그녀가 너에게 점프스케어하고 시간을 한 시간 전으로 돌릴 거야.
Ambience will begin to play at random. You must change the music on the Kitchen (CAM 04) camera or else she will jumpscare you and turn back time by an hour.
네게이트 레인보우 치카는 FNaF AR SD의 광고에 나오는 치카의 네게이트 레인보우 버전이다.
2.26.10. Negate Rainbow Foxy(네게이트 레인보우 폭시)X[편집]

그의 분위기가 재생되기 시작하면 3 층으로 가서 원숭이 방 카메라 버튼을 연타 클릭하여 그를 막아야 해. 분위기가 너무 오래 지속되면 그는 너에게 점프스케어를 하고 1 시간 전으로 시간을 되돌릴 거야.
Once his ambience starts playing, you must go to Floor 3 and spam-click the Monkey Room camera button to stop him. If the ambience plays for too long, he will jumpscare you and turn back time by one hour!
네게이트 레인보우 폭시는 FNaF AR SD의 광고에 나오는 폭시의 네게이트 레인보우 버전이다.
2.27. Misc. Mercnandise[편집]
2.27.1. FIGHT Bonnie(파이트 보니)O[편집]

오전 2시에 파란색 하트가 나타나서 화면 하단으로 떨어질 거야. 화살표 키로 하트를 이동시킬 수 있어. 기타들이 화면 하단을 이동할 거야. 하트가 기타들에 닿으면, 넌 죽을 거야.
At 2AM, a blue heart will appear and fall to the bottom of the screen. Use the left, right and up arrow keys to move. A bunch of guitars will move across the bottom of the screen. If the heart hits any of them, you will die.
공식 상품인 티셔츠에 나오는 흑백의 어드벤처 보니다. 언더테일 패러디답게, 파피루스의 패턴을 사용한다.
2.27.2. FIGHT Chica(파이트 치카)O[편집]

새벽 4시에 노란색 하트가 나타나고 커서에 의해 제어될 거야. 그에 이어서흑백 컵케이크 한 다발이 떨어질 거야. U를 눌러 그들을 쏴서 파괴 해. 만약 컵케이크가 화면의 하트나 하단에 닿는다면, 넌 죽을 거야.
At 4AM, a yellow heart will appear and be controlled by your cursor. A bunch of black and white cupcakes will fall down. Press U to shoot and destroy them. If the cupcakes hit the heart or the bottom of the screen, you will die.
공식 상품인 티셔츠에 나오는 어드벤처 치카의 흑백 버전이다.
2.27.3. FIGHT Toy Freddy(파이트 토이 프레디)O[편집]

마우스 커서가 새벽 5시에 빨간 하트가 될 거야. 그에 이어서 그가 피자 공격을 퍼부을 거야. 이 피자들에 너무 많이 맞으면 넌 죽을 거야.
Your cursor will become a red heart at 5AM. He'll throw pizza attacks out at it. Getting hit by too many of these pizzas will result in your death.
공식 상품인 티셔츠에 나오는 어드벤처 토이 프레디의 흑백 버전이다.
2.27.4. Jumpscare Game Freddy(점프스케어 게임 프레디)O[편집]

그는 조명 시스템에 머물면서 소음 수치 2칸을 추가하는 음악을 들려줄 거야. 그는 더 이상 피자가 없을 때 멈춰. 만약 그의 눈이 감겼다면, 넌 피자를 클릭해서 상자에서 꺼낼 수 있어. 만약 그의 눈이 떠진 상태에서 네가 피자를 클릭한다면, 그는 널 죽일 거야.
He stays in the Light System, playing music which will add 2 blocks to the noise meter. He will stop when he has no more pizza. If his eyes are closed, you can click the pizzas to take them out from the box. If his eyes are open and you click a pizza, he will kill you.
실제로 판매중인 'Five Nights at Freddy's Jumpscare Game'라는 이름의 장난감 속의 프레디다.
2.27.5. Nightmare Springtrap Frightlight(나이트메어 스프링트랩 공포손전등)X[편집]

네가 가지고 있던 손전등이 스프링트랩 사진으로 바뀔 거야. 하지만 손전등에서 스프링트랩을 키는데 필요한 추가 전기 때문에 손전등을 켤 때마다 약간씩 지연이 되겠지.
Your flashlight will turn into a photo of Springtrap, however due to the extra energy needed to project Springtrap from the flashlight, the flashlight has a bit of delay whenever you turn it on.
실제로 판매중인 손전등 장남감에서 가져왔다. 손전등을 키면 스프링트랩의 모습이 비춰지는 장남감으로, 메커니즘도 그대로 가져왔다.
2.27.6. Cereal Freddy(시리얼 프레디)O[편집]

하룻밤에 한 번, 그는 조명 시스템에 나타날 거야. 그가 나타날 때, 넌 반드시 조명 시스템에 흩어져 있는 네 가지 것들을 찾아서 클릭해야 해: 나이트메어 퍼프 한 상자, 우유 한 잔, 숟가락, 그리고 그릇. 너무 오래 걸리면 점프스케어를 해서 널 죽일 거야.
Once per night, he will appear in the Light System. When he does, you must find and click 4 things scattered around in the Light System: a box of Nightmare Puffs, a glass of milk, a spoon and a bowl. Taking too long will result in a jumpscare.
실제로 판매하는 'Nightmare Puffs'라는 이름의 시리얼 상자에 그려져있는 프레디의 모습. 메커니즘도 그대로 가져왔다.
2.27.7. Game Over Freddy(게임 오버 프레디)O[편집]

가끔, 3층의 정전기기가 녹색으로 변해. 레버를 당겨 정상으로 되돌려. 너무 오랫동안 녹색이면 게임 오버 프레디가 널 죽일 거야.
Sometimes, the static on Floor 3 will turn green. Pull the Lever to make it turn back to normal. If it is green for too long, Game Over Freddy will kill you.
Bioworld사의 상품이자 실제로 판매중인 티셔츠의 디자인으로 그려져 있는 프레디.
2.27.8. Split Face(분열된 얼굴)O[편집]

녀석의 내골격은 네 앞에 있는 벽에 있을 거야, 에너드 마스크 바로 옆에 말이야. 1층 카메라를 보면 프레디 파즈베어의 일부분이 내골격에 나타나. 2층 손전등을 사용하면 내골격에 보니의 일부분이 나타나. 3층의 소리 미끼를 사용하면 치카의 일부분이 내골격에 나타나게 돼. 4층 전기 충격을 사용하면 내골격에 폭시의 일부분이 나타나. 아무것도 하지 않으면 몇 초 후에 부품이 사라져. 4개의 부분이 한꺼번에 다 나오면 넌 죽을 거야.
Its endoskeleton will stay on the wall in front of you, right next to the Ennard mask. Watching any Floor 1 camera will make the Freddy Fazbear part appear on the endoskeleton. Using the Floor 2 flashlight will make the Bonnie part appear on the endoskeleton. Using the Floor 3 audio lures will make the Chica part appear on the endoskeleton. Using the Floor 4 controlled shock will make the Foxy part appear on the endoskeleton. The parts will later disappear after a few seconds if you don't do anything. If all 4 parts are all there at once, you will die.
Bioworld사의 상품이자 실제로 판매중인 티셔츠의 디자인으로 그려져 있는 프레디 파즈베어, 보니, 치카, 폭시의 얼굴이 합성된 모습이다.[89]
2.27.9. Poster Electrobab(포스터 일렉트로밥)X[편집]

그녀의 목소리가 들리면, 그건 그녀가 4층 환풍구(CAM 07)에 나타나서 너의 전기를 빼기 시작했다는 걸 의미해. 그녀를 떠나보내려면 두 번 전기 충격을 줘.
When you hear her voice, it means she has appeared in the Vent (CAM 07) on Floor 4 and is beginning to drain your power. Shock her twice to make her go away.
UCN의 단체사진에서 등장했던 일렉트로밥의 모습. 노란 눈 대신 보라색 눈을 가졌다.
2.27.10. Calendar Fredbear(달력 프레드베어)O[편집]

오전 1시에 조명 시스템에서 캐릭터들의 머리가 나타나. 한 캐릭터를 클릭한 다음 똑같은 캐릭터를 한 번 더 클릭하여 일치시켜. 일치하지 않거나 새벽 2시 이전에 퍼즐을 완료하지 않으면 달력 프레드베어가 너에게 점프스케어 할 거야. 클릭할 수 있는 머리는 보니, 나이트메어 프레드베어, 구형 프레디, 플러시킨들, 가상현실 팬텀 폭시야.
At 1AM on the Light System, character heads will appear. Match them by clicking one, then clicking another of the same character. If you mismatch them or don't complete the puzzle before 2AM, Calendar Fredbear will jumpscare you. The heads that can be matched are Bonnie, Nightmare Fredbear, Withered Freddy, Plushkins, and Virtual Phantom Foxy.
DateWorks에서 제작한 2018년도 달력 속에 등장했던 나이트메어 프레드베어의 모습. 원본 달력에서도 그렇지만 엉뚱하게도 나이트메어 프레드베어의 머리에 구형 프레디의 몸을 하고 있다.
2.27.11. Real Fredbear & Evil MatPat(진짜 프레드베어와 악마 맷팻)X[편집]

맷팻 튜브 텀블러 성지는 무대장[90]
에 있어. 넌 52개의 파즈코인을 기부할 수 있어. 미니게임(FNaF 4 게임플레이)는 밤이 끝날 무렵에 시작돼. 보통 52분 동안 지속되며, 기부할 때마다 1분씩 단축될 거야.
The MatPat Tube Tumbler Shrine is on the Show Stage. You can give it Faz-Coins, up to 52. The minigame (FNaF 4 gameplay) begins at the end of the night. Normally, it lasts 52 minutes, each donation shortening it by 1 minute.
2.27.12. True Sans(진정한 샌즈)O[편집]

그는 밤이 끝나는 순간 너와 싸움을 시작할 거야. 싸우는 동안, 그의 대표곡 메갈로바니아가 끝날 때까지 빨간 하트를 사용해서 그의 공격을 피해야만 해. 그러면 넌 이길 수 있어.
He will begin a FIGHT with you the moment the night would normally end. During the fight, you must dodge his attacks using a red heart until his signature song MELAGONAVIA finishes playing, at which point you will win the night.
샌즈가 정말로 Ness라는 이론을 바탕으로 만들어진 캐릭터다.
2.27.13. Construction Molten Freddy(건축 몰튼 프레디)O[편집]

그는 조명 시스템에 머무르고 그의 눈은 조명 시스템이 켜질 때마다 서서히 빨개질 거야. 너의 조명을 그의 눈에 비춰서 그게 다시 노란색으로 변하게 해. 완전히 빨개지면 죽어.
He stays on the Light System and his eye will slowly turn red whenever the light system is on. Shine your light on his eye to make it turn back into yellow. If it turns completely red, you die.
건축 몰튼 프레디는 맥팔레인 샐비지 룸 건축 세트에 나오는 몰튼 프레디다.
2.28. Other[편집]
2.28.1. Steel Wool Studios(스틸 울 스튜디오)X[편집]

그들은 밤의 시작을 늦출 거야. 밤의 게임 플레이는 정상적으로 작동하지만 타이머는 몇 초가 지날 때까지 0초에 고정 되어있을 거야.
They will delay the start of the night. The gameplay of the night will work as normal, but the timer will be frozen on 0:00:00 until a few seconds pass.
FNaF HW와 FNaF SB를 만든 회사다.
2.28.2. Lighting(조명)X[편집]

그는 밤새도록 당신의 사무실에서 혼란스러운 네온 효과를 만들어 낼 거야. 이걸 막을 방법이 없어.
He will create disorienting neon effects in your office throughout the night. There is no way to prevent or stop this.
조명은 실용적이거나 미적인 효과를 얻기 위해 의도적으로 빛을 사용하는 거다. 빛이 반사되는 물체 없이는 조명 자체를 보여줄 수 없어서, 개발자들은 그것을 위해 실제 모델을 사용해야만 했다. 개발자들은 가상현실 스프링트랩을 사용하기로 결정해서 아이콘이 스프링트랩이 됐다.
2.28.3. Fanart(팬아트)O[편집]

선풍기가 너무 오래 켜지면 다양한 종류의 팬아트가 다양한 카메라에 등장하기 시작할 거야. 팬아트를 사라지게 하려면 팬아트를 봐야 해. 팬아트가 너무 많이 소환되면, 넌 너의 종말을 경험하게 될 거야.
When the fan is on for too long, various types of Fanart will begin to appear on various cameras. You must look at the Fanart to make it go away. If too much Fanart is summoned, you'll experience your end.
팬아트는 공식 FNaF 스팀 포스트에서 나온 것으로, 모든 팬아트는는 스콧에 의해 기술적으로 소유된다고 한다. 불행히도, 지금까지 만들어진 모든 팬아트는 게임에 추가될 수 없기 때문에 이 캐릭터는 모두를 포함한다.
2.28.4. Baldi(발디)O[편집]

그는 GPS 시스템을 통해 널 향해 움직일 거야. 작업 시스템에 수학 문제가 있을 거야. 질문에 정확하게 대답하면 속도가 낮아지지만 잘못 대답하면 속도가 두 배로 빨라져. 살아남을 수 있는 유일한 방법은 충분한 질문에 정확하게 대답하는 거야.
He'll move towards you on the GPS System. There'll be math questions on the Task System. Answering a question correctly will half his speed, but answering wrong will double his speed. The only way to survive is to answer enough questions correctly.
발디는 발디의 기본 교육과 학습, 발디의 기본 플러스의 주요 적이다. 발디를 공식적인 FNaF 캐릭터로 만드는 2019 MatPat 스트림 7:14:16초의 FiS 2 부분에 언급됐다.[91]
2.28.5. The Spagheti Fox(스파게티 여우)O[편집]

스파게티 여우는 환풍구 덫과 문에 면역인 상태로 환풍구 시스템을 통해 다가갈 거야. 만약 그의 눈이 앞쪽 환풍구에서 보인다면, 그녀가 사무실에 들어가지 못하도록 재빨리 마스크를 쓰고 소음 수치를 최대로 높이고, 그녀를 쫓아내.
The Spagheti Fox moves through the Vent System, immune to the snare and door. If you see his eyes in the front vent, quickly put on the mask to prevent her from getting into the office, maxing out your noise meter, and eventually ending your run.
Ultra Custom Night의 기부자 Sush가 그린 맹글의 그림이다.
2.28.6. Eminem(에미넴)O[편집]

에미넴은 그의 계획이 효과가 없다면 때때로 그가 바꿀 네 가지 전략을 가지고 있어. 이 모든 것을 막지 못하면, 넌 그에게 죽어.
에미넴은 사무실에서 재킷을 입고 소음 수치를 올리며 프리스타일을 시작할 거야. 온도가 높으면 다른 전략으로 옮겨갈 거야.
그는 그의 주크박스를 통해 시끄러운 음악을 틀면서 소품 저장소[92]
카메라에 머무르고 있어. 박스 스테이션 모드로 전환하면 테크노 음악을 틀게 되는데, 그는 그것을 싫어해서 다른 전략을 시도할 거야.
그는 커서한테 쥐를 던질 거야. 가능한 한 쥐들을 피해. 잠시 후, 그는 또 다른 전략을 세울 거야.
그는 티저 프레디와 드레드베어와 비슷하게 1층의 왼쪽 또는 오른쪽 복도로 다가오니 그가 있는 곳의 적절한 문을 닫아야 해.
Eminem has four strategies that he will sometimes change if his plan does not work. If you fail to prevent all of these, you die to him.
Eminem will start to freestyle in jacket in the office, raising the noise meter. High temperature will make him move onto an another strategy.
He stays in the Prop Storage camera, playing loud music through his jukebox. Switching to The Box Station mode will make it play techno music, in which he hates it and goes to an another strategy.
He will throw rats into the cursor. Avoid them much as possible. After a while, he plans an another strategy.
He will walk through the left and right hallway of F1, similar to Teaser Freddy and Dreadbear, close the appropriate door on where he is.
3. 업데이트 예정 애니매트로닉스[편집]
3.1. Dark Blacklight Freddy(다크 블랙라이트 프레디)O[편집]

왼쪽 문에서 빛나는 눈이 보이면 위로 자외선 손전등(손전등을 사용하는 동안 우클릭을 하면 자외선 손전등이 켜짐)을 들고 있으면 더 밝은 색깔로 빛나기 시작할 거야. 그 눈이 충분히 밝아진 다음에 문을 닫으면, 그는 떠날 거야. 만약 쫓아내는 데 너무 오래 걸린다면 그는 널 죽일 거야.
When his glowing eyes become visible in the left doorway, hold the UV Flashlight (right-click while using the flashlight) over him and his brighter colors will start to glow. After they're bright enough and the door gets closed, he will leave. If you take too long he will kill you.
FNaF의 2021년 달력에 등장하는 프레디의 다크 블랙라이트 버전이다.
3.2. Chocolate Chica(초콜릿 치카)O[편집]

그녀는 모든 방에 초콜릿 바가 있는지 확인하면서 2층을 걸어다닐 거야. 초콜릿 바를 클릭하면 먹을 수 있어. 만약 모든 방에 초콜릿 바가 있다면, 초콜릿 치카는 너의 사무실로 들어와서 널 죽일 거야.
She walks around on Floor 2, making sure every room has a chocolate bar. You can click the chocolate bars to eat them. If every room has a chocolate bar, Chocolate Chica will have nowhere else to go but your office (you will die.)
FNaF의 2021년 달력에 등장하는 치카의 초콜릿 버전이다.
3.3. Blacklight Foxy 5(블랙라이트 폭시 5)O[편집]

그는 작업 시스템에서 틱택토 게임을 하고 있을 거야. 그의 차례가 끝나고 너의 차례가 올 거야. 만약 너가 두 번 연속으로 놓는다면, 그는 너가 부정행위를 했다 판단하고 널 죽일 거야. 하지만 놓는 시간이 너무 오래걸리면 연속으로 여러 번 놓을 수 있어. 만약 그가 이긴다면, 그는 널 죽일 거야. 만약 너가 이기거나 그냥 가만히 있는다면, 넌 살게 될 거야.
He'll be playing a game of tic-tac-toe on the task system. You're able to take your turn after he takes his. If you go twice in a row, he will kill you for cheating. However, he is able to go multiple times in a row if you take too long to do your move. If he wins, he'll kill you. If you win or get a stalemate, you'll live.
FNaF 2021년 달력에 등장하는 폭시의 블랙라이트 버전 중 하나다.
3.4. Blacklight Bonnie 2(블랙라이트 보니 2)X[편집]

그의 아이콘, 테두리, AI 번호의 복제본이 DVD 로고처럼 화면을 따라 튕겨나갈 거야. AI 레벨은 밤부터 적절한 양의 포인트를 떼어내며 AI 번호가 음수로 내려갈 거야. 아이콘을 마우스를 잡고 화살표를 클릭해야 AI 레벨을 다시 올릴 수 있어.
A replica of his icon, border, and ai number will bounce around the screen like a DVD logo. The AI level will constantly go down, even below zero, which takes off the appropriate amount of points from the night. You must catch and mouse over the icon, and click on the arrow to raise the AI level back up.
FNaF 2021년 달력에 등장하는 보니의 블랙라이트 버전 중 하나다.
3.5. Candy Cane Foxy(사탕 지팡이 폭시)O[편집]

사탕 지팡이가 마우스 커서 위에서 균형을 잡을 거야. 만약 그것이 떨어지면 그것은 땅에 떨어져서 튕길 것이고 사탕 지팡이 폭시가 너를 죽일 거야.
A candy cane will be balancing on top of your mouse cursor. If it falls off it will hit the ground and snap and Candy Cane Foxy will kill you.
FNaF 2021년 달력에 등장하는 폭시의 사탕 지팡이 버전이다.
3.6. Blacklight BB(블랙라이트 BB)O[편집]

때때로 그의 얼굴은 손전등에 보일 거야. 손전등(손전등을 사용하는 동안 우클릭을 하면 자외선 손전등이 켜짐)을 자외선 모드로 바꿔 빨리 그를 없애야 해. 만약 너가 제시간에 이것을 하지 않으면 그는 널 죽일 거야.
Occasionally his face will be visible on the flashlight light. You have a limited amount of time to get rid of him by switching to UV mode on the flashlight (right-click while using the flashlight). If you do not do this in time he will kill you.
FNaF 2021년 달력에 등장하는 벌룬 보이의 블랙라이트 버전이다.
3.7. Strawberry White Chocolate Bonnie(딸기 화이트 초콜릿 보니)O[편집]

그가 밤에 활성화되면 딸기 화이트 초콜릿 보니가 무언가를 할 거야. 딸기 화이트 초콜릿 보니가 무언가를 하면 딸기 화이트 초콜릿 보니가 사무실에 나타나 무언가를 할 거야. 딸기 화이트 초콜릿 보니가 사무실에 있는 동안, 그는 다른 어디에도 갈 수 없어. 딸기 화이트 초콜릿 보니가 무언가를 하고난 후에는 다른 일이 일어날 거야. 딸기 화이트 초콜릿 보니가 무언가를 하는동안 사무실에서 없앨 수 있어. 죽지않는 게 좋을 거야, 왜냐하면 그것이 너를 타이틀 화면으로 돌아가게 하게 할 거야. 딸기 화이트 초콜릿 보니는 AI 레벨이 0으로 설정되면 밤에는 나타나지 않아.
If activated during the night, Strawberry White Chocolate Bonnie will do something. Once Strawberry White Chocolate Bonnie does it, Strawberry White Chocolate Bonnie will appear in the office and do a thing. While Strawberry White Chocolate Bonnie is in the office, he cannot appear anywhere else. After Strawberry White Chocolate Bonnie does this thing something else will happen. You are able to get rid of Strawberry White Chocolate Bonnie from the office by performing a certain action. Make sure not to die, as that will cause you to return to the title screen. Strawberry White Chocolate Bonnie does not appear during the night if his AI level is set to 0.
FNaF 2021년 달력에 등장하는 보니의 딸기 화이트 초콜릿 버전이다.
3.8. Blacklight Freddy 4(블랙라이트 프레디 4)O[편집]

그는 FNaF 사소한 퀴즈를 내기 위해 매 시간마다 나타날 거야. 정답을 맞추면 100점을 주거나, 잘못 대답하거나, 너무 오래 걸리면 100점을 빼앗을 거야. 마지막 문제를 맞히면 300점을 주지만 틀리면 500점을 빼앗을 거야.
He pops up every hour to ask a FNaF trivia question. Answering correctly gives you 100 points, answering incorrectly or taking too long takes away 100. Answering the final question correctly gives you 300 points instead, but takes away 500 if you get it wrong.
FNaF 2021년 달력에 등장하는 프레디의 블랙라이트 버전 중 하나다.
3.9. Dark Blacklight Chica(다크 블랙라이트 치카)X[편집]

그녀의 빛나는 눈이 오른쪽 출입구에서 보일 때, 그녀에게 자외선이나 일반 손전등을 사용하지 마. 그렇지 않으면 그녀는 5%의 전기를 빼앗을 거야. 그녀는 저소음 환기구를 사용하면 떠나는 속도가 높아질 거야.
When her glowing eyes become visible in the right doorway, do not use the UV or regular flashlight on her, or else she will take away 5% power. She will leave after a while, using the Sil. Ventilation speeds it up.
FNaF 2021년 달력에 등장하는 치카의 다크 블랙라이트 버전이다.
3.10. Blacklight Chica 1B(블랙라이트 치카 1B)O[편집]

블랙라이트 피그패치의 머리들이 Lumber. Co 층에 나타날 거야. 오른쪽에 있는 나무 구조물 위에 있을 거야. 왼쪽에는 커다란 새총과 그 위에 있는 블랙라이트 치카 1B의 머리가 보일 거야. 새총으로 그녀의 머리를 던져 밤이 끝나기 전에 피그 패치를 모두 죽여라. 그렇게 하지 않으면 너는 죽을 거야.
A group of Blacklight Pigpatch's heads will appear on the Lumber Co. Floor, resting on a wooden structure to the right. To the left you will see a big slingshot and Blacklight Chica 1B's head on it. Fling her head with the slingshot to kill all the Pigpatches before the night ends or you will die.
FNaF 2021년 달력에 등장하는 치카의 블랙라이트 버전이다.
3.11. Blacklight Freddy 3(블랙라이트 프레디 3)?[편집]

그는 환풍구 시스템을 통해 움직여, 아마 그럴 거야.
He moves through the vent system, I guess.
FNaF 2021년 달력에 등장하는 프레디의 블랙라이트 버전이다.
3.12. Blacklight Puppet 2(블랙라이트 퍼펫 2)X[편집]

Fury's Rage 층에 블랙라이트 뮤직 박스가 있을 거야. 너는 그것을 쳐서 그것을 없애야 해. 완전히 감기면 오류를 수정하는 버튼이 임의의 위치로 이동하기 시작할 거야.
There is a blacklight music box on the Fury's Rage floor. You must hit it to wound it up. If it winds down fully, the buttons to fix errors will begin moving to random places.
FNaF 2021년 달력에 등장하는 프레디의 블랙라이트 버전이다.
3.13. Chocolate Freddy(초콜릿 프레디)?[편집]

그는 2층 부품 및 서비스에 머물 거야. 온도가 너무 높으면 그는 녹기 시작할 거야. 잠시 후 그는 녹아내리는 초콜릿 프레디가 될 거야. 불행히도 녹아내리는 초콜릿 프레디는 공식적으로 존재하는 캐릭터가 아니라서 현실이 무너지기 시작할 거야.
He'll stay in the F2 Parts and Service. If the heat is too high he'll begin melting. After a bit he'll become Melted Chocolate Freddy. Unfortunately Melted Chocolate Freddy isn't a character that exists and reality will start to crumble.
FNaF 2021년 달력에 등장하는 프레디의 초콜릿 버전이다.
3.14. Blacklight Foxy 6(블랙라이트 폭시 6)O[편집]

그는 게임을 다시 프로그래밍해서 새벽 1시에 너를 죽일 거야. 임무 시스템에 들어가면 작은 임무 매니저와 그의 얼굴이 표시될 거야. UltraCustomNight.exe와 Ultra_Custom_Night.exe의 두 가지 작업이 있는데, 그 중 하나가 바이러스야. 바이러스를 선택하면 그는 걱정스러운 표정을 지을 거야. 바이러스를 종료하기 위해서 선택한 후 작업 종료 버튼을 클릭해.
He'll install a virus into your night, which reprograms the game so he will kill you at 1AM. Accessing the task system will show a small task manager and his face. There are two tasks, UltraCustomNight.exe and Ultra_Custom_Night.exe, one of these is the virus. You'll know which one is the virus as he will make a worried face if you have it selected. Click the end task button after selecting to end the virus.
FNaF 2021년 달력에 등장하는 폭시의 블랙라이트 버전 중 하나다.
3.15. Sparky the Dog(개 스파키)X[편집]

그는 AWDF 단축키를 사용해서 문을 닫을 때마다 시계에서 일정 시간(AI 레벨에 따라 최대 4초)을 뺄 거야.
He will substract some amount of time from the clock (depending on the AI level, can be up to 4 seconds) every time you close a door through the use of AWDF shortcuts.
개 스파키는 Five Nights at Freddy's Hoax의 원조이자 처음으로 나온 애니매트로닉스다. 클릭팀 영상에 출연한 적이 있고, 이것으로 사실 상 공식 캐릭터가 됐다.
3.16. Christmas Tree Bonnie(크리스마스 트리 보니)O[편집]

그는 왼쪽과 오른쪽 문의 틀을 크리스마스 조명으로 장식할 거야. 만약 한쪽 문의 불이 파란색으로 바뀌면, 그가 와서 너를 공격하기 전에 문을 닫아. 만약 한 문의 불이 빨간색으로 바뀌면, 문을 닫으면 안 돼. 그렇지 않으면 그는 너를 죽일 거야. 대신, 빨간 불을 다시 초기화하려면 충격 패널을 이용해야 해.
He'll decorate the frames of the left and right doors with Christmas lights. If one door's light turns blue, then close it before he comes and attacks you. If one door's light turns red, then do not close the door or he will kill you, instead, used the controlled shock to get the red lights to reset.
FNaF 2021년 달력에 등장하는 보니의 크리스마스 트리 버전이다.
3.17. HD Long Monty(HD 롱 몬티)X[편집]

그는 움직이며, 지켜보고 있어.
He moves, watching.
시큐리티 브리치의 소품이다.
3.18. Blacklight Freddy 1B(블랙라이트 프레디 1B)O[편집]

그는 밤이 시작되기 전에 너를 죽일 거야.
He will kill you before the night begins.
FNaF 2021년 달력에 등장하는 프레디의 블랙라이트 버전 중 하나다.
3.19. Dark Blacklight Foxy(다크 블랙라이트 폭시)O[편집]

그의 빛나는 눈이 왼쪽 문 밖에 보일 때. 자외선 손전등을 사용하거나 손전등을 켜면 널 바로 죽일 거야. 저소음 환풍기 안 켜져 있다면 말이야. 그는 잠시 후에 떠날 거야.
When his glowing eye become visible in the left doorway. Using the UV or regular flashlight on him will immediately kill you, unless you have the Sil. Ventilation active. He will leave after a while.
FNaF 2021년 달력에 등장하는 프레디의 블랙라이트 버전 중 하나다.
3.20. Blacklight BB 2(블랙라이트 BB 2)X[편집]

그는 4층 옷장에 서서 블랙라이트 코인을 요구할 거야. 블랙라이트 코인을 보고 받는 방법은 사무실에 있는 자외선 손전등을 사용해서 코인을 찾고 코인을 마우스로 가리키면서 클릭하는 거야. 새벽 4시까지 동전을 주지 않으면 시계는 멈출 것이고, 다시 시작하기 위해서는 동전을 지불해야 해.
He stands either F4 closet and demands Blacklight Coins. The way to see and get Blacklight Coins. is by using the UV flashlight in your office to search around for the coins and click on them while mousing over them. If you do not pay him the coins by the end of 4AM, he will freeze the clock and you have to pay him the coins in order for it to resume.
FNaF 2021년 달력에 등장하는 프레디의 블랙라이트 버전 중 하나다.
3.21. Kai(카이)X[편집]

새벽 1시에 충격 패널 버튼이 살아날 거야. 이걸 고치려면 카메라를 계속 열었다 닫았다를 반복해.그가 나타나서 마법의 바늘을 이용해서 너의 적이 될 거야. 이러한 효과는 한 시간이 지나도 멈추지 않고, 그저 밤이 끝날 때까지 계속될 거야
새벽 2시에 왼쪽 및 오른쪽 문이 살아나고 때때로 너의 명령을 무시할 거야. 충격 패널을 사용하여 초기화 시켜.
새벽 3시에 책상이 살아나서 왼쪽에서 오른쪽으로 움직이기 시작할 거야.
새벽 4시에 카메라가 살아나고 때때로 너에게서 떠날 거야. 다시 카메라를 보려면 사무실 어딘가에서 카메라를 찾아야 해.
새벽 5시에 손전등이 살아나고 가끔씩 무작위로 깜박이기 시작할 거야.
At 1AM, the controlled shock button will come alive and start shutting off on occasion requiring a camera flip for it to turn it back on.
He'll pop up and use his magic needle to turn some objects into your enemies. These effects don't stop after an hour, they just continue on until the end of the night.
At 2AM, the left and right doors will come alive and occasionally stop functioning. Use the controlled shock to reset them.
At 3AM, The desk will come alive and start to move left to right.
At 4AM, the monitor will come alive and will sometimes leave you, meaning to be able to acess it again you have to find it somewhere in the office.
At 5AM, your flashlight will come alive and start randomly flickering from time to time.
카이는 헥스라는 만화 와 헥스라는 이름의 회사의 주인공이자 마스코트다. 주로 다코 영상에 광고로 등장했고, 이로 인해 FNaF의 공식 캐릭터가 됐다.(...)
3.22. Wrapping Paper Chica(포장 종이 치카)X[편집]

그녀는 계속해서 충격 패널과 환풍구 레버를 포장해서 작동시킬 수 없게 만들 거야. 포장지를 클릭하면 한 조각씩 제거될 거야.
She will constantly wrap wrapping around the controlled shock and vent lever, making them inaccessible. Clicking on the wrapping paper will remove one piece.
FNaF 2021년 달력에 등장하는 치카의 포장 종이 버전이다.
3.23. Dark Blacklight Bonnie(다크 블랙라이트 보니)X[편집]

그의 빛나는 눈이 오른쪽 문에서 보이게 되면, 너의 일반적인 손전등은 비활성화 될 거야. 자외선 손전등을 충분히 오랫동안 그의 위에 두면 그의 밝은 눈이이 빛나기 시작할 거야. 눈이 충분히 밝으면 그는 떠날 거야.
When his glowing eyes become visible in the right doorway, your regular flashlight will become disabled, Hold the UV flashlight (right-click while keeping the flashlight button held) over him long enough and his brighter colors will start to glow. He will leave once they're bright enough.
FNaF 2021년 달력에 등장하는 보니의 블랙라이트 버전 중 하나다.
3.24. Gingerbread Freddy(생강쿠키 프레디)O[편집]

사무실의 생강쿠키 모형이 책상 위에 놓여 있을 거야. 네 개의 작은 문 중 하나에 작은 생강쿠키 프레디가 나타나면 생강쿠키를 클릭한 채 W, A 또는 D를 눌러 해당 생강쿠키 프레디가 있는 문을 닫으면 공격하지 않을 거야.
A gingerbread replica of the office sits on your desk. If a small Gingerbread Freddy appears in any of the four small doorways, click and hold on the gingerbread office and press W, A, or D to close the corresponding gingerbread door to thwart this attack in time.
FNaF 2021년 달력에 등장하는 프레디의 생강쿠키 버전이다.
3.25. Puppet Steve(꼭두각시 스티브)X[편집]

그가 블록을 만들어서 화면에 배치할 거야. 그 블록은 일반적으로 마우스 커서가1 통과할 수 없어. 하지만 마우스 우클릭을 누르고 있으면 블록을 옮길 수 있어.
He will Craft blocks and place them onto your screen. Your mouse cursor cannot normally pass through them. However, if you're holding the right click, you can Mine them out.
꼭두각시 스티브는 유튜브 채널 Puppet Steve의 마인크래프트 스티브의 꼭두각시 인형 버전이다. FNaF의 펀코 상품을 리뷰하는 채널이다.
3.26. Games Freddy(게임즈 프레디)X[편집]

(그는 죽었어) 그의 유령은 북쪽에서 GPS로 다가올 거야. 그가 너에게 닿기 전에 포스필드를 켜야 해! 포스필드에 부딪히면 그의 위치는 초기화 될 거야. 그가 너의 사무실에 도착하면 20%의 전기를 훔쳐갈 거야. 네게이트 레인보우 캐릭터가 활성화되면 더 공격적이야.
(He died) His ghost approaches from the north on the GPS system. Turn on the forcefield before he reaches you! When he hits the forcefield he will reset. If he reaches your office he'll take 20% power. He's more aggressive if any Negate Rainbow characters are enabled.
게임 프레디는 UCN에서 50/20 모드를 깨고나서 로비에 나오는 황금 트로피다.
4. 스페셜 애니매트로닉스[편집]
특별한 방법으로 볼 수 있는 애니매트로닉스들.
4.1. Le Frog(레 프로그)O[편집]

"We've only just begun. I will never let you leave. I will never let you rest."
"이제 막 시작했을 뿐이야. 절대로 널 보내 주지 않을 거야. 절대로 널 쉬게 해 주지 않을 거야."
대사
해피 프로그처럼, 그녀는 히터에 면역된 상태로 배관 시스템으로 너에게 갈 거야. 소리 미끼를 사용해서 그녀를 제자리에 유지해.
Like Happy Frog, she will go through the Duct System, immune to the Heater. Use the Audio Lure to keep her in place.
레 프로그는 카밀 피르마의 전 게임 중 하나인 레 프로그의 주인공이다. UltraCN에서는 해피 프로그만 1로 설정하면 이스터 에그로 나온다.추가로 배관 시스템에서는 일반 해피 프로그는 초록색 느낌표로 확인이 되지만 레 프로그는 초록색 느낌표가 아닌 레 프로그에 얼굴[93]이 뜬다.
4.2. Negate Rainbow Dee Dee(네게이트 레인보우 디 디)X[편집]

매수된 후, 그녀는 플레이어의 사무실에 나타나서 밤부터 무작위로 활동하는 한 명의 캐릭터를 제거해.
After getting bought, she appears in the player's office and removes one random active character from the night.
네게이트 레인보우 디디는 50코인을 내면 살 수 있는 울트라 커스텀 나이트 멀티 플레이(네트워크 모드를 설정에서 켜야만 멀티 플레이가 가능하다.)의 캐릭터로 등장하는 네게이트 레인보우 버전 디 디다.원작 UCN에서는 캐릭터를 무작위로 소환하는 캐릭터이었지만 울트라 커스텀 나이트에서는 무작위로 캐릭터 1명을 제거시켜주기 때문에 매우 고마운 캐릭터이다.
단 이 캐릭터가 등장해버리면 포인트(점수)나 상점에서 쓸수 있는 파즈 코인을 얻을수 없다.
5. 삭제된 애니매트로닉스[편집]
안타깝게도 이 게임에서 삭제된 애니매트로닉스다.
삭제된 이유는 리메이크를 하기기 위해 삭제되었거나 능력 차이가 심하기 때문이다.
5.1. Trash and the Gang(쓰레기와 갱단)X[편집]

???
설명에는 ???로 뜨지만 행동을 서술하자면 다음과 같다.
넘버 원 크레이트 - 사무실 왼쪽 아래에 나타나는데 그녀가 말한 후에는 화면에 점프스케어를 한다.
버킷 밥 : 넘버 원 크레이트처럼 점프스케어 한다.
미스터 캔-두 : 카메라에 무작위로 나와서 시야를 가린다.
미스터 허그와 팬 스탠 : 미스터 캔-두처럼 카메라에 무작위로 나와서 시야를 가린다.
모두 삭제된 애니매트로닉스이지만 쓰레기와 갱단에 나오는 캐릭터들을 따로 분류하여 리메이크하였다.
5.2. Dark Foxy(다크 폭시)X[편집]

그는 밤새 아무렇게나 문을 열고 닫을 거야.
He will open and close your doors at random throughout the night.
다크 폭시는 FNaF VR HW의 FANF 1 하드모드에 처음 등장한다.
다크 폭시가 삭제된 이유는 그림 폭시 사진에 흑백 효과를 주어 겹쳐보이기 때문이라고 한다.
이와 같은 메커니즘을 가진 애니매트로닉스인 더 펭귄이 업데이트되어 생겼다.
5.3. Beta Endo(베타 엔도)O[편집]

그가 너의 사무실에 나타나면 그의 눈 색깔을 확인하고 해당 버튼을 눌러야 해. 눈 색깔이 흰색이면 키보드 7번, 파란색이면 8번, 노란색이면 9번, 빨간색이면 0번을 눌러. 너무 오래 걸리거나 잘못된 버튼을 누르면 그가 너를 죽일 거야. 7을 누르면 엔도가 프레디 파즈베어(Freddy Fazbear)의 머리를 착용할 거야. 8을 누르면 엔도가 보니(Bonnie)의 머리를 착용할 거야. 9를 누르면 엔도가 치카(Chica)의 머리를 착용할 거야. 0을 누르면 엔도가 폭시(Foxy)의 머리를 착용할 거야.
When he appears in your office, check his eye color and press the corresponding button. If they're white, press 7. Blue, press 8. Yellow, press 9. Red, press 0. Waiting too long or pressing the wrong button will lead to a jumpscare. Pressing 7 will cause Beta Endo to wear a Freddy Fazbear head. Pressing 8 will cause Beta Endo to wear a Bonnie head. Pressing 9 will cause Beta Endo to wear a Chica head. Pressing 0 will cause Beta Endo to wear a Foxy head.
FNaF 1 스팀 버전에서 업적을 깨면 나오는 프레디 슈트를 찬 엔도이다. 울트라 커스텀 나이트에선 아무 슈트 없이 엔도만 등장한다.
아쉽게도 삭제된 애니매트로닉스다. 하지만 같은 메커니즘을 가진 애니매트로닉스인 그린라이트 프레디가 업데이트되어 생겼다.
5.4. Trailer Endo(트레일러 엔도)X[편집]

그는 때때로 네가 카메라를 내리면 사무실에 나타날 거야. 제어된 충격(Controlled Shock)을 줘야 해. 그가 사무실에 있을 때 네가 프레디 가면을 쓰면 몇 초 동안 가면을 쓰지 못 할 거야.
He will sometimes appear in your office after lowering the monitor. Using the controlled shock will make him go away. Putting on the Freddy Fazbear Mask when he's in the office will lock it from being wearable for a few seconds.
FNaF 1의 트레일러에서 볼 수 있다시피 보니가 탈을 벗었을 때 등장하는 트레일러의 엔도다.
위 베타 엔도와 같이 삭제된 애니매트로닉스다. 하지만 이와 같은 메커니즘을 가진 애니매트로닉스인 트레일러 보니가 업데이트되어 생겼다.
5.5. Super Mario(슈퍼 마리오)O[편집]

여러 굼바들이 화면 하단의 오른쪽에서 왼쪽으로 이동할거야. 마우스를 머리 위로 스와이프해 밟아. 굼바 중 한 명이 왼쪽에 도착한다면 마리오가 널 밟아버릴거야.
Several Goombas will appear at the bottom of the screen, walking from right to left. Swipe your mouse onto their heads from the top to stomp on them. If any of them walk the left side of the screen, Mario will stomp you.
FNAF SD의 인터뷰에 나왔다. 재미있는 사실은 이 캐릭터가 게임에 등장한 날이 마리오의 날인 3월 10일이다.
 이 문서의 내용 중 전체 또는 일부는 2023-11-04 19:08:41에 나무위키 Ultra Custom Night/애니매트로닉스 및 스킨 문서에서 가져왔습니다.